Installing Satellite Antenna by Yourself
Standard satellites — Sirius, Amos and Hotbird — currently broadcast 72 channels.
Satellite TV: Advantages
The standard combination of three satellites — Amos 4.0W, Sirius 5.0E, Hotbird 13.0E — provides a wide variety of channels for any taste.
Satellite TV technology continuously evolves, thus more satellites, TV channels and naturally users appear each year.
How the Antenna Works
The satellite signal hits the antenna's reflector surface.
Reflected, it reaches the converter.
The converter sends the satellite signal to the receiver.
Through the receiver, the signal reaches the television.
There Are Two Types of Dishes
IMPORTANT! The Svec dish and receiver combination is most commonly used, as the reliability and practicality of this manufacturer's products have been confirmed by more than a decade on the satellite TV services market.
Installing Satellite Antennas: Installation Options
Mounting a satellite dish requires selecting the right location carefully: a tree standing in the signal path may degrade reception quality or even block it entirely.
Antennas for three satellites should be aligned to the southwest direction.
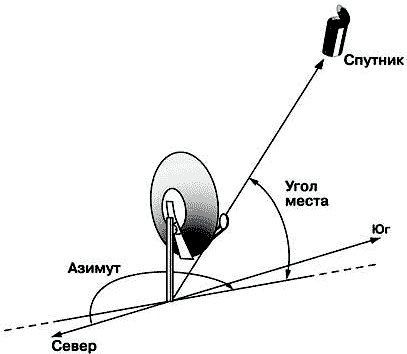
Figure 1 — Satellite Antenna Placement
Satellite TV Kit
The kit includes:
- Reflector (dish) to receive the signal. The dish diameter should be at least 60 cm (some models have a 1.2 m mirror diameter). The choice of diameter depends on the terrain and obstacles blocking the satellite signal path.
- Head (converter) converts the signal reflected from the dish and sends it to the receiver. There are converters with different numbers of outputs, allowing one, two or more receivers to be connected simultaneously.
- DiSEq connects multiple converters.
- Cable.
- Bracket.
- DVB receiver – the most expensive part of the kit. For free channels, a Globo receiver will suffice, but for paid channels, receivers with card readers must be used.
- F-connectors link the cable to converters, receiver, DiSEq and other system parts. The standard installation scheme requires 8 units.
IMPORTANT! To isolate F-connector and cable connections, additional items like heat shrink tubing and anchors for mounting the bracket to the wall must be purchased.
Preparing the Equipment
Determine the direction of the cardinal points on-site. The illustration below shows an approximate position of the south at different times of the day (for Kiev). You can only use the sun for orientation in clear weather. More accurate readings can be obtained using a compass.
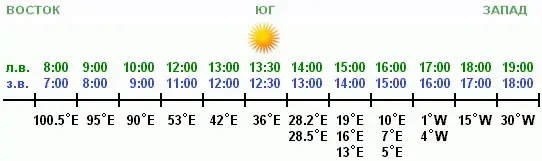
Figure 2 — Hourly Orientation for Antenna Installation
IMPORTANT! Near a reinforced concrete wall, the compass may malfunction. Also note that the NTV+ satellite is always in the south, while Sirius, HotBird and Amos satellites are approximately in the southwest (for Kiev).
Determine visibility of the satellite at the installation site.
The ideal setup excluding interference possibilities is mounting the dish on the roof. It's undesirable to mount the dish on collective antennas or gas flue pipes. However, mounting on an elevator shaft wall is possible.
It's not advisable to mount the satellite dish under a roof overhang if the apartment windows face southwest or south: the overhang will block the signal. Also, precipitation falling from the overhang might change the dish position. It is optimal to mount the dish on the outer side of a balcony if the view is towards the south or southwest.
When installing the satellite dish on a building's facade, you may need permission from the architectural construction control and a standard installation project.
IMPORTANT! Theft of satellite dishes from rooftops is frequent. If there is a possibility to mount the dish on the building wall, choose this option.
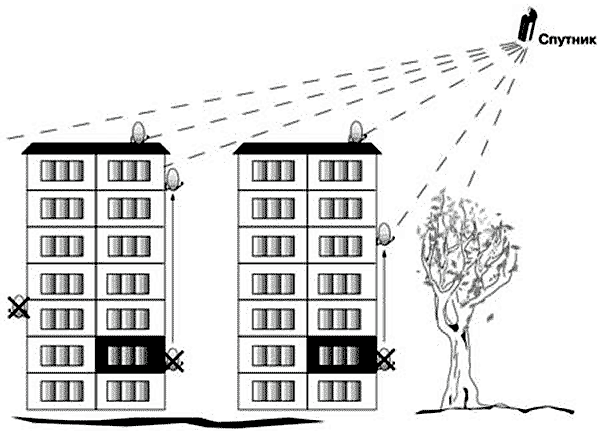
Figure 3 — Satellite Visibility for Signal Reception
Mounting the Satellite Dish Based on Elevation Angle
Assemble the satellite dish (the operation manual and assembly instructions are included with each unit).
Mount the bracket. The selection of fasteners (anchor bolts, nuts, screws, etc.) should be based on expected wind load and the wall material to which the satellite dish will be mounted.
Mount converters in the holder with the connector facing down: atmospheric moisture should not enter the converters after installation.
Connect the cable to the converters using F-connectors.
Secure the cable to the dish holder's curve using plastic ties or insulating tape.
Seal the F-connector joint. It is essential to seal with two layers of insulating tape along its entire length. Apply a layer of sealant (preferably silicone) over the tape.
Mount the antenna on the bracket. Tighten the adjustment nuts: after installation, you should be able to move the antenna slightly vertically and horizontally.
IMPORTANT! If your plan does not include calibrating the dish relative to satellite position, you can mount the antenna with a motorized bracket that automatically adjusts to the satellite's location.
Secure the cable to the bracket using plastic ties or insulating tape.
IMPORTANT! Leave a 1-meter cable spare near the antenna, secured to the bracket.
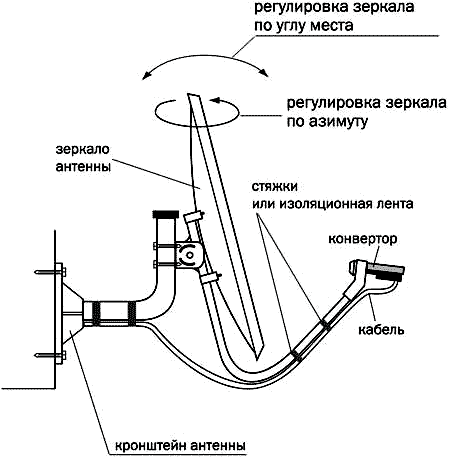
Figure 4 — Antenna Construction
Figure 4 — Antenna Construction
Installing F-Connectors
Remove the top cable insulation about 15 mm. It's important not to damage the shielding.
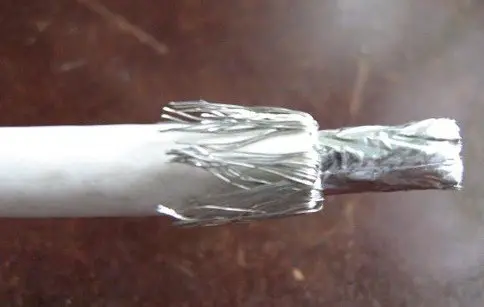
Photo 1 — Remove Top Cable Insulation
Place the shielding along the cable.
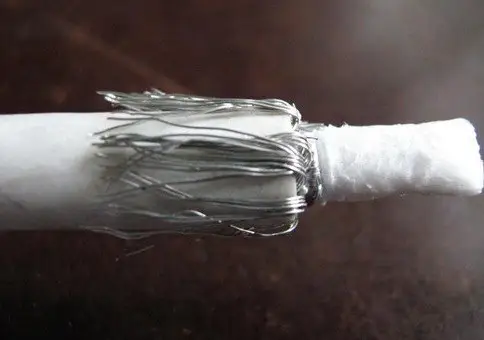
Photo 2 — Place Shielding Along the Cable
Place foil along the shielding.
Remove the inner insulation about 10 mm.
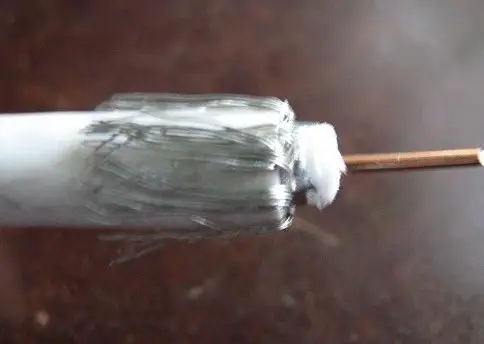
Photo 3 — Remove Inner Insulation
Screw the connector until it stops (see Photo 4).
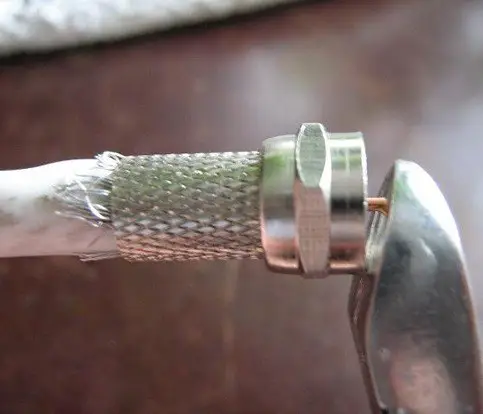
Photo 4 — Screw the Connector to the Cable (to the Stop)
IMPORTANT! The center conductor should not extend more than 2 mm beyond the connector. If it exceeds this, trim the excess.
Properly Adjusting the Dish by Yourself
Approximately set the azimuth and elevation angles of the dish (azimuth is set with a compass).
Connect the cable to the satellite receiver (the operation manual should clearly explain this step) — the cable should run from the converter or DiSEq. F-connectors are handled according to the method described above.
Connect the digital receiver to the TV. Turn on the receiver.
IMPORTANT! A digital satellite receiver, when purchased, should already be pre-programmed with channels from satellites (Sirius, Amos, Hotbird — for standard dishes or, for example, Yamal 201 — for dishes with motorized brackets). From the receiver's channel list, select any open channel with a signal from the satellite.
Gently move the dish surface vertically/horizontally around the approximate point of the selected satellite location. As a result, a signal strength indicator and TV picture should appear on the screen.
IMPORTANT! When rotating by one degree, wait at least 5 seconds — the signal from the satellite should reach your antenna within this time.
In the satellite receiver menu, find the item "Signal Level" and activate it. Maximum signal level can be achieved by smoothly moving the dish surface vertically/horizontally.
IMPORTANT! The signal level will depend directly on weather conditions.
Tighten the adjustment nuts while monitoring the signal level received by the system.
To tune the antenna for receiving signals from satellites Sirius, HotBird and Amos, adjust the corresponding converters by switching the channel on the receiver to the satellite currently being configured.
Installing the Trikolor TV Satellite Antenna
Among satellite systems providing quality signals to consumers throughout the country and beyond, the most popular is the Trikolor TV system.
Among its advantages is not only excellent signal and a multi-thousand-strong user audience, but also that you won't need to call a specialist: a clear instruction and an easy-to-use installation system will be understandable even for beginners. Self-installation and setup will take no more than 2 hours! You won't need special knowledge of signal reception organization or specific equipment: everything needed for mounting is provided in the kit.
$ Installing the Trikolor TV Satellite Antenna: Price
The cost of installing the Trikolor TV FULL HD antenna is approximately 300$. This price includes payment for the full equipment kit, the Maximum HD package (170 channels, 24 of which show in FULL HD format), antenna installation, decoder registration, and activation of the access card in the Trikolor subscriber system.
Popular satellite TV networks also include Rainbow TV and Telecard TV.
On the official website of the Rainbow TV network, you can find a special installer assistant program that details all major aspects of satellite TV antenna installation and provides a database for signal tuning.
Installing a Satellite Antenna by Yourself
You will need:
- Adjustable wrenches in size 10 (used for assembling the antenna and fixing the dish at elevation angle);
- Open-end wrench in size 10 (used during assembly);
- 13mm G-shaped socket wrench (used for mounting the antenna in azimuth);
- Adjustable wrench (used if the antenna is mounted on anchors);
- Cross-head screwdriver;
- Wire cutters (used for trimming coaxial cable and plastic ties);
- SDS-plus hammer drill (used for drilling mounting holes in the wall);
- Drill bits d=12 mm, length from 120 to 180 mm;
- Extension cord;
- Construction magnetic level;
- A small TV with low-frequency input (used when no special tuning tools like Openbox SF-10, SF-20 or SF-30 are available);
- Satellite receiver;
- Insulating tape;
- Plastic ties (used for cable mounting);
- 40 cm of plastic corrugated tubing d=10 mm (used for protecting the cable from crushing when descending from the roof);
- 13mm screws with a key head and plastic anchors, 60-80 mm long;
- Thick and wide metal washers d=30/50 mm – about 4-5 units (used for leveling the dish).
Installing a Satellite Antenna by Yourself: Choosing the Installation Location
$ Installing Satellite Antennas: Cost
How much does it cost to connect satellite TV?
All will depend on several factors: for example, the number of TVs connected to the antenna:
Kiev — 950 UAH, 1,550 UAH, 2,100 UAH and 2,400 UAH for 1, 2, 3 and 4 TVs respectively.
Or the size of the dish itself:
Moscow — 2,500 rubles, 4,000 rubles and 6,000 rubles for dishes with 0.6/0.9/1.2 m diameter respectively.
The cost calculation may also include an additional fee for installation in a hard-to-access location, mounting a motorized bracket, removing dishes and setting up the system for installation.