Chandeliers for the ceiling: tips and tricks

Photo 1 — Design option for a chandelier
Mounting a chandelier using a hook
The hook is the simplest and most reliable mounting method. Even pirates knew a thing or two about hooks. But let’s return to chandeliers. If your chandelier weighs no more than 3–4 kg, you can safely use a standard metal hook with a threaded shaft. Drill a hole in the ceiling, insert a plastic sleeve, and screw in the hook. However, never attach a hook to a gypsum board ceiling — it won’t hold. In this case, install the hook only on a concrete ceiling base.
If the chandelier is heavier (over 5 kg), you’ll need to modify the setup slightly.
For heavier chandeliers, use special expansion bolts with a threaded hook, with a diameter of at least 10 mm. Drill a hole of the correct diameter, insert the anchor, and tighten firmly. The light fixture will now stay securely in place and not fall on your head.
If the chandelier is designed for hook mounting, it should have a special cup to conceal the ceiling attachment point. The cup must be adjustable vertically and lock in the top position. You can manually adjust the height at which you wish to hang the chandelier.
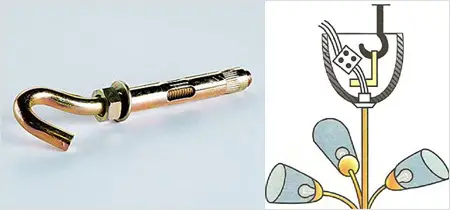
Photo 2 — Chandelier mounting options
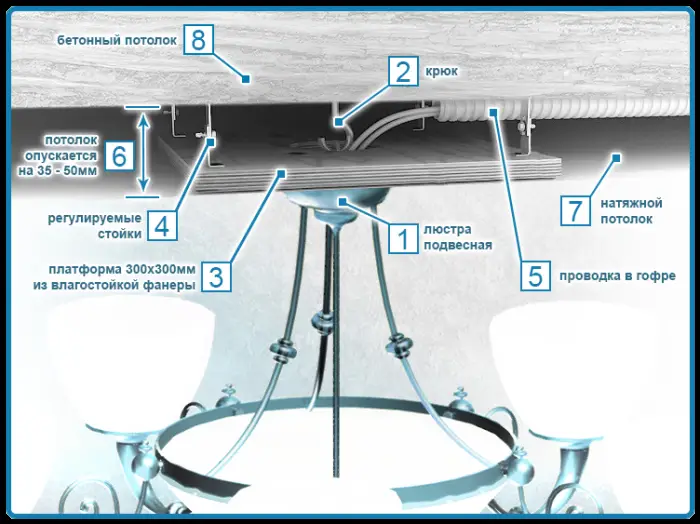
Diagram 1 — Installing a chandelier on a suspended ceiling
Mounting a chandelier on a bracket or support beam
Now let’s move to the second mounting method — using a bracket (or support beam). This is slightly more complex than the hook method, but you can still do it yourself.
Usually, the chandelier comes with a special metal bracket or support beam.
Insert two screws into the bracket, adjust the distance between them, and tighten with nuts. Then secure the bracket to the ceiling using a drill and two sleeves. Position the chandelier against the ceiling.
Align the two screws fixed in the bracket with the holes in the chandelier. Bingo — the chandelier is now ready to illuminate your home. If you have a wooden ceiling, fix the bracket with wood screws. If you have a gypsum board ceiling, attach the chandelier to a load-bearing metal stud using metal screws, or directly to the concrete base.
If the chandelier is small or you have a ceiling-mounted light fixture, it should be attached directly to the ceiling surface. The back of such a fixture should have three mounting holes. Depending on the fixture’s weight, you may use only two mounting points. Simply drill the holes and secure the fixture with sleeves.
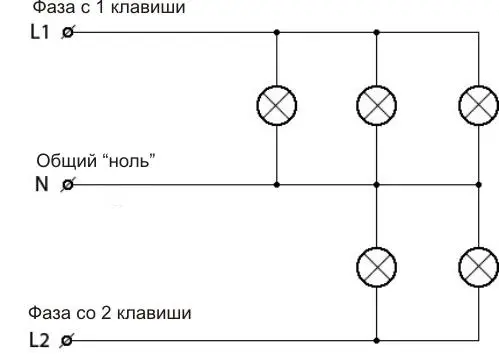
Diagram 2 — Wiring diagram for a two-switch light switch
By the way, when choosing a chandelier, remember that large and low-hanging models are suitable only for high ceilings.
For low ceilings, a flush-mounted light fixture or a small, neat chandelier hung higher is more appropriate. Otherwise, your tall guests might bump their heads on the light.
And in low rooms, bulky chandeliers destroy the sense of cosiness and comfort. The fixture will hang too low and feel oppressive.
By the way, if you ever need to remove a ceiling light, disassembly follows the reverse order of installation. Always remember safety — you’re dealing with electricity.
First, turn off the light and the circuit breakers. Then, remove fragile or breakable parts from the chandelier, disconnect the wires, and insulate exposed ends. Only then can you begin dismantling the mounting hardware. If you have a gypsum board or suspended ceiling, remove the chandelier itself. Do not touch any auxiliary fasteners — they won’t be useful for reuse.
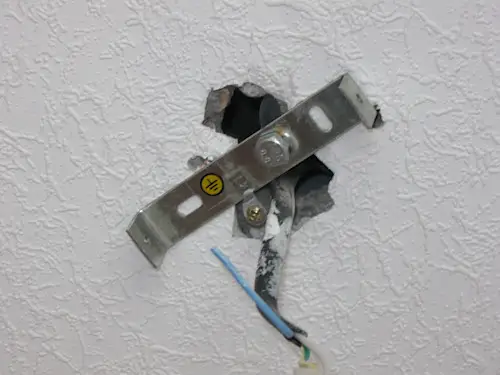
Photo 3 — Chandelier mounting options
Installing a chandelier on the ceiling
We’ve covered the basics. Now comes the most complex part: actually mounting the chandelier to the ceiling. If the manufacturer forgot to connect the wires inside the fixture, you’ll need to do it yourself.
Let’s examine the setup for single-switch and double-switch switches.
With single-switch setups, two wires come from each shade, differing in color (but even if they’re the same, it’s not critical). Connect one wire from each shade together, and connect the remaining wires together. Then, route one connection to the neutral wire and the other to the live wire from the switch.
For double-switch setups, refer to the diagram below. We recommend using clamp-type connectors (not screw-type) for connecting chandelier wires to ceiling wires. Their reliability is higher when joining copper or aluminum conductors.
Secure the mounting plate to the ceiling so that the chandelier’s cup hides the hole from view.
In older homes, single-switch chandeliers use two wires (neutral and live), while double-switch models use three (two live wires from each switch and one common live). In the first case, connect the combined wires from each shade to each wire.
If your home is newly built, an additional grounding wire (typically yellow-green) will be present. Connect the wires as in older homes. Use connectors to join the wires, then attach the chandelier to the ceiling using the mounting plate or hook.
Before connecting wires, disconnect the power by turning the switch to ‘off’ or switching off the circuit breaker, if you’re unsure which side indicates ‘off’.
All done. Now enjoy the light and comfort in your room.
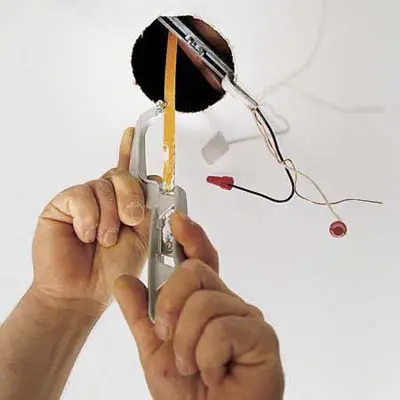
Photo 4 — Chandelier installation
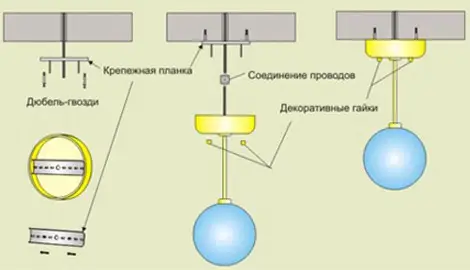
Diagram 3 — Chandelier installation