How to Properly Lay Laminate: VIDEO
There are several benefits to installing laminate yourself: first, laminate is a universal covering that can be laid almost on any surface;
secondly, laminate panels are low-maintenance and require minimal care;
thirdly, the material cost is much lower than, for example, parquet boards, and after installation, laminated flooring looks no worse than highly polished parquet.
Moreover, you won't need to pay for a master's services or part of a turnkey renovation (approximately 5-7$/m²).
Installing laminate yourself: advantages and disadvantages
There are several benefits to installing laminate yourself:
- first, laminate is a universal covering that can be laid almost on any surface;
- secondly, laminate panels are low-maintenance and require minimal care;
- thirdly, the material cost is much lower than, for example, parquet boards, and after installation, laminated flooring looks no worse than highly polished parquet.
Moreover, you won't need to pay for a master's services or part of a turnkey renovation (approximately 5-7$/m²).
As for the drawbacks, problems may arise with prolonged contact of inexpensive laminate with water (some panel types not only have an upper protective and water-repelling coating - laminate - but also the impregnation is applied to the locking system elements, preventing water from seeping and being absorbed through the unprotected end side of the material).
Some types of laminate may also not be as durable as you would like, and they fail badly under high heels or heavy furniture - scratches and dents may appear on the surface. However, this won't happen if you don't skimp on the purchase of laminate and choose products from world-renowned brands with corresponding quality certifications.
IMPORTANT! In rooms requiring constant wet cleaning, manufacturers recommend laying laminate with sealant along the joints.
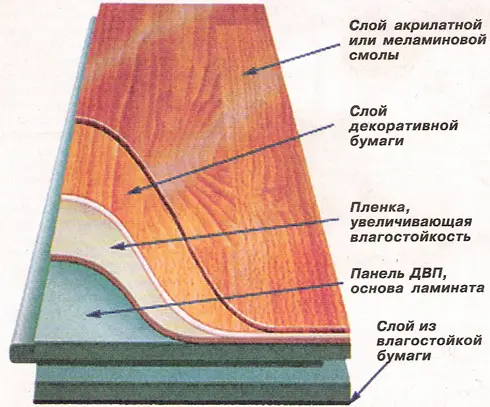
Figure 1 — The 'Structure' of a laminated panel
Masterclass: How to Lay Laminate Yourself
You will need:
- square;
- measuring tape;
- circular saw (reciprocating saw);
- hammer with rubber mallet;
- spacers;
- shims;
- painter's tape;
- laminate;
- baseboards;
- underlayment for laminate.
Work procedure:
On a flat, dry and dust-free base, lay the underlayment. In this example, we used cork underlayment because this material is stable, eco-friendly, doesn't cause settling, has sound-dampening and minor floor leveling properties. If it's not possible to use cork underlayment due to its relatively high cost (starting at $12/m² for a 3mm thick sheet, polystyrene underlayment costs at least four times less), it's recommended to use polystyrene underlayment: unlike the foam polyethylene one, it doesn't cause settling or wear.
IMPORTANT! Cork underlayment sheets should only be laid butted together!
Adjacent cork sheets are secured to each other with painter's tape.
IMPORTANT! Laminate should be acclimatized in the room for at least 2 days before installation!
Start laying the laminate from the far corner of the room, and lay the panels in the direction of natural light (this way, seams between panels won't be visible). The first row of boards needs to be cut, removing the locking mechanism from the side that touches the wall.
Boards are joined end-to-end, but not pressed tight against the wall - a gap of 8-10 mm must be maintained between panels and walls (this is a thermal joint necessary for natural expansion/shrinkage of laminate due to air temperature/humidity changes). Subsequent rows will be aligned with the first row, so it must be laid as evenly as possible.
IMPORTANT! To maintain a consistent gap width all around the room between walls and adjacent panels, special spacer shims are placed.
The last board of the row is cut to the required length, and the second row starts with cutting a board if its length is at least 25-30 cm (this method of laying is called staggered, making the seams between panels less visible; panels can also be laid parallel to each other).
The second and all subsequent rows are assembled similarly, following the principle of locking: the new panel is inserted into the lock of already laid laminate at an angle and snapped in (locking systems vary by manufacturer).
IMPORTANT! It is considered that laminate with beveled edges - V-shaped locking - is more reliable and keeps the seam invisible longer.
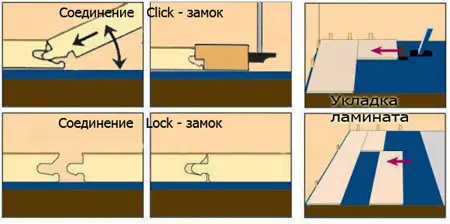
Figure 2 — Types of panel locking systems in laminate
Each subsequent row should be tapped with a hammer on the edge after laying to ensure better panel connection.
When laying the last row, there might not be enough floor width to reach the wall. There are two options:
- the first involves cutting panels for the last row to fit the floor width;
- the second is calculating the number of laminate panel rows before installation and adjusting the position of the first row relative to the back wall (this method works if the width of the last row is more than twice the width of a ready-made panel).
After laying the last row, remove the spacers from all room perimeters. Installation is complete!
Installing Laminate: Complex Cases
- Near the door, laminate is laid by cutting the door frame to the total height of the laminate panel and underlayment. The door frame should not interfere with the panel: the laminate should fit smoothly under it.
- To install laminate under a radiator, the locking system is cut off from both sides of that panel. This part of the row is installed only after installing the next rows: the panel under the radiator is glued and butted to the adjacent row.
- For pipes, holes are cut in panels larger than the pipes by 8 mm. Then the panel is cut in half along the center of the circles to fit the laminate part behind the pipe, and finally, these panels are reassembled with glue.
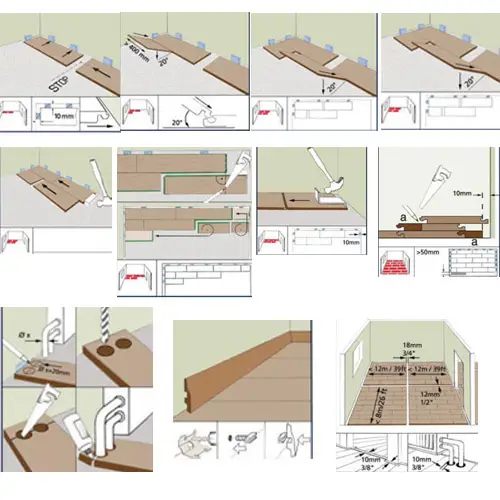
Figure 3 — Schematic instruction for installing laminate
As for laying wide laminate, artistic covering or laminate in different colors, the principle remains the same. The only difference is the need to align the pattern.
IMPORTANT! When choosing two-color or monochrome laminate and textured covering for combined installation, select from the catalog of the same manufacturer and preferably from the same price category.
This will help avoid many difficulties during use: for example, one type of panel settling more than another, or one type of panels fading before the other.
Cost of Laminate and Its Installation
Regarding manufacturers, reviews from customers and market popularity made these companies:
- Egger (Germany), laminate cost - from $9.5/m²;
- Balterio (Belgium), laminate cost from $17/m²;
- Quick Step (Belgium), cost from $21/m² (photo below);
- Tarkett (Germany), cost from $18/m².
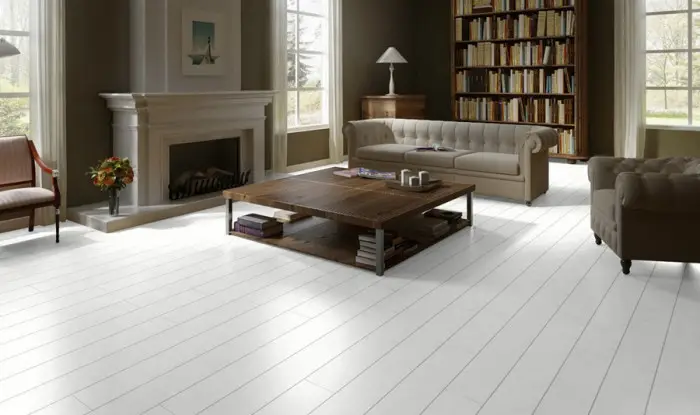
Photo 1 — Quick-Step Vogue UVG1394 White Oak Intense, price $80 per sq. m
Installation cost of laminate:
Kiev - from 35-40 UAH/m²;
Moscow - from 195-210 RUB/m².