Laminate Installation by Yourself: Technology, Instructions
Self-installation of laminate: where to start
Before starting the work, make sure you have all the necessary tools for laminate installation. When installing laminate, especially if you are doing such work for the first time, you should only use professional tools.
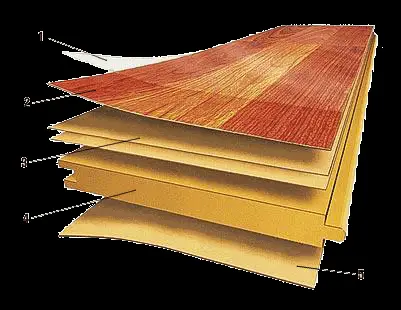
Figure 1 — Structure of a laminated panel: 1 – high-strength protective laminating film made of melamine/acrylic resin; 2 – artificial paper/foil imitating wooden structure; 3 – film increasing moisture resistance; 4 – high-density wood fiber board (HDF), the main load-bearing layer; 5 – moisture protection paper
Tools for laminate installation:
In addition to tools for laminate installation, you will need tools for installing baseboards:
- drill/impact driver (used for wooden/concrete surfaces respectively);
- miter saw/angled fasteners (if wooden or plastic baseboards are used respectively).
Cost of tools (assuming each component in the list is purchased) - around $150-200.
In most building markets, you can also buy a kit for self-installation of laminate.
Typically, the installation kit (e.g., Krono Original, Poland) includes:
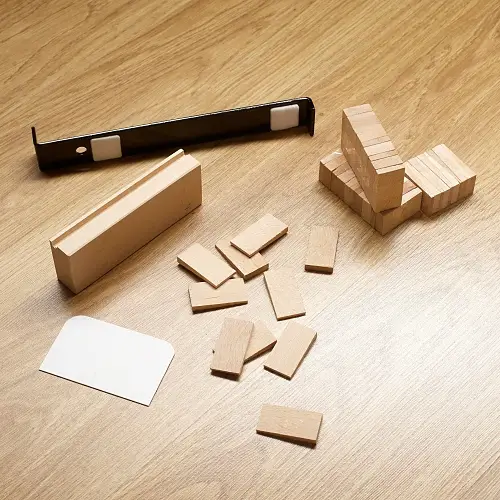
Photo 1 — Installation kit Krono Original, Poland
Rules for Laminate Installation: Preparation Stage
Laying laminate on different types of surfaces requires various preparatory works. A solid and even base is half the success and guarantee for long service life of the new coating.
On concrete
If you are laying laminate on a slab made less than a month ago, it is better to wait. According to professionals, the slab should cure for at least 45 days before applying any coating. Otherwise, moisture can form on the concrete surface, and moisture under laminate boards may cause the coating to mildew, deteriorate, and develop mold. Delay is also necessary when laying laminate on a heated floor. For concrete base, as in most other cases, a special underlayment must be laid, but we'll discuss that later.
On wooden floor
Previous floor covering may be quite suitable and there is no need to remove it, provided ceiling height allows for such flooring. The wooden floor should be inspected for unevenness (use a construction level to determine the horizontal plane of the room floor), loose boards - secure them, sink the nail heads 2-3 mm into the wood, and gaps - fill with spackle. Floor boards should also be sanded before installing laminate.
In most cases, installation is not done on a wooden floor but on plywood to level the floor surface (laminate should not be laid directly on HDF as it is very sensitive to temperature or humidity changes in the room). On uneven floors, if there is no possibility of removing it, it is better to lay laminate on particle board.
On linoleum
Laying laminate on old linoleum is not only possible but recommended if you want to achieve additional sound insulation. The linoleum surface must fit tightly to the floor, without bulges, tears or other visible damage. Laminate should not be laid on linoleum if it is too soft: panels may easily sink in on such a weak base.
On parquet
Laying laminate on parquet boards is recommended only if the previous surface does not raise concerns: parquet is laid evenly, does not creak, does not settle, and boards do not move. Laminate can be laid on old parquet using a non-standard underlayment (at least 2-3 mm thick) rather than the standard one, but at least 5 mm thick.
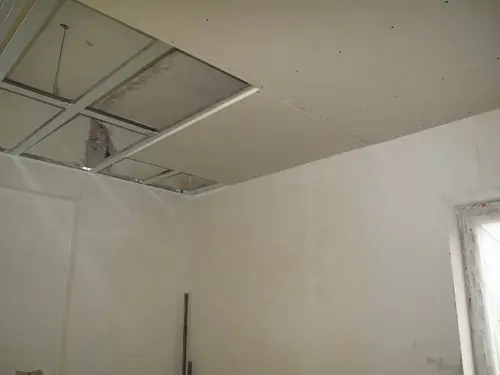
In some cases, laminate installation is not done on the floor but on walls or even the ceiling. Laminate, in principle, is not intended for cladding these surfaces, but our craftsmen manage to adapt it for any purpose.
On joists
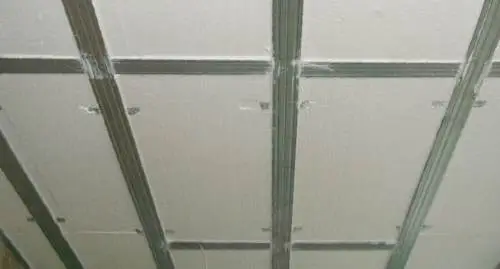
Laminate can be laid on joists by making a wooden grid as shown in the photo below. A vapor and hydro-isolation layer is required under this system. Then sheets of moisture-resistant plywood are laid on the joists, and then the laminate is placed on top.
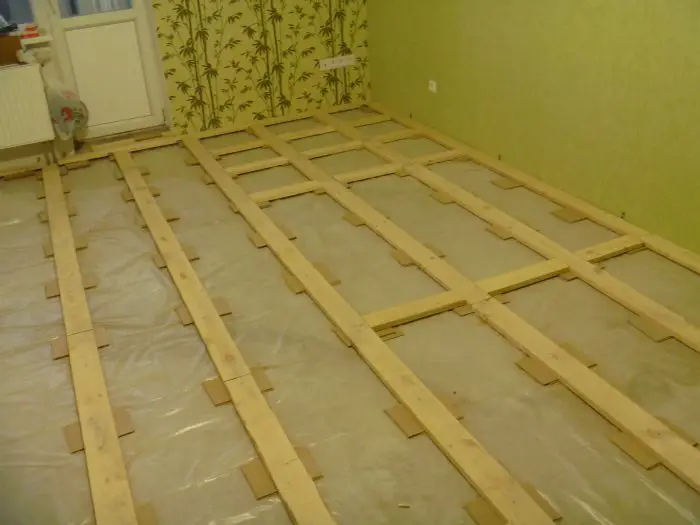
Photo 2 — Laminate installation on joists. Making the grid
This is a good option if you need to lay laminate on an old floor without removing it. Joists and special underlayment for the grid will help level the floor and create an ideal base for new flooring.
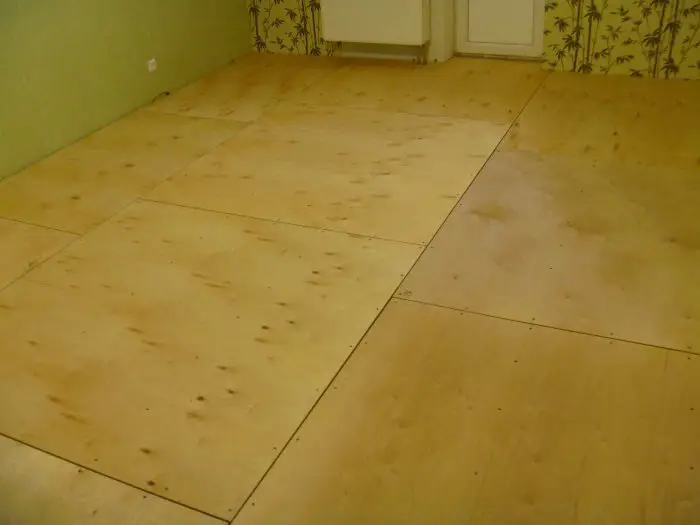
Photo 3 — Laminate installation on joists. Paneling with plywood
Features of Laminate Installation on Walls or Ceiling
Let's consider some features of laminate installation on walls or ceiling:
- need for additional wall leveling (OSB boards should be used, as they are not sensitive to temperature and humidity fluctuations, and unlike plywood, do not delaminate);
- direction of laminate installation on the floor and walls should match (if only walls or ceiling are covered with laminate, the direction of installation should be parallel to the direction of natural room lighting);
- laminate on walls or ceiling is mounted in a floating manner - placing boards in a specially built frame.
IMPORTANT! Laminate should not be glued, as the coating made of natural materials must have the ability to expand or contract due to temperature or humidity changes in the room.
Tips from specialists on mounting laminate on walls/ceiling - see VIDEO
Underlayment Installation for Laminate
As mentioned above, regardless of the type of floor surface, the floor must be covered with special underlayment before laying laminate.
The minimum required for installing laminate is a 2 mm thick underlayment. The thickness of some types of underlayments can reach 12 mm!
What types of underlayment are available:
- foamed polyethylene (2 mm thick or more, $0.35 per m²);
Polyethylene foam is a material with high chemical resistance, has antistatic properties, and also provides sound insulation and noise absorption. Polyethylene foam does not allow moisture to pass through but does not isolate the floor from air exchange. Using polyethylene foam will reduce heat loss through the floor. This material is easy to cut and install. However, this underlayment is not wear-resistant, and with prolonged use it becomes thinner, almost twice as much. The deformation process negatively affects other properties of the material.
- foamed polystyrene ("IsoShum", 3 mm thick or more, $0.45 per m²);
This type of underlayment can be called the most popular, as it possesses all the positive qualities of polyethylene foam but does not wear out as quickly. "IsoShum" is a denser and more reliable material.
- cork underlayment (1.85 mm thick or more, $3 per m², sold in packs of 10 m²);
The main advantage of this material is its eco-friendliness. Cork surpasses polyethylene foam and polystyrene in many ways. Unlike other materials, cork underlayment is sold not only in rolls but also as boards, which allows laying it in any configuration with less waste.
Cork underlayment can be used not only for laminate but for any type of floor covering. It perfectly withstands moisture and temperature fluctuations.
- bitumen-cork underlayment (2 mm thick or more, $3.2 per m² (sold in packs of 10 m²)).
This is a two-layer underlayment: sheets of material consist of cellulose and bitumen. The latter is dusted with cork crumbs (no more than 2-3 mm). Underlayment on uneven floors is laid with the bitumen-cork layer down, and sheets are joined together with mounting tape. Bitumen-cork underlayment provides internal ventilation of the floor.
Manufacturers: Estonia, Portugal, Ukraine, Russia.
Methods of Laminate Installation
Let's determine the direction of laminate installation.
IMPORTANT! The pattern and structure of the laminate should harmonize with the shape and lighting of the room. Installing laminate across the direction of light is also possible, although it is undesirable due to visual distortion of the room.
Direct installation of laminate
The correct installation in this case is to lay from the door, parallel to the direction of light rays. The material consumption for cutting will be around 4-7%. Recommendations from specialists about this installation are not without reason: light falling on the floor from a window will not create shadows on the joints between laminate boards, and such surface will appear perfectly flat. Visual continuity of the surface is only possible if the windows in the room are located along one wall.
Installing laminate across the light direction distorts the room, visually "stretching" it in the direction of installation. This property can be used advantageously during renovation in a narrow corridor or hallway. However, in such cases more material will be needed for cutting.
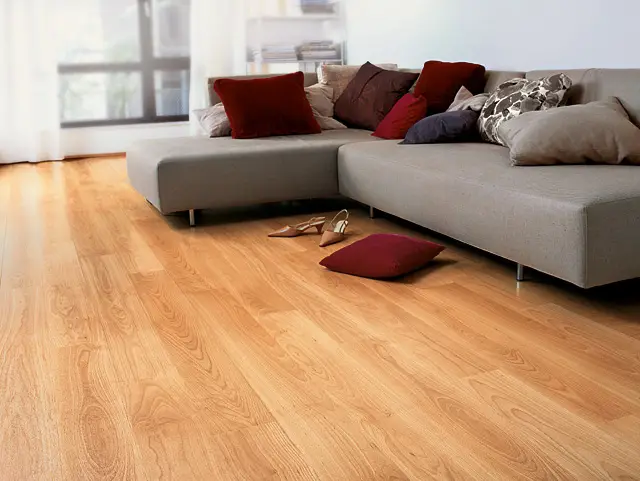
Photo 4 — Direct installation of laminate in interior
Diagonal installation of laminate
Diagonal installation visually also expands the room. This installation method is considered the most expensive and complex. It will be extremely problematic to do it by yourself without previous experience in such work. Material consumption for cutting will be around 15%! This installation method is not suitable for rooms cluttered with furniture or covered with carpets - such a design idea is lost: to show the decorative aspect of the floor.
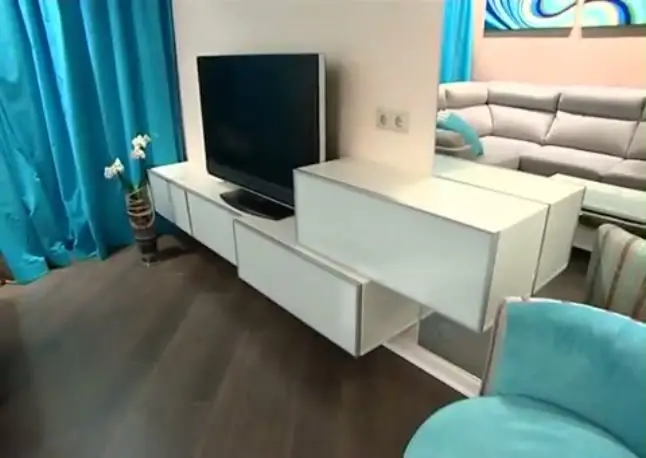
Photo 5 — Diagonal installation of laminate in interior
Laminate installation in squares/"Christmas tree"
This method also belongs to decorative. This type of laminate installation is only possible if the selected laminate has a special type of locking system.
If the previous two types of laminate installation can be done with most standard models, then "Christmas tree" layout can only be achieved by finding a specific product in the manufacturer's catalog.
This type of laminate is available, for example, in the Quick Step (Quick Step) Noblesse collection. The advantage of this collection is that the boards in it are identical in size to parquet boards: 45.15*9.03*0.8 cm. Thanks to the unique design, small boards can be joined at a 90° angle. The Noblesse collection from Quick Step offers simple but original solutions that allow laying laminate in fifty different ways!
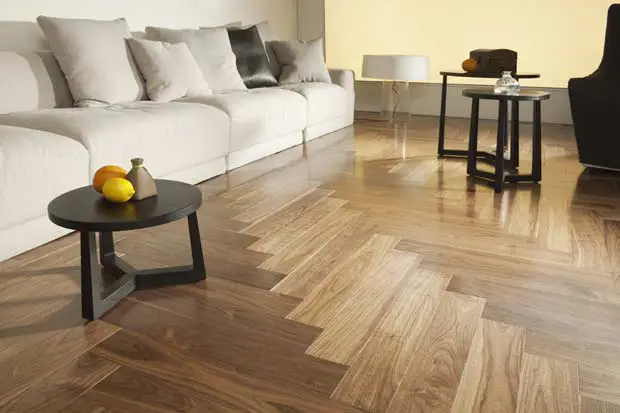
Photo 6 — Installation of laminate "Christmas tree"
IMPORTANT! In collections of many well-known manufacturers, you can find not only panels "wood-like," but also artistic panels that imitate any desired pattern. For example, this includes German factory laminate Versale (Versailles).
Installation Instructions for Laminate: Practical Tips
- Check the quality and quantity of purchased material
Before starting the installation of laminate, you should check the quality of the purchase, and calculate the required amount of laminated panels in advance, taking into account material consumption for cutting (the percentage of waste is indicated above). Installation should also be done in daylight hours: errors in both your work and the material will become apparent immediately.
- "Acclimatization" of purchased laminate
Another important preparation step is to let the laminate rest in the room for about two days. The air temperature should be no less than 17°C. The packaging for acclimatization does not need to be unpacked. If the difference in humidity/temperature between the room and storage conditions of the laminate is significant, this period should be extended to three or four days.
- Installation only in dry rooms with normalized air humidity levels
Laminate should not be installed directly in contact with water (water droplets, for example). Water can penetrate into the base of low-cost laminate through the edges and cause lasting damage. This is one of the reasons why laminate should not be installed in rooms with constant high humidity levels - in saunas, small bathrooms, etc.
- Checking the condition of the base
The maximum height difference on the floor surface should not exceed 3 mm per meter of length. The floor must be dry and solid.
- Vapor barrier
Before laying laminate on the floor, a vapor barrier layer is laid. We previously discussed what types of underlayment exist and what materials can be used for its manufacture. The film is laid with a 30 cm overlap (cork boards are laid in line) and secured with tape. Conditionally, the preparation for laminate installation ends at the underlayment surface: you can now proceed to mounting.
- Thermal joints and distance to the wall
The base of laminated panels is a fiberboard (HDF), which, like natural wood, is susceptible to swelling or compression due to climate changes. Therefore, laminate is not installed flush against the wall but with a small gap from each wall. These gaps are also called "thermal joints".
Installation errors in laminate usually appear in summer/fall, as after a dry period, panels absorb moisture and, not having enough space for natural expansion, become distorted. As a consequence - repeated installation of the coating. The width of the thermal joint largely depends on the type of laminate and its characteristics, as well as the surface area of the room. On average, the gap from the wall should be at least 8 mm. If the laminate is installed on large surfaces (not in an apartment, but, for example, in an office), the gap size increases significantly.
Calculation method for gap size: 1 meter of floor width = 1.5 mm thermal joint around the perimeter of the room.
Examples of calculations: for a 5-meter wide room, there should be at least 5*1.5 = 7.5 mm clearance from the walls. For a room with a width of 3 meters, it should be about 4.5 mm.
IMPORTANT! This rule only applies if the relative humidity in the room does not exceed 65%.
If the laminate is installed incorrectly, the most vulnerable areas will be door frames, stair joints, transition profiles, and heating pipes.
If the room where you are laying laminate is filled with heavy furniture that restricts natural expansion (e.g., on a balcony, in the kitchen, or in a corridor), the gap from the wall opposite to the furniture should contain two clearances, i.e., for the same 3-meter room, the gap size should be about 9-10 mm.
Thermal joints will not be visible along the walls later, as they will be covered with baseboards.
- Laminate Installation Technology
Installation of laminated floor elements can be done in a regular or irregular order. The offset of end joints between adjacent rows should be at least 40 cm in any mounting scheme.
Brief Guide for Laminate Installation (Direct Installation Order)
Let's look at the direct installation process in detail:
The process of installing laminate begins with the far corner of the room. The first panel, without cutting it in width, is laid on the underlaid floor, previously trimming the locking side facing the wall (professional equipment with cutting will work better if you're doing a DIY renovation, just rent a machine and set the saw aside: this tool will only damage the panel).
Snap the panels of the first row together with the short side.
IMPORTANT! Laminate can have several types of locks. The most common systems are "Click" and "Lock" (we did not consider the adhesive method of attachment). Some manufacturers, for example, Tarkett (Tarkett) develop specific types of attachment for their products, and the differences between them are clearly visible in the bottom picture.

Figure 2 — Types of attachment for laminated panels from Tarkett
Insert spreading wedges of the required width (they come in the installation kit) between panels and the wall along the first row.
The last panel in the row is cut to length if necessary, and the second row starts with the cut piece if it is not shorter than 40 cm.
When installing the second row, first snap the panels together with the short side, and then the long side.
For all subsequent rows, the same installation principle applies.
After laying out all the panels in the last row, measure the distance to the wall. If there is not enough space for laying the last row (remember about the gaps!), cut the panels to the available width (the lock on the side adjacent to the wall can also be cut).
Secrets of Laminate Installation in Complex Room Areas
- Laminate installation near the door frame must be done with consideration for maintaining gaps all around the panel at the points where it meets the door, threshold, and walls. The door frame should be trimmed to the height of the panel so that it slides under it without pressure, and no stress is applied to the panel.
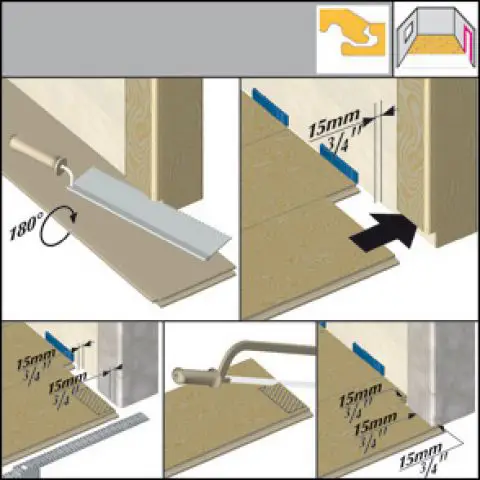
Figure 3 — Laminate Installation Near Door Opening
- Laminate near radiators is installed by trimming the lock. Often, this panel is fixed with glue.
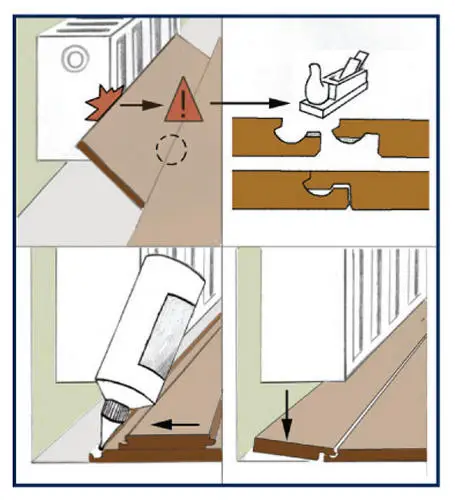
Figure 4 — Laminate Installation Near Radiator
- Laminate near pipes is also mounted with glue, cutting a hole of the appropriate diameter in the panel, and adding allowances of 10 mm along the entire circumference.
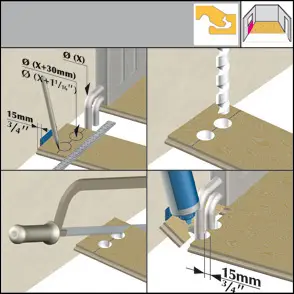
Figure 5 — Laminate Installation Near Pipes
Installing baseboards and special masking strips in doorways completes the laminate installation, hiding gaps when transitioning from one covering to another. A threshold is not necessary only if the laminate is laid in several rooms simultaneously as one continuous surface.
IMPORTANT! Step-by-step instructions are one of the mandatory inserts for branded products from Alloc (Alloc, Norway), Pergo (Pergo, Sweden) and other well-known manufacturers of floor coverings like Egger (Egger, Germany) or Wasterhof (Wasterhof, Germany).
Besides that, you can find educational videos online about how to properly install laminate from a specific manufacturer. For example, a tutorial on installing Classen (Classen, Germany) laminate.
VIDEO: Installing Classen (Germany) Laminate
VIDEO: Installing Pergo (Sweden) Laminate
VIDEO: Choosing Quality Floor Covering: Balterio (Belgium) Laminate
It is not difficult to notice from the videos above that the master lays laminate exclusively on a poured floor - a flat and reliable base.
$ Laminate Installation: Cost Considerations
If we're talking about laminate, it's important not how much the coating costs but what guarantees the manufacturer gives for their product. Buying cheap laminate means you'll have to renovate again soon, as panels without moisture protection (e.g., wax) and properly laminated will not last more than five years, let alone handle high heels or heavy furniture.
The cost of laminate can be calculated by square meter or by packaging. For example, the Egger (Egger) brand mentioned earlier costs on average $15/m² or $38 per pack (standard packaging contains 2.48 m²).
Some websites or trade representatives offer free delivery (provided) if the order amount exceeds $80-100.
Average prices for the mentioned manufacturers:
- Egger laminate costs from $9.5/m² (model Oak Harrison, 7 mm);
- Balterio laminate costs from $17/m² (model Oak Bleached Optimum, 8 mm);
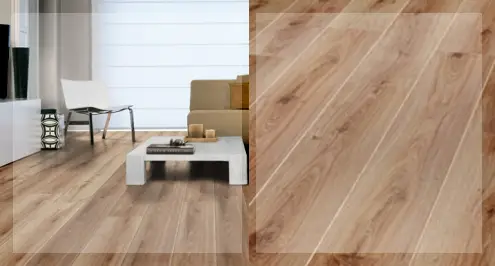
Photo 7 — Balterio Laminate, model Oak Bleached Optimum, 8 mm
- Quick Step laminate costs from $21/m² (model Oak Old Natural Classic, 7 mm);
- Tarkett laminate costs from $18/m² (model Oak Sherwood Mokko Woodstock, 8 mm).
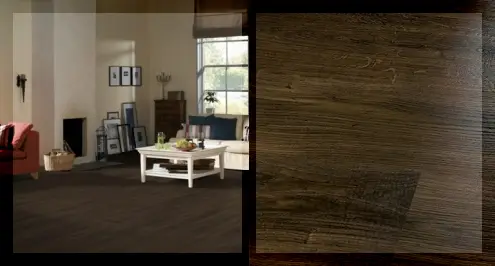
Photo 8 — Tarkett Laminate, model Oak Sherwood Mokko Woodstock t, 8 mm
To determine the approximate number of laminate packs you can use a special calculator. It looks something like this:
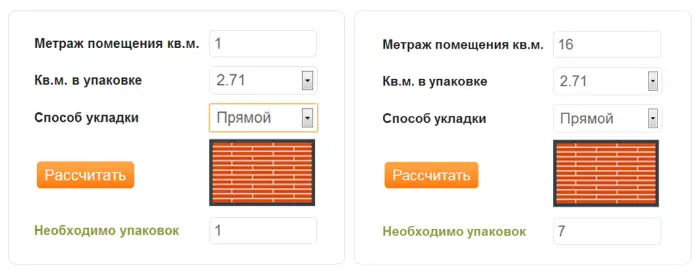
Figure 6 — Material Quantity Calculation
Laminate Price:
Kiev - from 69 UAH/m²;
Moscow - from 345 rubles/m².