Installation of Window Sills on Plastic Windows
Installation of Window Sills on Plastic Windows
Window sills come in various types:
- plastered;
Plaster tends to crack over time, and damage becomes even more noticeable during house settling. If plastering is needed with a width exceeding 3 cm, reinforcement must be installed. Installing window sills made of plaster requires priming the surface after the plaster layer, spackling, and then painting or wallpapering. These sills require frequent cosmetic repairs—surface coating should be renewed with fresh paint every 3 years.
- gypsum;
Gypsum sills provide better thermal insulation than plastered ones, but they are more sensitive to moisture. They also require spackling, priming, and painting.
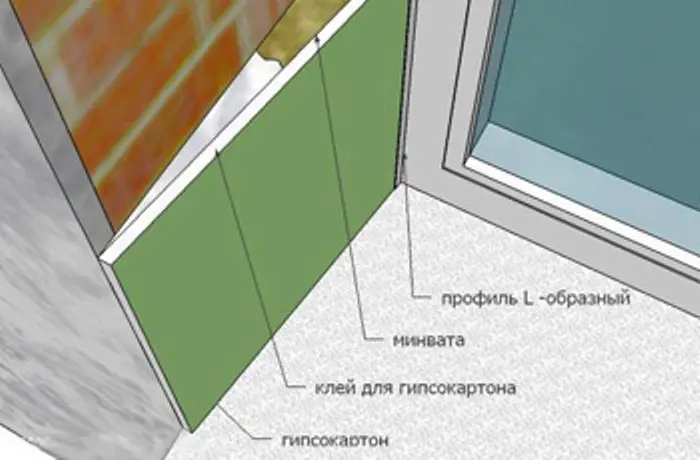
Scheme 1 — Installation of Sills Using Gypsum Board
- plastic.
This is the fastest and most cost-effective way to cover window sills—this can even be done by yourself. If necessary, the sills can be insulated. The service life of such a finish is at least 15–20 years, and it's extremely easy to clean.
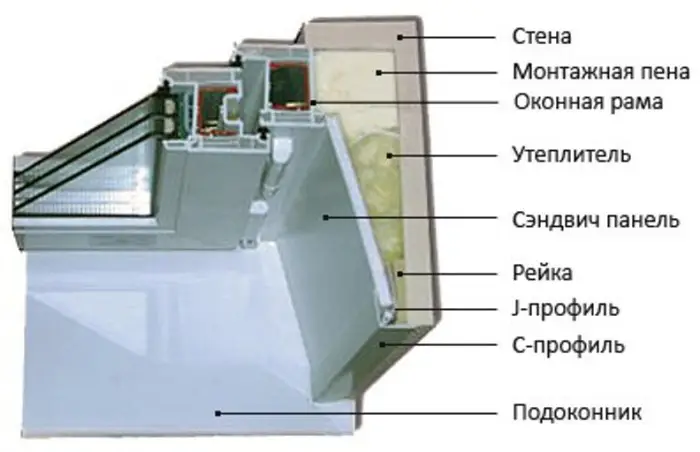
Scheme 2 — Installation of Sills Using Plastic
We will now examine the installation of this type of sill in more detail.
Installation of Plastic Sills
Work sequence:
Installation of plastic window sills should begin with installing the top panel.
After taking measurements, cut the required panel and test-fit it.
Secure the plastic panel with mounting foam in several stages: cover the contact points of the sill and window with a continuous layer, then fill the remaining gap once the foam has dried. While the foam dries, secure the sill with painter's tape to the wall. Do not apply too much foam—remember that this mounting material expands up to three times its volume!
Install the sill plate according to a method similar to that used for installing the top panel. After applying foam, evenly press down the sill in several places and leave a weight on it for at least 12 hours.
Measure the vertical dimensions of the window opening and cut two side panels. The bottom one should be cut at a 90-degree angle, and the top edges of the panels should align with the top part of the sill.
The installation process using mounting foam is similar to that of the top panel.
Seal joints between panels and walls with decorative corner pieces.
Ensure that all three panels and the sill plate extend beyond the window frame.
To achieve this, small grooves are cut in the gaps between the frame and wall, and excess mounting foam is removed.
Finally, seal joints between the panels and sill plate with silicone.
The installation of plastic window sills is now complete.
Window Gutters
There are several types of window gutters:
- aluminum gutters;
They are resistant to environmental conditions and can withstand temperatures from -40°C to +80°C.
- galvanized gutters;
The most economical option. Offers excellent decorative and mechanical properties.
- copper gutter;
The most durable material for gutters. It is not inexpensive.
- plastic gutter.
Easy to maintain and install, and cost-effective.
Installation of Window Gutters
Materials needed:- utility knife;
- drill;
- silicone;
- angle grinder.
Trim excess foam from the outer side of the window.
Install covers on the gutter and take measurements: there should be no large gaps between the house wall and the gutter.
If needed for better waterproofing, install PSUL under the gutter.
Fix the gutter with a self-tapping screw 4x20 mm (a 'claw').
Seal joints with silicone.
Install the gutter under the window with a slight incline so that water running off the gutter does not seep into the joint between it and the window frame.
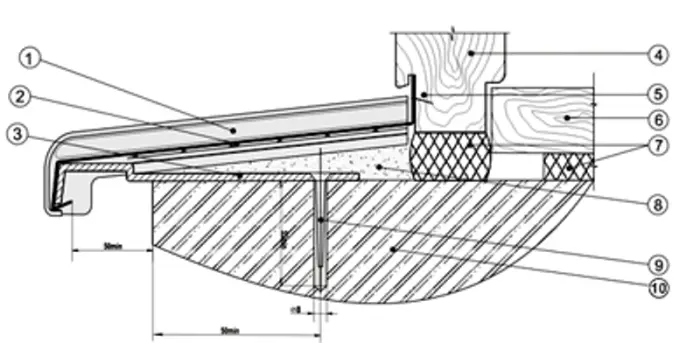
Scheme 3 — Gutter Installation: 1 - gutter cover; 2 - window gutter; 3 - support bracket; 4 - window box; 5 - screw; 6 - sill plate; 7 - mounting foam; 8 - cement mortar; 9 - plug; 10 - wall
VIDEO: Installation of Window Sills on Plastic Windows
$ Price Inquiry
Cost of gutter installation:
Kiev - 120 UAH per linear meter. Moscow - from 600 rubles per linear meter.
Cost of sill finishing:
Kiev - from 350 UAH. Moscow - from 1,600 rubles.