Installation of Sills: Plastic and Marble
You will need: plastic sill;
foam gun;
plugs;
sealant;
jigsaw;
level;
measuring tape;
square;
pencil;
clean cloth.
Installation of Plastic Sills:
Sill Installation: Materials and Tools
You will need:
- plastic sill;
- foam gun;
- plugs;
- sealant;
- jigsaw;
- level;
- measuring tape;
- square;
- pencil;
- clean cloth.
Installation of Plastic Sills: Work Steps
Some craftsmen recommend installing the vertical panel of the window frame after the sill has been mounted. However, in our case, the installation of plastic sills will be done after all components of the gypsum board window frames have been installed.
Each window at the bottom of the frame has a special profile - the window plate. It is easy to notice that it is recessed below the general level of the window profile. The difference in levels is designed to ensure that the window fits tightly against the sill.
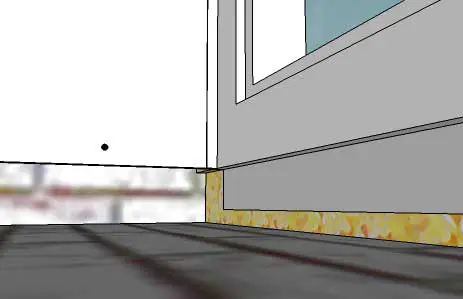
Figure 1 — Window Plate. Preparation for Sill Installation
To ensure a tight fit, the sill is pressed against the window from below using foam, first securing wooden wedges. The wedges are made to match the width of the sill so that it fits as tightly as possible against the window.
Installation rules require fixing wedges every 500 mm. The number of wedges installed depends on the quality and type of sill.
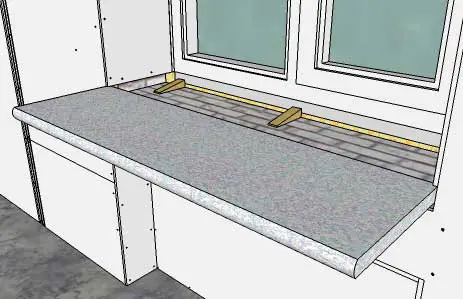
Figure 2 — Installation of Wedges
A bonding compound or sealant can be applied to the internal surface of the frame and the window profile. If you are installing the sill yourself, do not worry about applying too much silicone or liquid nails - excess can be easily removed once all mounting work is completed.
After taking measurements, cut the sill to the required length (accounting for a 3-5 cm overhang on both sides into the wall). Try it on.
Install the sill: if you were able to fit it in easily, you've done everything correctly!
The gap between the sill and the window opening should be filled with mounting foam. The installation process requires approximately 12-24 hours for the foam to cure - only after a day can the load, evenly placed on the surface of the sill, be removed (placed to prevent the mounting foam from pushing the sill out of position during expansion). Initially, fill the joint between the sill and the window plate with foam. Once this area has dried, fill other gaps between the sill and the window opening.
Tip: As a load on the sill, you can use spacers. Alternatively, you can use equally filled containers. When using spacers, use wedges to adjust the pressure.
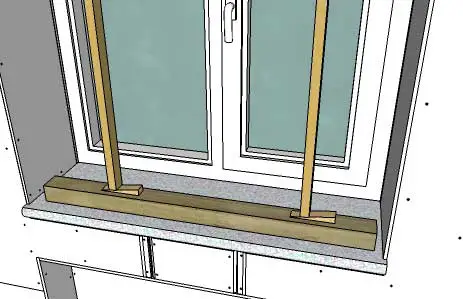
Figure 3 — Installation of Spacers
After the foam has hardened, trim any excess that protrudes beyond the vertical wall of the sill using a knife and treat the joint with spackle (a gypsum solution can be used as an alternative).
The ends of the sill are decorated with plugs (can be secured with adhesive and slightly embedded into the wall).
The external joint between the window and the sill is treated with sealant. Remove excess sealant using a clean cloth.
Tip: If you use white sealant instead of transparent, the cleanliness of the cloth plays a big role. Using a dusty or dirty cloth can spoil the appearance of the joint. While contamination does not significantly affect hydro-isolation properties, it will look unattractive.
Installation of a plastic sill by yourself is now complete.
This method is similar for most sills made of different materials.
Exception - Installation of Marble Sills:
- firstly, it is not recommended to install such an expensive component by yourself;
- secondly, marble, despite its exceptional strength, becomes fragile during cutting, so the required size of the slabs should only be cut by a specialist;
- thirdly, marble must be well polished and finished before installation;
- fourthly, for sealing the joint between the sill and the window profile, special plastic corner profiles filled with acrylic sealant are used;
- finally, to level the marble sill, it must also be set on wedges, but these should be thicker and larger to ensure stability of the heavy structure.
Sill Installation: Prices
The cost of the work depends on the working surface area and the material of the sill being used.
For example, installation of plastic sills:
Kyiv - from 250 UAH;
Moscow - from 790 RUB
Mounting Sills. Price for work with marble:
Kyiv - from 450 UAH;
Moscow - from 1,400 RUB (mounting a 40x20 cm sill with straight angles).
As you can see, the cost of the original material for the sill largely determines the price for its installation. By the way, the best representatives in the mid-range price category are brands such as WERZALIT, DANKE, and KLINKER.