Everything You Need to Know About Self-Installing Mosaic
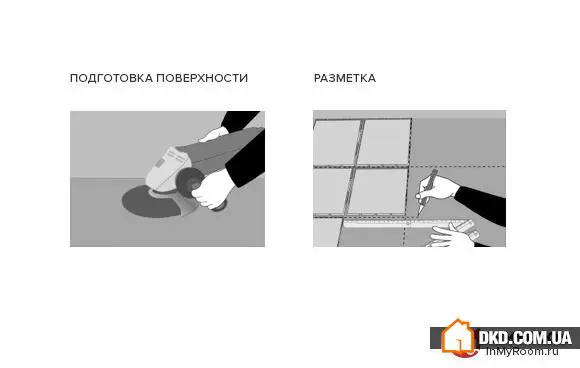
Step 1: Prepare the Surface
If the wall surface is not perfectly flat, polish it using a angle grinder with a stone or ceramic disc. Sometimes, more than 2 mm of material needs to be removed to level the surface. The surface ready for mosaic installation must be completely dry, clean, and flat. Pay attention to the room temperature—it should be between +5°C and +30°C.
Step 2: Make Markings
On the cleaned surface, draw lines that will help you correctly adhere the mosaic. First, lay out the sheets on the floor so that the distance between them matches the spacing of mosaic pieces—transfer these measurements to the wall. Check the direction of the lines using a level.
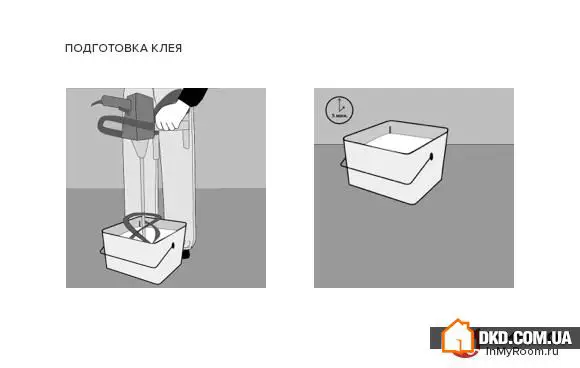
Step 3: Prepare and Apply Adhesive
1. Prepare the adhesive according to the instructions on the package. Using an electric drill with a mixer function, mix the adhesive with water. Let the prepared mixture rest for 5 minutes, then stir again.
2. Apply the adhesive to the wall with a trowel (flat side)—the area covered should not exceed the size of 9 mosaic sheets. After applying adhesive to the wall, create grooves on it using the notched edge of the trowel.
3. Apply adhesive to the back of a mosaic sheet using the smooth side of the trowel. Then spread the mixture evenly across the surface with the notched side of the tool.
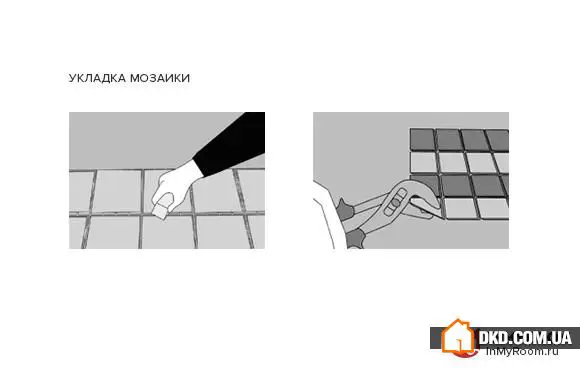
Step 4: Install the Mosaic
1. Attach the mosaic sheets to the marked area so that the front side of the mosaic faces you.
2. Adjust the sheet's position and secure it by gently tapping it with a rubber trowel.
3. Repeat the process for each prepared sheet. For cutting mosaic, use special pliers that do not require sharpening.
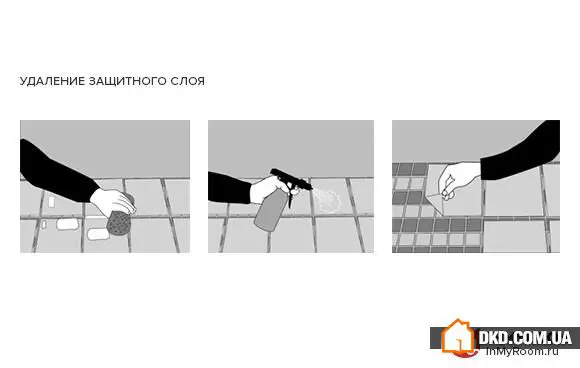
Step 5: Remove the Protective Layer
1. After 24 hours from the time of mosaic installation, remove the protective layer from the front surface of the material. Using a damp sponge or spray bottle, moisten the paper layer until it begins to peel off from the front surface of the mosaic.
2. Remove the protective layer with smooth movements. Re-wet the mosaic surface with a sponge to remove any remaining adhesive.
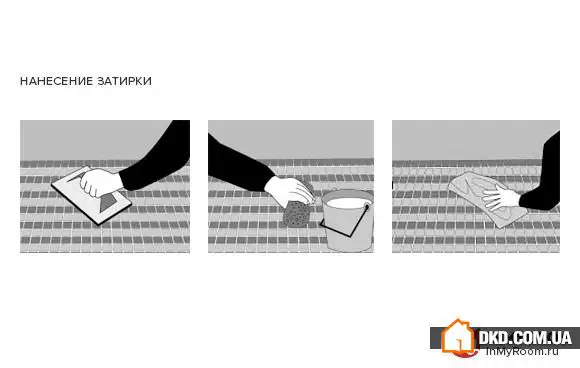
Step 6: Apply Grout
1. Using a rubber float, apply grout to the mosaic surface evenly, distributing it across the entire area. Work the grout into the joints until they are fully filled.
2. Allow the mosaic surface to dry for 15–20 minutes. Remember to remove excess grout from the tiles in a timely manner.
3. Clean any remaining grout with a dry cloth or felt rag. If the mosaic is located in areas where it comes into direct contact with water (e.g., pool bowls or shower trays), leave it for 10 days to dry completely.
Need a renovation specialist?
Find verified professionals for any repair or construction job. Post your request and get offers from local experts.
You may also like
More articles:
 5 Main Rules for Living Together
 Underwater Rocks in Kitchen Renovation: A Pro's Advice
 How Much Sunlight to Install in Grams: 6 Facts About Insolation
 What to Do Right Now: Choosing a New Color for Interior
 10 Big Secrets of a Small Kitchen – Fit Everything You Need
 How to Arrange a Kitchen with Balcony: 3 Options + Expert Comments
 Visual Guide to Installing Linoleum in an Apartment
 Custom Furniture: 7 Myths to Debunk