How to Make a Box from Gypsum Board
How to Make a Box from Gypsum Board with Your Own Hands
Photo 1 — Installation Scheme of a Ceiling Box for Hidden Lighting
Making a box, regardless of whether it is installed on a ceiling with backlighting, over a range hood in the kitchen or in another location for different purposes, begins with preparation. Preparation
Includes not only preparing the base for mounting profiles but, above all, planning the box. Its design should not take up too much space, but at the same time it is necessary to ensure:
- profiles do not run directly adjacent to communications, ideally they should not touch them;
- access is provided to important nodes such as the distribution box of wiring;
- the box can be assembled later (this requires planning the assembly sequence and checking whether tools can reach hard-to-access places).
First, guide profiles are mounted to the wall, walls or ceiling and wall with expansion anchors or nails. Using a level, check whether they are strictly vertical/horizontal. Then, rectangular bases of the box are marked out and such profiles are mounted according to the markings. Vertical profiles or ribs of the box that do not abut any bases are mounted into them. When all ribs of the box are assembled and a parallelepiped is obtained, pieces of profile of the required length are cut out that, when attached transversely, will increase the structural rigidity. If a ceiling box is being installed, after mounting the guide profile on the ceiling, hangers made from the same profile are cut and often attached to it.
IMPORTANT! Point light fixture markings should be done in advance, the distribution box and wires leading to points should be secured.
Required sheets of gypsum board are measured and screwed to the profiles with self-tapping screws. If installation, distribution boxes or light fixtures will be mounted directly into the gypsum board, it is necessary to mark and cut holes for them in advance. Do not forget the rules for mounting gypsum board: if non-whole sheets are used, sheet joints should fall in the center of profiles.
Priming and spackling of the box is performed. External angles of the box are protected with serpentine tape and perforated corner beads glued on spackle, internal angles abutting to walls or ceiling are sealed with paper tape on spackle. The box is ready for finishing decoration works.
Installation work should be carried out with consideration of surface features to which the box is attached. Mounting profiles to walls and ceiling and mounting gypsum board to profiles should be solid and frequent, especially when dealing with suspended ceilings.
IMPORTANT! Remember that gypsum board sheets and profiles come in wall and ceiling types.
Box from Gypsum Board, Video:
$ Cost of a Box from Gypsum Board
It is approximately in the same range as wall cladding with gypsum board.
- Moscow – on average from 350 rubles per linear meter.
- Kyiv – mostly from 60 hryvnia per linear meter.
How to Make a Box from Gypsum Board with Your Own Hands
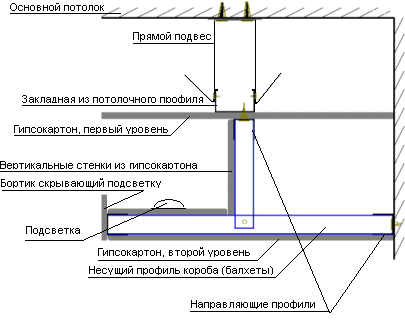
Photo 1 — Installation Scheme of a Ceiling Box for Hidden Lighting
Making a box, regardless of whether it is installed on a ceiling with backlighting, over a range hood in the kitchen or in another location for different purposes, begins with preparation.
Includes not only preparing the base for mounting profiles but, above all, planning the box. Its design should not take up too much space, but at the same time it is necessary to ensure:
- profiles do not run directly adjacent to communications, ideally they should not touch them;
- access is provided to important nodes such as the distribution box of wiring;
- the box can be assembled later (this requires planning the assembly sequence and checking whether tools can reach hard-to-access places).
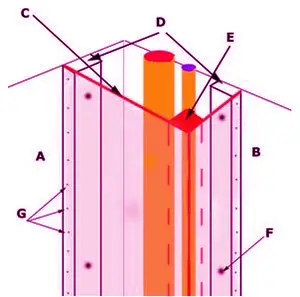
Photo 2 — Vertical Box for Bathroom, Hiding Pipes
First, guide profiles are mounted to the wall, walls or ceiling and wall with expansion anchors or nails. Using a level, check whether they are strictly vertical/horizontal. Then, rectangular bases of the box are marked out and such profiles are mounted according to the markings. Vertical profiles or ribs of the box that do not abut any bases are mounted into them. When all ribs of the box are assembled and a parallelepiped is obtained, pieces of profile of the required length are cut out that, when attached transversely, will increase the structural rigidity. If a ceiling box is being installed, after mounting the guide profile on the ceiling, hangers made from the same profile are cut and often attached to it.
IMPORTANT! Point light fixture markings should be done in advance, the distribution box and wires leading to points should be secured.
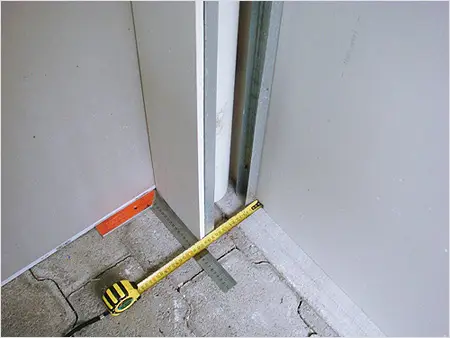
Photo 3 — Box Installation
Required sheets of gypsum board are measured and screwed to the profiles with self-tapping screws. If installation, distribution boxes or light fixtures will be mounted directly into the gypsum board, it is necessary to mark and cut holes for them in advance. Do not forget the rules for mounting gypsum board: if non-whole sheets are used, sheet joints should fall in the center of profiles.
Photo 4 — Box Ready for Finishing
Priming and spackling of the box is performed. External angles of the box are protected with serpentine tape and perforated corner beads glued on spackle, internal angles abutting to walls or ceiling are sealed with paper tape on spackle. The box is ready for finishing decoration works.
Installation work should be carried out with consideration of surface features to which the box is attached. Mounting profiles to walls and ceiling and mounting gypsum board to profiles should be solid and frequent, especially when dealing with suspended ceilings.
IMPORTANT! Remember that gypsum board sheets and profiles come in wall and ceiling types.
Box from Gypsum Board, Video:
$ Cost of a Box from Gypsum Board
It is approximately in the same range as wall cladding with gypsum board.
- Moscow – on average from 350 rubles per linear meter.
- Kyiv – mostly from 60 hryvnia per linear meter.