How to Make a Frame for Gypsum Board
Depending on the material, the frame for gypsum board can be metal or wooden.
Wooden frame - how to assemble a frame for gypsum board
Wooden lathing is a more solid and durable option with decent sound and thermal insulation, but the structure turns out much heavier than a metal one. In addition, installing such a frame in humid rooms, for example, in a bathroom, even with special impregnation with antiseptic, is undesirable. The cross-section of wooden strips will depend on the curvature of the base, and to level it, you can even use strips of different thicknesses.
IMPORTANT! A wooden frame for a gypsum board ceiling or a frame made of timber on a wall differs in how it is attached to different bases.
Wooden wall and ceiling frames are nailed or screwed to a wooden base. For brick and concrete walls and floors, plugs or holes are drilled into the base into which wooden inserts are driven, to which the strips are then nailed. How to install such a frame evenly level can be helped by inserting wooden wedges between the base and strips. Gypsum board is nailed or screwed to such a frame using self-tapping screws.
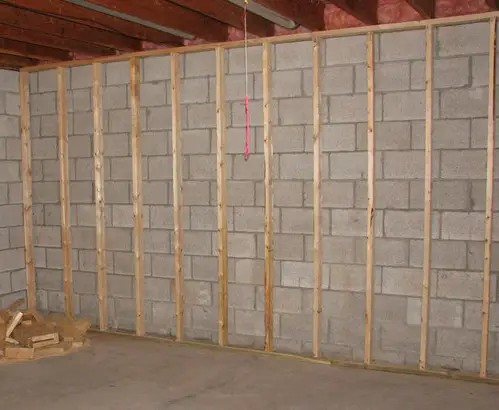
Photo 1 — Wooden frame for gypsum board
Metal frame for gypsum board
Constructing a frame from metal profiles is simpler and faster than a wooden one. A lighter structure and the ability to take various forms make a metal frame for gypsum board almost universal.
IMPORTANT! One of the advantages of this method is the availability of many special parts: guide profiles, stud profiles, ceiling profiles, single and double-level crabs, straight and anchor suspensions, brackets, ties, etc. Special profiles are available not only for walls and ceilings but also for door openings.
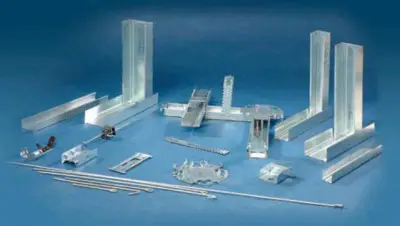
Photo 2 — Various fasteners and parts for installing a frame for gypsum board
Properly calculating and marking the frame is key to the success of the entire operation.
Evaluate the condition of the room
First, you need to assess wall irregularities, determine the thickness of stud profiles and gypsum board sheets, plan how communications will run, how much space they occupy, and based on this data measure a sufficient but economical setback from the wall to draw a strictly horizontal line – the frame boundary. This same line is transferred to the ceiling.
Marking profile placement
Then you need to mark the location of stud and ceiling profiles: the heavier the wall cladding surface, the more frequently the profiles are placed.
IMPORTANT! At this stage, you also need to plan reinforcement of the frame in places where heavy items like wardrobes, air conditioners, televisions or other equipment will be mounted using transverse strips and wooden boards.
The spacing between profiles must be planned so that the joints of the sheets during installation fall in the center of the profile.
Marking for lighting fixtures
Planning mounting of light fixtures and chandeliers, especially heavy ones. Prepare the mounting hardware for the chandelier in the floor slab and mark the positions of light fixtures and outlets.
Installing the frame
Frame installation starts with mounting guide profiles, which are "covered" on one side with rubber insulation. Then the suspensions (sound insulation can also be installed under them) are mounted using plugs and self-tapping screws, and the stud or ceiling profiles are installed.
Assembling a frame can have its own specifics for each part of the room and interior element, but the method remains the same.
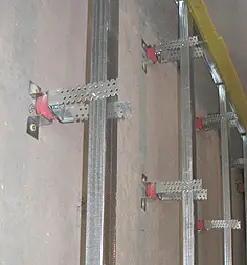
Photo 3 — Installing a frame with sound insulation (under the suspensions)
How to Build a Floating Frame
Frame ceilings can be secured not rigidly but on sliding suspension. A frame for a gypsum board ceiling, if the distance between floors is large (due to the need to reduce ceiling height or hide bulky communications), is mounted on special suspensions. A rod of the required length is attached to a plug in the floor slab, which is fixed to a bracket installed on the load-bearing profile. To avoid cracks in gypsum board structures, for example, in a log cabin where the wall timber will settle over time, in addition to flexible suspensions and ties, a technology developed by Knauf is used: the absence of rigid mounting of the main and load-bearing profiles to the wall.
Small deflections of load-bearing structures or vibrations and deformations of walls will not disrupt the horizontal alignment of such a suspended ceiling. Main profiles are mounted using suspensions to load-bearing structures. Load-bearing profiles are connected to the main ones using a two-level connection.
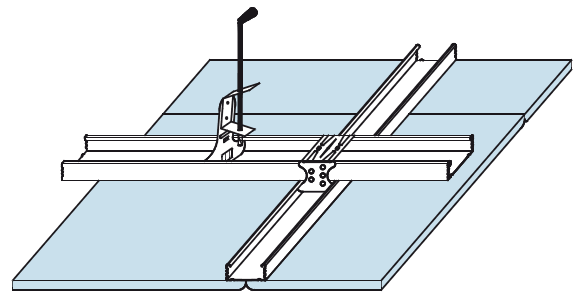
Photo 4 — Installation scheme of a floating ceiling according to Knauf technology
Special attention should be paid to door and window openings during frame installation. The assembly of a frame around a window starts with mounting guide profiles on the floor and ceiling, then the uprights are installed on both sides of the window, and a strip is placed between two uprights above it – thus, the outer part of the frame for mounting the window surrounds is ready. Variants of frame assembly for door openings are shown in the image below.
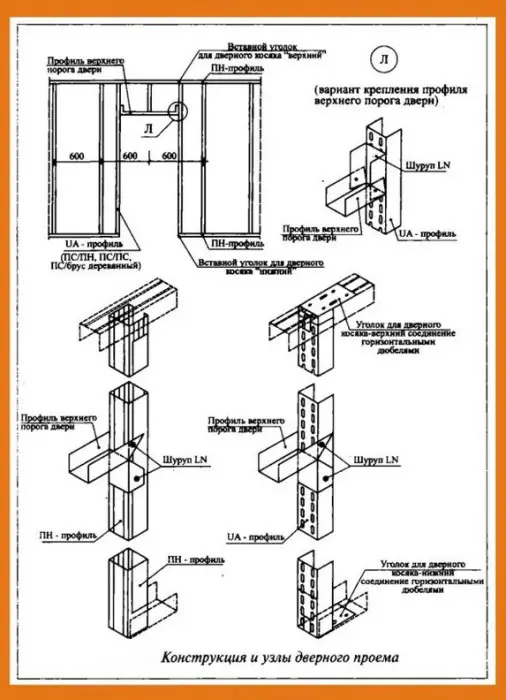
Photo 5 — Variants of profile mounting in a door opening
The principles for building frames for various interior elements do not differ from the sequence of wall and ceiling construction. A frame for a pipe box in a bathroom and a frame for a wardrobe in the hallway or a frame for library shelves in the living room differ only in the number of parts and complexity of execution.
Cost of Frame Installation
Frame installation costs are usually not listed separately, as they are included in the total cost of frame construction and its cladding, and sometimes even in spackle application for joints.
- Installation cost (including gypsum board cladding) in Moscow - from 250 rubles/m²;
- Installation cost (including gypsum board cladding) in Kiev - from 60 hryvnia/m²