How to Apply Vinyl Wallpapers
Why vinyl? First of all, this material has a remarkable feature: it repels water, making it easy to clean from dirt and stains.
Secondly, recent developments allow vinyl wallpapers to 'breathe', as the wallpaper sheets now have micro-pores.
Thirdly, due to their significant thickness and weight, vinyl wallpapers are easier to apply - they won't tear during wall application or roll unwinding. And, of course, such wallpapers will also last longer than regular paper ones.
Before applying vinyl wallpapers, you need to know several distinguishing features that significantly affect the wallpapering technique.
Why vinyl?
First of all, this material has a remarkable feature: it repels water, making it easy to clean from dirt and stains.
Secondly, recent developments allow vinyl wallpapers to 'breathe', as the wallpaper sheets now have micro-pores.
Thirdly, due to their significant thickness and weight, vinyl wallpapers are easier to apply - they won't tear during wall application or roll unwinding. And, of course, such wallpapers will also last longer than regular paper ones.
Before applying vinyl wallpapers, you need to know several distinguishing features that significantly affect the wallpapering technique.
How to Properly Apply Vinyl Wallpapers
Step 1. How to Prepare Walls for Wallpapering?
Remove old coating, sand, prime, level, and dry the base.
IMPORTANT! Concrete walls must be primed before wallpapering: otherwise, spots may appear on the wallpapers.
You can use either store-bought primer or a heavily diluted wallpaper adhesive. After priming, it is essential to open the walls with white water-emulsion paint.
There are specific guidelines for preparing different types of walls for wallpapering.
For example, before applying fresh wallpaper to painted walls, conduct a small test: scratch the paint in several places, then cover the scratches with regular office tape. If the paint cracks and particles remain on the sticky tape when peeling off, you need to remove the paint from the entire wall.
Wallpaper on plastic or any other smooth surface should only be applied after sanding the wall, and wallpaper on gypsum board should only be secured with a special adhesive compound.
Step 2. How to Cut the Wallpaper Strips?
Before opening the first roll, check the total number of purchased rolls and ensure color and pattern consistency, as well as identical batch numbers. Wallpapers from different batches can differ significantly. Even if the difference is not noticeable at first glance, applying vinyl wallpapers to walls will quickly reveal color or texture differences.
It is easiest to cut wallpaper without patterns. In this case, you need to measure the wall height and add 5-10 cm extra for allowances. You can cut such wallpapers on a special table or any spacious flat surface. After cutting the first strip, measure an equal strip from the roll and join them at the cut points.
In all other cases, subsequent strips must be cut only after aligning the pattern of the first and following strips.
IMPORTANT! Mark strips in order of application on the back side with a pencil, and also mark the top and bottom of each strip.
When wallpapering walls with patterns, a much larger amount of material will end up in waste. Therefore, it is recommended to buy such wallpapers with a surplus.
IMPORTANT! Wallpapers must be unrolled from the roll in the same direction during cutting. All even and all odd strips of patterned wallpapers are identical, meaning that the matching points for patterns are similar for all of them.
When purchasing, pay attention to the wallpaper labeling: each roll's packaging should have special symbols indicating the method of cutting this type of wallpaper.

Figure 1 - Symbols for Determining the Method of Cutting Wallpapers
IMPORTANT! When choosing wallpapers, it is better to opt for wider ones since meter-wide wallpapers are easier to apply side-by-side than regular ones, resulting in fewer seams and a more cohesive pattern appearance.
Step 3. What Adhesive to Use for Vinyl Wallpapers?
Each type of wallpaper should use a specific adhesive. All necessary information regarding the best adhesive for vinyl wallpapers must be indicated on the roll packaging.
When preparing adhesive, strictly follow the instructions provided on the packaging of the adhesive mixture.
Because vinyl wallpapers are heavy, extra water in the prepared adhesive will negatively affect adhesion: after a few weeks or even hours from application, the strips may detach from the wall, requiring a complete restart.
Only purchase adhesive specifically designed for vinyl wallpapers. Using universal adhesive or, worse yet, adhesive for paper wallpapers cannot guarantee a good bonding result.
In their class, the best are QUELYD (5$/300 g, consumption - up to 5-6 rolls), Pufas (3$/200 g, consumption - 25-32 m²) and Metilan (4$/300 g, consumption - 32-50 m²). The smell of these types of adhesive is either absent or very mild.
Drying time for each type of adhesive is individual, but on average it is no less than 12-24 hours. It is recommended to keep the room closed for 48 hours.
Step 4. How to Apply Vinyl Wallpapers Correctly?
You will need:
- a bucket;
- a wide spatula;
- a sponge;
- a sharp knife;
- a pencil;
- a brush for smoothing (or a rubber roller);
- a plumb line;
- scissors;
- a meter stick;
- a brush for applying adhesive;
- a working surface (table).
Work process:
Lay the cut strips on a flat surface and evenly coat them with adhesive, following the instructions provided on the manufacturer's packaging of the adhesive mixture.
For convenient transport and storage, the applied strips should be folded as follows: one edge with the back side inward is folded by 2/3 of the length, and the second edge by 1/3. When folding, the strips should not have any creases. Roll the strips loosely and set aside.
IMPORTANT! If you don't plan to use a particular roll for more than half an hour after applying the adhesive, wrap it in plastic film to prevent premature drying of the edges.
On average, wallpapers need 5 to 10 minutes to absorb the adhesive (a more precise figure should be indicated on the roll packaging).
After absorbing the adhesive, wallpapers become more elastic and often change shape in width. After drying on the wall, the wallpapers stretch and all irregularities are removed naturally.
IMPORTANT! If wallpaper strips were not evenly coated with adhesive or one strip stayed in adhesive longer than the other, it may affect their appearance (especially if discussing patterned strips): the pattern may shift or be distorted due to vinyl compression after drying.
Also, if the wallpapers are left in adhesive for too long, the edges of the strips may stick together and tear when trying to separate the strip for wall application.
ADVICE: To determine the optimal absorption time, align the edges of the strip: if they "pull apart" when aligned, there was insufficient time for proper absorption, and you should wait longer.
Walls in a room are rarely perfectly vertical, so you should not orient yourself on the verticality of corners when wallpapering. For the first strip of wallpaper on each wall, you must draw a vertical line yourself: use a level or plumb line.
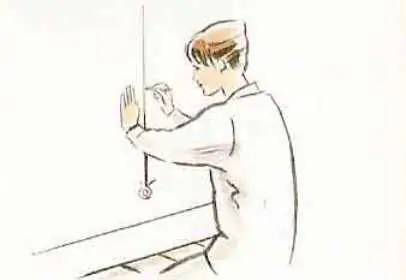
Figure 2 - Marking Vertical on the Wall Using a Plumb Line
To ensure adhesion, pre-prime the wall with a layer of adhesive (this double coating is often used when wallpapering walls with heavy, washable vinyl wallpapers).
Properly hold the wallpaper before application:
- hold the adhesive-coated roll in your hands and climb up to the ceiling (at the point of vertical line drawing);
- bend your left arm at the elbow and carefully unfold the roll, gently flipping it over your arm;
- grasp the edge of the strip from the larger side and carefully separate the wallpaper (ideally, you should only hold the edge and let it fall naturally along its full length so that the separation happens naturally under the weight of the applied strip);
- separate the bottom third of the strip, still folded toward the center, after securing 2/3 of the strip to the wall.
More details - in the video (description of roll position during wallpapering can be found starting from 8 minutes).
VIDEO. How to Apply Vinyl Wallpapers
Continuation:
After straightening, align the strip with the marked vertical line and, using a special brush or rubber roller, apply the wallpaper to the wall:
- first, use the selected tool to go through the center of the strip, and then, following the 'pine needle' principle, smooth the strip on both sides, removing excess air under the wallpaper;
- detach the bottom third and smooth it using the same method.
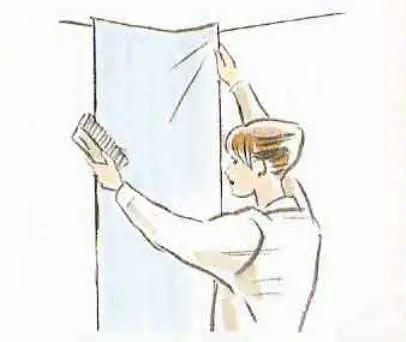
Figure 3 - Smoothing Vinyl Wallpaper Strips
IMPORTANT! When securing the strip, remember about the allowances for the ceiling and baseboard, which should be 5-10 cm!
Although most wallpapers today are applied side by side, if you want to apply them overlapping, start from the window: this way, shadows won't appear at the seams when sunlight falls on them.
You cannot apply wallpapers in corners as full-width strips: otherwise, creases will form in the corners over time. For corner application, cut the strip to width so that it extends onto the opposite wall no more than 1.5 cm. To apply the second part of the wallpaper strip in the corner, draw a vertical line on a clean wall with a plumb line, equal to the width of the applied strip part, and then fix it to the wall. This way you will get both proper corner finishing and a strictly vertical start for further wall application.
Seams should be smoothed with a special roller. It is important to note that when wallpapering walls with thick wallpapers, excessive pressure on the roller can damage the surface of the strip. Textured wallpapers should not be smoothed with a roller.
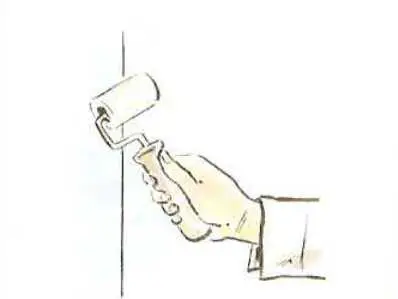
Figure 4 - Special Rubber Roller for Smoothing Seams
10. The edges of the wallpapers that extend onto the ceiling can be removed in three ways:
- use the back side of scissors to sweep along the wall-ceiling joint, as if flattening the wallpaper strips together, then fold the strip and cut the excess material with sharp scissors along the formed fold line. Apply the strip to the wall without additional adhesive and smooth the fresh seam;
- to trim the ceiling allowance, you can also use a spatula and wallpaper knife (first support the strip at the joint between wall and ceiling with the spatula, then cut it with the knife over the spatula);
- you can carefully trim the wallpapers using a special trimming blade (when using it, adhesive will not get on the ceiling or other surrounding surfaces).
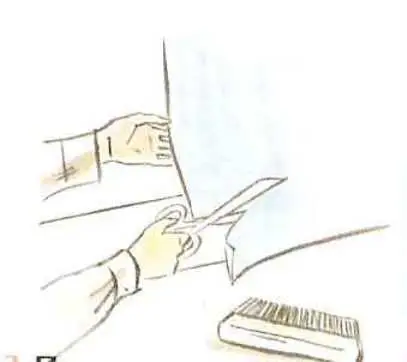
Figure 5 - One of the Ways to Trim the Allowance for Length Adjustment
11. If you plan to apply wallpapers with a border, start applying the decorative tape only after the adhesive has completely dried, i.e. in 24-48 hours (the drying time indicated on the roll label by the manufacturer).
Are Vinyl Wallpapers Harmful?
When choosing wallpapers, most buyers ask whether vinyl wallpapers are harmful to human health or not, having heard about the adverse effects of vinyl coating.
If it's a quality product, the answer is