Installing Radiators Yourself
Installing Radiators Yourself: Tips and Materials
You will need:
- radiators with plugs;
- brackets;
- Maevsky valve;
- mounting kit;
- rubber gaskets;
- adapters;
- plastic (metal-plastic) pipes;
- spherical valves.
Installation Tips:
When purchasing tools, pay special attention to torque wrenches—they must precisely match the parameters of the system. Most connections in the heating system can function normally only when the torque specification is strictly followed.
The fluid in the room's heating system operates under constant pressure, so a poorly sealed joint may cause water jets from pipes or leakage from the radiator itself. In another case, if the joints are over-tightened, the threads may be stripped, which will also cause damage.
IMPORTANT! Basic torque specifications should be indicated in the instruction manuals for parts and also directly on heating appliances.
Before replacing the radiator, shut off the water supply in the system and use a pump to remove as much water as possible from the system. Only then can you shut off the water supply at the pipe of the radiator being replaced and begin disassembly.
Before removing the radiator, provide a container for draining water with a volume approximately equal to that of the radiator. Some water may remain in the radiator or pipes even after draining from the system.
A mounting schematic and all necessary parts for installation should be available to you (or the worker). The number and type of parts must be determined by the radiator connection schematic and the selected radiator type.
IMPORTANT! To disconnect the radiator from the system, you will need shut-off valves or special taps. Installation companies, when providing a list of required materials for installation, also include “spherical valves with American connections” in the list. These tools are not suitable for self-installation: achieving proper sealing with them requires certain experience. For beginners, we recommend replacing the spherical valve with a radiator valve.
Installing Radiators in a Single-Pipe Heating System
If you have a single-pipe heating system, provide a bypass—a path for the heat carrier to flow around. If this is not done, closing the valve will shut down the entire heating system in that riser.
Also, when installing, pay attention to the fittings: on these, a sleeve is screwed on, which is then screwed into the installed radiator after being tightened.
Another important tool is the Maevsky valve. This device is designed to release air from the radiator. In most cases, the Maevsky valve should be included in the basic delivery kit of the radiator.
Additional tools you may need include:
- regular tees;
- pass-through tees;
- elbows;
- pipes with threaded ends;
- couplings;
- nipples, etc.
The necessity of these elements depends on each specific connection scheme.
Installing Radiators in a Two-Pipe Heating System
If your house has a two-pipe heating system (the riser consists of not one but two pipes), you do not need to install a bypass. All other works follow the same instructions.
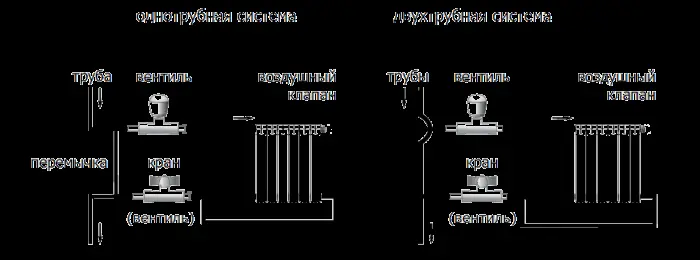
Figure 1 – Radiator Connection Schemes in Different Heating Systems
Installing Domestic Radiators: Installation Characteristics
When replacing a radiator, due to discrepancies between the parameters of the house's water supply system built in Soviet times and modern European standards, you often have to choose between replacing not only the radiator but the entire pipe system (if this is even possible) or purchasing a domestic radiator instead of an imported one. For cost savings, many choose the latter.
IMPORTANT! If you are looking for a new European radiator, pay attention to the products of brands such as FONDITAL (Italy), KERMI (Germany), or KORAD (Slovakia). These products are most adapted to the conditions of our heating systems and, what is equally important, to the financial capabilities of an average Russian or Ukrainian consumer.
Installing Cast Iron Radiators: Work Steps
Before mounting, disassemble the cast iron radiator, unscrew the nipples, and reassemble it. Radiators are usually disassembled at a bench using two radiator keys. The keys must be inserted into the nipple holes (each nipple has upper and lower holes).
It is more convenient to work when you can insert a crowbar into the radiator key hole (located at the bottom). The nipples must be turned simultaneously to avoid skewing.
IMPORTANT! The threads on nipples located on different sides of the radiator are in opposite directions. Only remove the outermost section.
Unscrew all other sections of the cast iron radiator and proceed to grouping. To group two sections, 2 or 3 threads of the nipples are captured from each side. Then both nipples must be tightened simultaneously.
IMPORTANT! This method also works for assembling a radiator made of any number of sections.
After assembly, the radiator is pressure tested. If a leak is found, tighten the nipples.
IMPORTANT! With careful work during radiator installation, you can paint the radiator before mounting it, as painting it after completion will be difficult without covering the wall or floor surfaces.
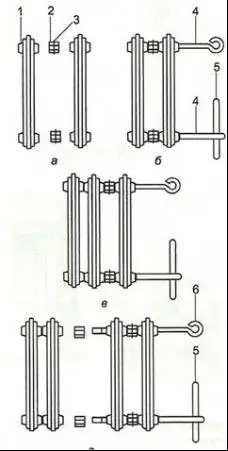
Figure 2 – Grouping Radiator Sections: a — Capture threads of sections with nipples; b — Tighten nipples, connect sections; c — Mount third section; d — Group two radiators; 1 — Section; 2 — Nipple; 3 — Gasket; 4 — Short radiator key; 5 — Crowbar; b — Long radiator key
Before installing the cast iron radiator, install its mounting brackets. Wall-mounted radiators can only be installed in urban apartments. These radiators are mounted on brackets.
In country houses where most buildings are made of wood, radiators are installed only on stands placed on the floor, and only supporting brackets are mounted on the walls, not carrying the main load of the structure.
For houses or walls with particularly light construction, radiators can be mounted on brackets with a solid support, where the main mounting point is on the outer side of the wall.
IMPORTANT! When purchasing a radiator, pay attention to the compatibility of mounting brackets with your home’s wall type.
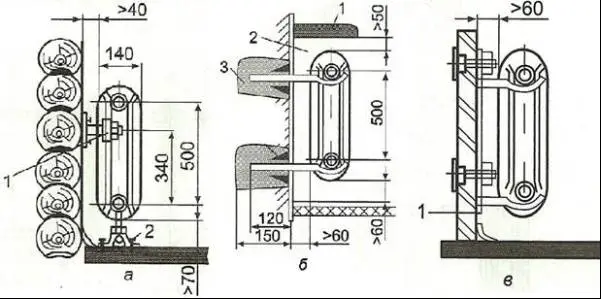
Figure 3 – Radiator Mounting Schemes Based on Wall Type: a — Wooden wall: 1— Strips; 2 — Stand; b — Brick-plastered wall: 1 — Sill; 2— Niche; 3 — Bracket; c — Lightweight wall construction: 1— Bracket with solid support
Radiators Installation Rules: Proper Wall Mounting
Proper radiator installation is not only about joint sealing and correct connection sequence to the water supply system. It is also about proper wall mounting.
Using these rules, align the radiator with the wall and mark points for mounting. Check the accuracy of your measurements with a level: the ribs of the radiator should be positioned strictly vertically with a slight incline.
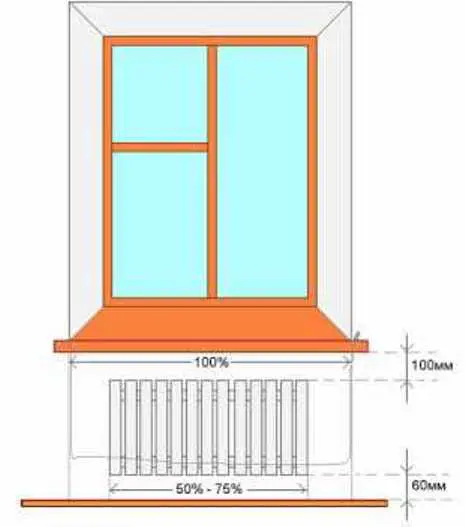
Figure 4 – Radiator Placement Relative to the Window
IMPORTANT! All heating units located in the same room should be at the same level.
Mounting on brackets. One bracket per square meter of heating surface should be installed. The mounting points for brackets on the wall are transferred using a template (a special board). The template is positioned horizontally according to plumb and holes are drilled in the wall based on pencil marks. The brackets should be inserted at least 12 cm deep. After installation, the brackets are embedded in cement mortar.
To connect the radiator to the heating system, unscrew the plugs from the radiator and connect the bypass with a valve first to the system. The radiator is mounted in the heating system using fittings.
Installing aluminum radiators, as well as bimetallic radiators, follows the same sequence. The only recommendation is that mounting the radiator to the wall should be done only after installing a special heat-reflection screen protecting the wall surface from overheating.
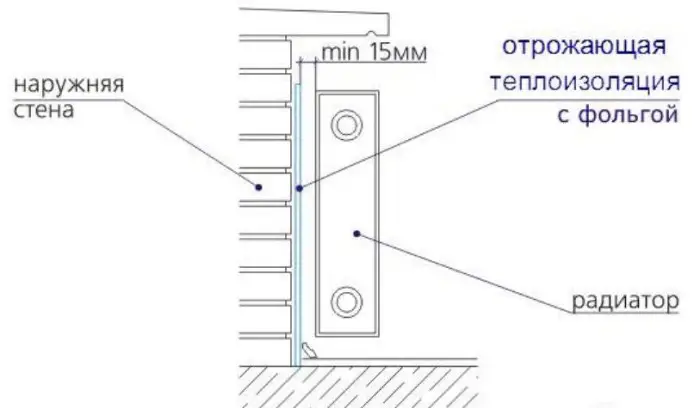
Figure 5 – Heat-Reflection Screen Installation Scheme
IMPORTANT! Regulatory documents prohibit installing heating in a balcony. Special wall cladding is intended for insulating this part of the apartment, but not for laying pipes.
$ Installing Radiators: Cost Considerations
The average cost of radiator installation typically varies from $35 to $50 per point depending on the material of the product.
How much does radiator installation cost:
- In Kiev – 250-350 UAH per point (excluding the cost of pipe connection or replacement);
- In Moscow – from 2,750-3,000 RUB per point (excluding the cost of pipe connection or replacement).
In addition, the price will decrease when installing two or more radiators. As you can see, self-installation does not save much money, but paying the bills will allow you to sleep peacefully.