Before and After: Kitchen-Dining Room Overhaul
The designer opted for a light color palette and the absence of partitions. She also saved budget using IKEA and a couple of smart tricks.
Designer Maggie Burns received this project from her close friend and her husband. They moved from Toronto to New York, bought a secondary apartment, and decided to do a full renovation. According to the couple, the dining room and kitchen, which were about the size of a shoebox, needed the most serious transformation.
How did the kitchen and dining room look before the renovation?
The tiny kitchen was completely isolated from the dining room. Everything needed to be changed—from the finishing to the furniture and utensils. The dining room's interior was also far from ideal. The couple decided to get rid of the gray walls and create a bright and cozy space for family gatherings.
What changed?
Everything! First of all, Maggie suggested removing unnecessary partitions between the kitchen and dining room. Now there is more light and air, and cooking became much more convenient.
However, part of the partition had to remain—here the electrical wiring ran. A wide opening was made in the wall, and that was enough.
Instead of tiles on the floor, a plank of warm tone was laid—this contrasts beautifully with white walls. If you choose a quality version and coat it with a protective layer of varnish or oil, you don't need to worry about high humidity on the kitchen floor.
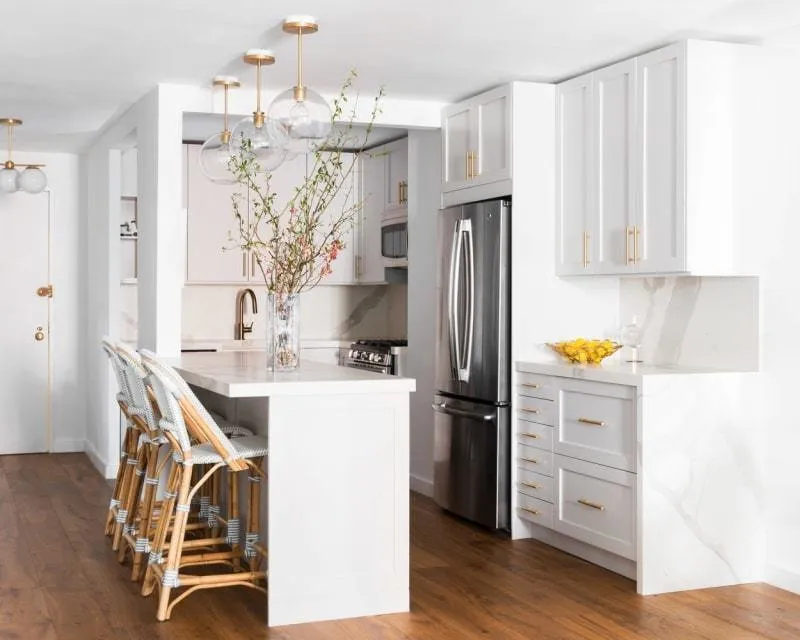
The place of the dining table was taken by a functional kitchen island. Here you can have lunch with your partner or host friends for evening gatherings. But the most important thing is that the island has plenty of storage space to hide household appliances and other kitchen utensils.
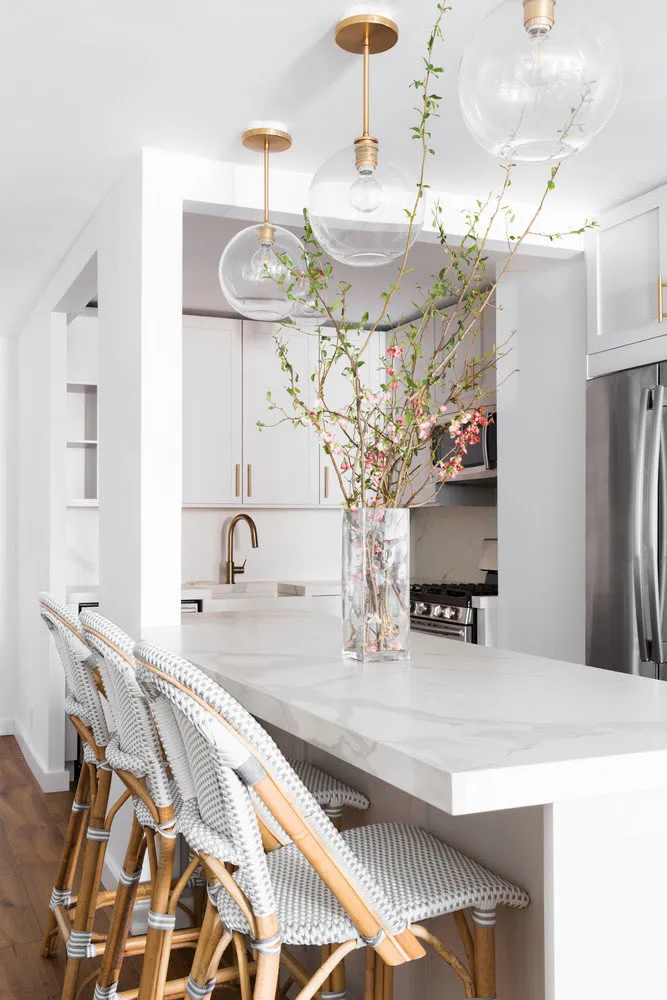
Pay attention to the countertop: it looks like it's made from a single piece of marble. In reality, the countertop is made of porcelain and painted to look like marble. It looks realistic and is much more budget-friendly than natural stone.

Aside from the island, Maggie also planned a lot of storage space. The kitchen cabinets were purchased at IKEA, which also helped save money. However, the attractive cabinet doors were ordered separately—this was a luxury the clients could afford after a good budget saving.
The cabinet doors were painted in a light gray to slightly break up the pure white color palette. At first glance, the difference in shades is very small, but the interior instantly became warmer and cozier.
Before the renovation, the designer asked the clients to do a full inventory of their kitchen utensils and keep only what was necessary. Based on that, they calculated the number of cabinets and drawers so that each pot and pan would have its own place.
How to Design a Stylish and Functional Kitchen-Dining Room?
- Don't skimp on finishing materials: use moisture-resistant paint and quality flooring. This way, you won't need to renovate for years.
- Keep more open space: say goodbye to partitions!
- Use a kitchen island: it's more convenient than a table and offers additional storage space.
- Don't be afraid to buy from IKEA—they can always be updated or modified.
- Find quality imitations of expensive materials for the countertop.
- Think carefully about storage for dishes and kitchen utensils (and get rid of everything unnecessary).
Photographer: Lindsey Brown
How not to ruin a new kitchen: 11 tips from a pro
Before starting the renovation, take a look at our article. That way, you’ll definitely avoid mistakes during the redesign and quickly decide on practical materials and cabinet contents.
Need a renovation specialist?
Find verified professionals for any repair or construction job. Post your request and get offers from local experts.
You may also like
More articles:
 Personal Experience: How to Rent Out an Apartment and Make Money for a New Life
 Is Your Garden Properly Watered: 4 Important Points
 How to Store Shoes in a Small Apartment: 13 Best Ideas
 5 Mistakes in the Repair of a Scandinavian Studio Apartment
 How to Transform an IKEA Shelf into a Kitchen Island
 How to Get Along with Your Husband's Relatives on the Dacha
 2-room apartment in Sweden: Scandinavian design on a small budget
 What to Do on the Dacha in July: 6 Important Garden Tasks