How to Lay Tile in the Bathroom: Step-by-Step Guide
A professional decorator, artist, and blogger shares insights on how tile joints, nodes, and seams should look in modern bathrooms and toilets
If you want to create your dream bathroom, you'll need to find the best tile layer in the world. To communicate effectively with them and clearly know what you want, you must understand the secrets of perfect tile joints and seams as well as the decorator Oksana Panteleeva does.
Oksana PanteleevaDecoratorHistory major, Oksana Panteleeva became a decorator and stylist after graduating from the "Details" school. She constantly redesigns and repaints her apartment and shares her experiences in the blog "On the Wave of Decoration"
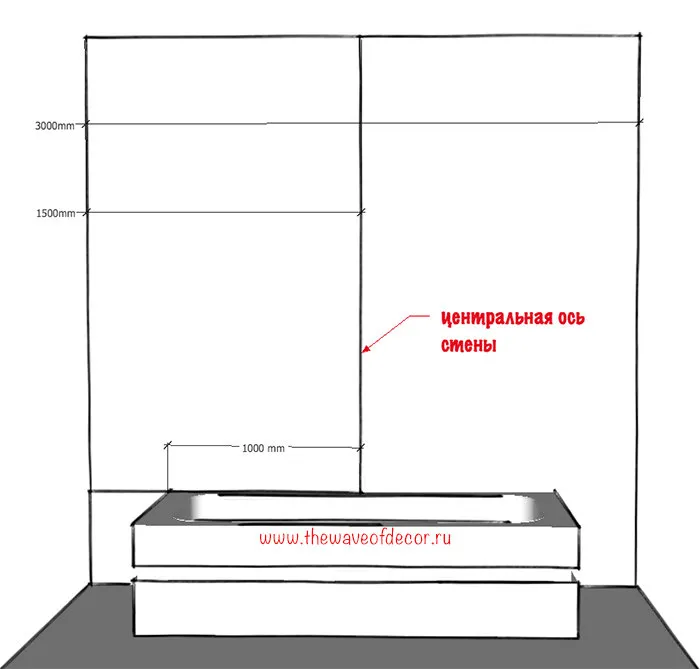
Where to Start?
When you begin sketching your tile story on the wall layout:
1. First, draw a plan with furniture and plumbing fixtures placement.
2. Decide on the location of decorative tiles (tiles with design), depending on which wall is the most beautiful and which one is just a wall... beautiful, but not as important.
3. Find the central part of your layout. I recommend starting from the center in most cases, if you're not a professional or don't do this daily.
4. Calculate how the tiles will run along the wall: symmetrically to each other, or just in a strip down the center (not centered), or the whole wall along the bathtub — one large tile.

5. Carefully plan the beginning of tile laying: from where you start and where you end.
6. Decide how the joints will look: with a baseboard, with a cornice, with the floor without a baseboard, or with the ceiling without a cornice.
7. Plan all corners — both internal and external: are special ceramic angles needed (many collections have them), or will the master cut tiles at 45 degrees.
8. Consider floor layout together with wall layout to understand how seams will align, and how the mat (e.g., metla style) will be positioned relative to furniture. Could it happen that we draw a beautiful mat but then it becomes invisible due to the bathtub?
Several Unwritten Rules
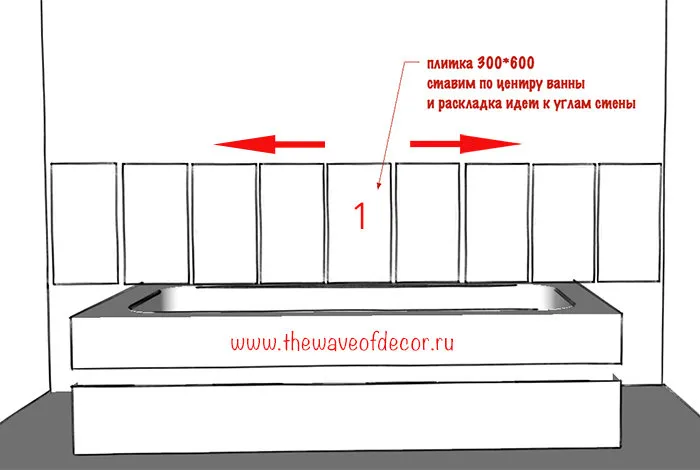
1. Start tile layout from the edge of the bathtub, i.e., there should be a whole tile above the bathtub.
2. A whole tile is usually left at the wall-ceiling joint.
3. Cut tiles go on the wall-floor joint.
Tile Cutting
If there are too many cuts, I suggest first looking for an alternative format. Perhaps you'll find the perfect tile with ideal dimensions and minimize the number of cut joints.
It's beautiful to use cut tiles in corners if there's half or slightly more than half of a tile remaining.
Or tile pieces can be a full continuation of each other, which is often seen in "metro" style tile layouts.
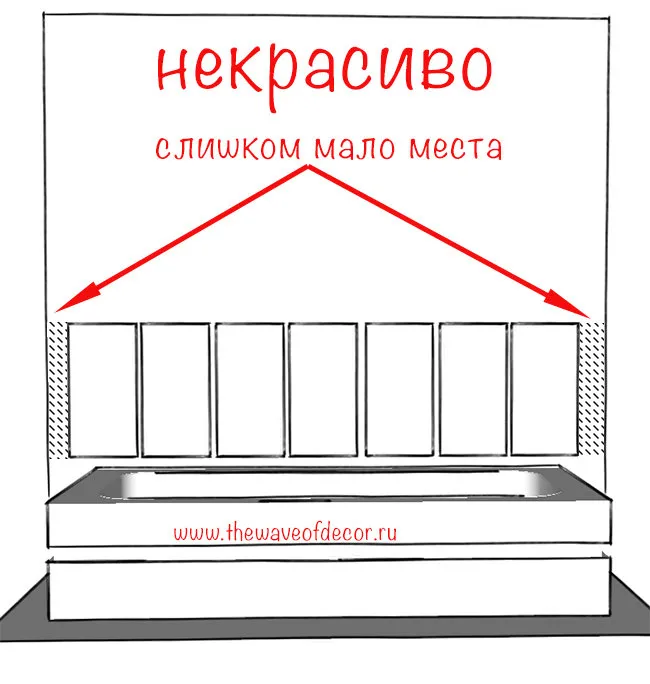
The most common mistake is leaving small pieces of tile at the corners.

When there is very little space left, and tile cutting turns it into a "bite," it's not very attractive. Here you can look for matching decor by size or mosaic... or change the tile.
At one project, I ordered "factory" cutting of the central tile with edge finishing and placed it in the center so that whole tiles would be on the sides, and there would be just one narrow tile in the center instead of two bite-sized pieces on the sides.
Nodes and Joints
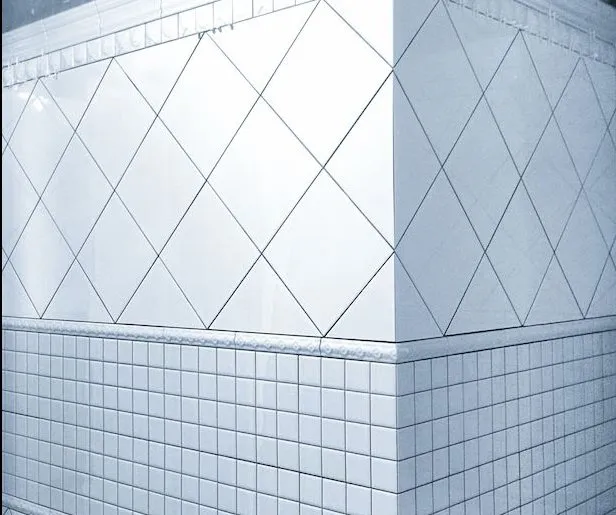
What does a professional mean by a node when discussing tile installation? Nodes are places where tiles meet and connect. All corners, internal or external, all cuts, all transitions from one tile pattern to another will be called nodes.
Let's agree — we forget about plastic corner pieces forever. For a beautiful bathroom, it's terrible! And no matter what builders tell you, that other options are impossible, that they're expensive or impractical... don't fall for their arguments. It means they just don't know how to do it properly.
Tip: You should know that there are collections where external and internal angles for tile laying exist, including angles with decorative elements.
Maybe you don't want to offend the master and find such a collection (usually from premium manufacturers).
Tip #2: Convex, voluminous tiles with design are really hard to cut, join, and so on. The master must be a super-professional!
Plus Several More Important Rules from the Pro
Vitaliy LikhovExpertFounder of companies SM-HOME and VITSET
1. If the tile edge allows it and is acceptable with client and designer agreement, don't go all the way to the glaze on the edge. The disc won't grip it, and it won't flake off in chunks. If such an option is not acceptable, see the next point.
2. Hedgehog method (they complain but get pricked). Tiles are cut on a machine with extra margin to the desired point, and then manually sharpened with any trimming tools.
3. The master must have the appropriate skill level. This is clear to everyone.
4. Having good tools and equipment. No matter how skilled the master is, if the disc "bites," the result on chips will be appropriate.
5. Time. This is manual labor that requires significant time investment. If the goal is to do it well, you must allocate enough time.
6. Extra tile stock. Cutting at 45 degrees significantly increases the risk of tile chipping regardless of skill level.
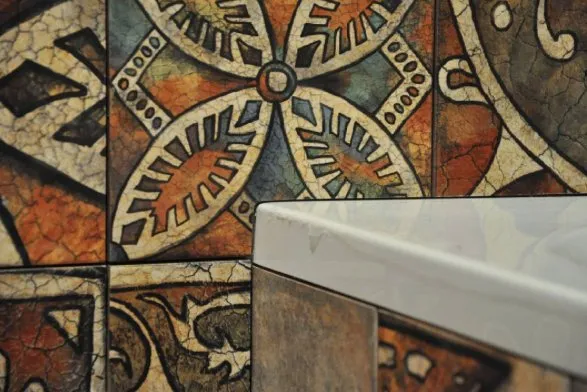
Photo on the cover: Natalia Kupreychuk's project
Summer in the City: 5+ Most Beautiful Parks of Moscow with Rich History
Need a renovation specialist?
Find verified professionals for any repair or construction job. Post your request and get offers from local experts.
You may also like
More articles:
 What You Need to Know About Decorative Stucco
 10 Tips for Decorating an Apartment in Modern Eco Style
 How to Do a Renovation: Rules and Regulations
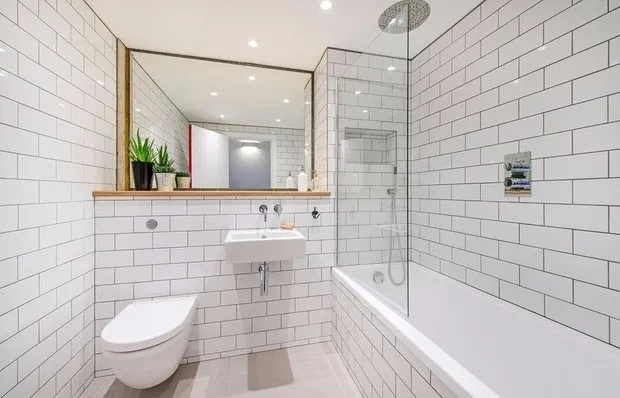 How to Legally Increase the Size of a Bathroom: Professional Opinion
 How to Use the SOKKER Mini-Greenhouse
 How to Reduce Water Consumption and Save Money: 8 Effective Methods
 Kitchen Setup in Panel House: 3 Legal Layout Options
 Does Minimalism Have a Soul and Who Is This Interior Style For