Installing Kitchen Exhaust Fan Yourself
Choosing an Exhaust Fan and Its Main Characteristics
Depending on Installation LocationExhaust fans can be:
- wall-mounted;
Advantages. This type of exhaust fans is currently the most in-demand largely due to the typical layout of most domestic kitchens.
What to Choose. If the vertical wall near the gas stove is not yet cluttered, you have many options to choose from. There are numerous installation variants for dome, sloped or decorative exhaust fans in such cases. You can confidently choose any model from the standard range, even if a small cabinet is mounted above the gas stove.
In such cases, the exhaust fan will be mounted on its lower surface (for example, Elica KREA GFA WH/F/60, Shindo MAYA 60 SS/BG, Sub-Zero Wolf or Miele DA 2270).
- corner;
Advantages. The placement of the stove in the corner of the kitchen is not typical for our countries, so a corner stove and exhaust fan above it will look attractive.
What to Choose. In such cases, you have to limit your choice to dome or T-shaped exhaust fans. There are not many good corner variants available today, and most of them are made by world brands (e.g., Krona KAROL 1000 or Faber PREMIO ANGOLO HIP X/V A100).
- built-in;
Advantages. Compactness and minimalism, they do not interfere with interior design, and there is the possibility of hidden installation in a cabinet.
What to Choose. There are several fully built-in exhaust fans. In such cases, only the air intake surface remains visible. However, more often than not, people choose telescopic built-in exhaust fans with an extendable carriage and additional grease filter (e.g., Bosch DHL 545 S, Elica KREA GFA WH/F/60, Shindo MAYA 60 SS/BG, Sub-Zero Wolf or Miele DA 2270).
- island;
Advantages. A stove in the middle of the kitchen, not by the wall - a luxury that is affordable only for some apartments. And not every owner of such housing. Therefore, the prices for built-in equipment are correspondingly high, and the quality of assembly from manufacturers is not questionable. However, island exhaust fans mounted to the ceiling can be useful if you want to place the stove by the window.
What to Choose. The choice of exhaust fans in the island category is indeed limited. Existing budget options are unlikely to be called interesting. However, this is exactly the category where you can find the most interesting design variants of exhaust fans (e.g., Franke FPD 4506 I XS, Franke FAK 907 I XS, Kuppersbusch IKDU 3900.0 J or Zigmund Shtain K 276.71 S).
- chimney.
Advantages. These are the most powerful exhaust fans capable of functioning efficiently not only in large kitchens but also at relatively high mounting heights above the stove.
What to Choose. First, do not buy a chimney exhaust fan unnecessarily - that is a waste of money. Second, you have many options to choose from due to the high price and thus wide possibilities for realization (e.g., Cata COR-L DT4 S DUSK, Elica ICO BL/F/80 or Ventolux Ibiza 60 BK).
Width of Exhaust FansExhaust fan width often meets standard sizes: 50 cm, 60 cm, 90 cm and 120 cm. When choosing an exhaust fan, remember the golden rule: the width of the exhaust fan must never be narrower than the cooking surface.
Fan PerformanceThis is a measure of the amount of air that passes through the exhaust fan in a given time unit. According to sanitary norms, the air exchange on the kitchen should be arranged so that the entire volume of air is replaced at least 10 times per hour.
When choosing an exhaust fan, pay attention to its performance and know the volume of air in your kitchen (in cubic meters). To calculate the required parameter, multiply the kitchen volume by 10.
IMPORTANT! This indicator does not depend on whether the exhaust fan is installed in a private house or an apartment. The standardized formula for calculating performance applies to all types of premises.
Example Calculation:
Kitchen area - 10 m².
Ceiling height - 2.7 m.
Kitchen volume - 27 m³.
Fan Performance - at least 270 m³/hour.
IMPORTANT! Experts recommend not buying exhaust fans with the minimum throughput capacity that meets the kitchen parameters, but to choose one with a margin.
Installation Height of Kitchen Exhaust FanThe installation height of the kitchen exhaust fan affects its performance. The recommended installation height is not less than 70 cm above the stove. But if in your apartment, the installation of the exhaust fan is possible only at a height of 85 cm or more, you should choose an exhaust fan with higher performance.
Air Cleaning Methods- circulation;
Suck in air through a filter system, clean it and return it to the room, keeping heat in the apartment. Filters in such exhaust fans can be grease-removing and activated carbon.
- exhaust;
Contaminated air is expelled outside the room. These are considered more efficient. These exhaust fans use only grease-removing filters.
- combined.
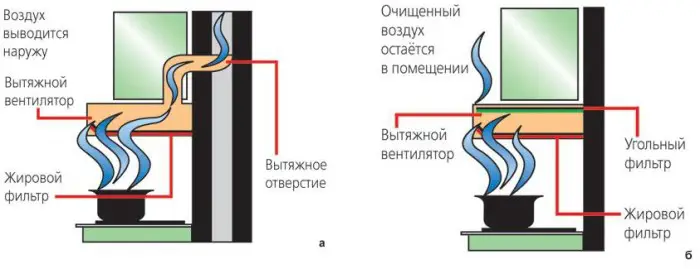
Figure 1 - Principles of Air Cleaning a - Exhaust; b - Circulation
Filter TypesGrease-removing (coarse cleaning filter) and activated carbon (fine cleaning filter) filters are distinguished. The first one traps even the smallest oil droplets and soot, while the second one absorbs odors.
Types of grease-removing filters:
- sintered (organic);
- felt (paper);
- acrylic;
- metallic (aluminum, steel) cassette-type filter.
IMPORTANT! Felt filters are single-use and require regular replacement. Acrylic filters can be washed, but material damage is easily possible during washing. The most effective are metallic filters.
The base of the activated carbon filter is fine activated charcoal powder. This filter can only be an addition to grease-removing filters and should only be used in circulation mode.
IMPORTANT! The activated carbon filter reduces overall exhaust fan performance. It must be regularly replaced with a clean one - the old filter cannot be cleaned.
Control TypeThe most expensive type of control is electronic. Buying an exhaust fan with such control is justified if you really need the wide functionality of the device. Among others, the device has such functions:
- mode switching (available in all types of exhaust fans);
- automatic increase in performance;
- automatic activation during cooking;
- automatic lighting activation when someone approaches the cooktop;
- filter clogging indicator;
- remaining operation function (the exhaust fan will continue to run for 10 more minutes after the exhaust fan is turned off to fully replace the air in the kitchen);
- interval mode (the exhaust fan will automatically turn on at minimum power every hour, providing additional kitchen ventilation).
At maximum power, the exhaust fan should not produce more than 70 dB. For comparison, 40 dB is quiet human speech, and 70 dB is a clear conversation audible from a distance of 1 meter.
IMPORTANT! The necessary constant air supply to the kitchen can be ensured in three ways: regular manual ventilation (windows should be opened for 10 minutes every two hours), constant air supply (using built-in window or wall intake devices), and installing exhaust fans.
Installing an Exhaust Fan on the Kitchen: Regulatory Documents
The most important documents that you or your craftsmen should follow during preparation and installation work are SNiP 41-01-2003 "Heating, Ventilation and Air Conditioning" and the installation manual for the exhaust fan. The first provides you with the rules for installing an exhaust fan, and the second contains the installation scheme for a particular model of the device.
Installing Built-in Exhaust Fan
Assemble the frame in which the exhaust fan will later be placed. Since the cabinet bottom will be removed for installation, vertical brackets should only be installed at the mounting points of the upper horizontal beam.
Before assembling the frame, mark the exit point and drill a hole in the upper panel of the cabinet for the flue pipe. Kitchen exhaust fans are often installed so that the air outlet goes through the upper panel, although there are cases where it is routed through the back wall.
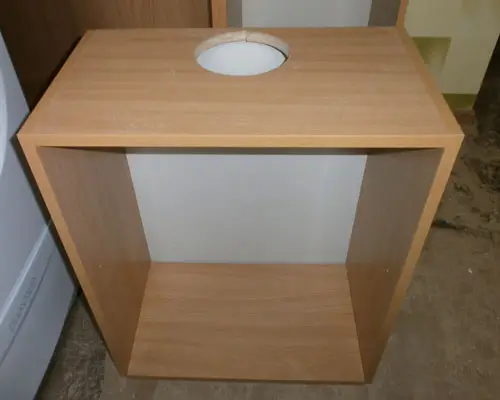
Photo 1 - Preparing the Kitchen Cabinet for Installing Built-in Exhaust Fan
Mark the bottom of the cabinet. After measuring the exhaust fan body, transfer these measurements to the removed panel and mark the cutout for the duct.
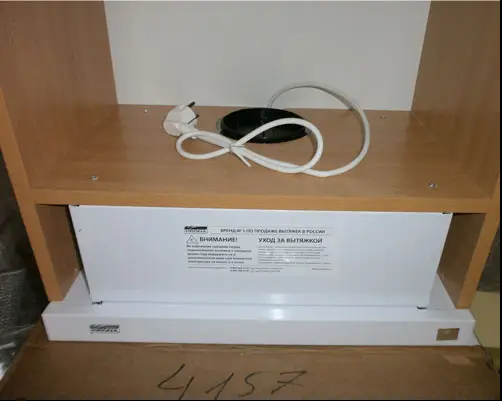
Photo 2 - Running the Power Cord Over the Exhaust Fan, and Organizing an Opening for the Duct
After securing the body to the panel, insert the transition ring for the duct.
IMPORTANT! Do not connect the exhaust fan's power cable under the stove - it must be run into the cabinet, organizing an outlet behind its back panel. After mounting the exhaust fan in the cabinet, connect the built-in exhaust fan to the ventilation system using a duct.
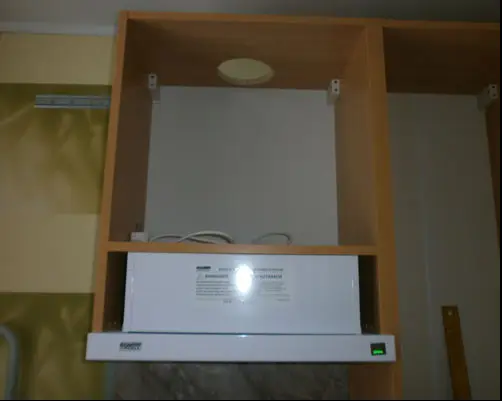
Photo 3 - Example of Mounting the Exhaust Fan in the Cabinet Over the Cooktop
Installing Built-in Exhaust Fan: What to Pay Attention To. VIDEO
Installing a Kitchen Exhaust Fan
Work Steps:
To ensure the operation of the exhaust fan, an individual outlet must be organized.
Mark the mounting points of the exhaust fan on the wall using the template provided or by measuring with a tape measure and level if your model does not come with a template.
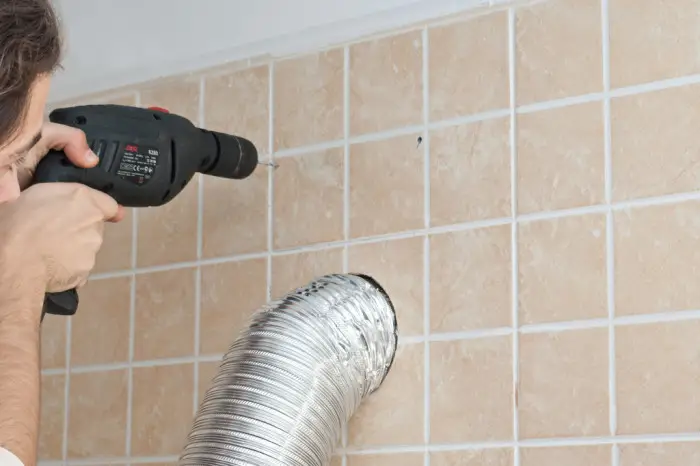
Photo 4 - Organizing Openings for Mounting the Exhaust Fan
IMPORTANT! Installation of suspended exhaust fans should be done after assembling and hanging the kitchen cabinet.
Mount the exhaust fan with anchors and screws.
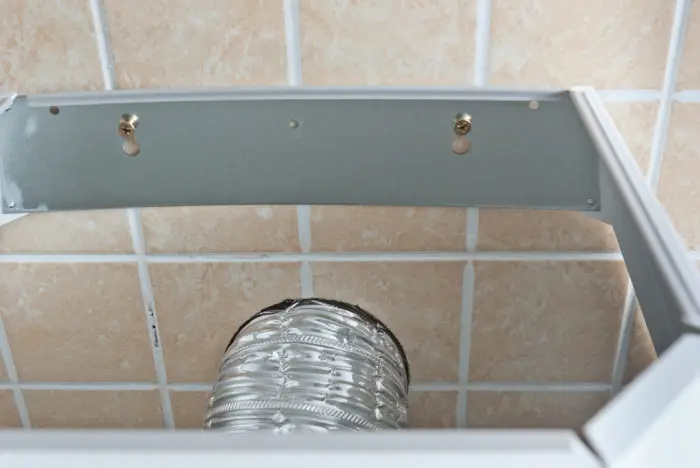
Photo 5 - Example of Mounting the Exhaust Fan to the Wall
IMPORTANT! Maintain strict horizontal alignment of the exhaust fan!
To connect the exhaust fan to the ventilation shaft, select a duct system and appropriate accessories.
IMPORTANT! The duct diameter must be appropriate. If the duct is too long or has more than three bends, the exhaust fan's performance will be reduced. Duct narrowing is prohibited.
Ventilation systems should use smooth PVC ducts. Bends in corrugated pipes may increase noise levels during exhaust fan operation. Outlet pipes should only be used with circular cross-sections, with a minimum diameter of 120 mm.
Connecting to the Ventilation Shaft.
For connecting the exhaust fan to the ventilation shaft, in most cases, an additional plastic conduit is sufficient.
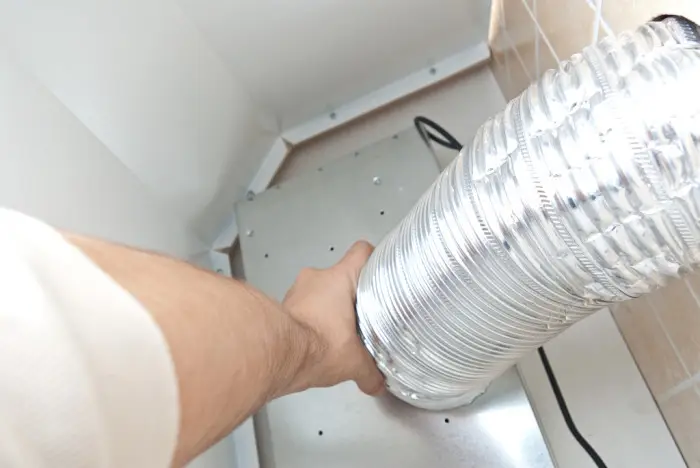
Photo 6 - Organizing the Duct
IMPORTANT! It is preferable to mount the duct with minimal bends. The duct cross-section must match the diameter of the exhaust fan's outlet opening for the kitchen.
Before first testing, connect the exhaust fan to the power supply, install the cover and adjust it by height.
Installing a Kitchen Exhaust Fan. VIDEO
Installing an Exhaust Fan: Replacing Filters by Yourself
Installing an Exhaust Fan
As mentioned above, there are several methods of room ventilation. While regular ventilation might be acceptable in a kitchen, installing an exhaust fan is more rational for a bathroom or toilet.
An exhaust fan can be mounted in the wall, window, or ceiling.
It does not make sense to install an exhaust fan and exhaust fan in the same kitchen. A properly installed ventilation system will not require additional ventilation.
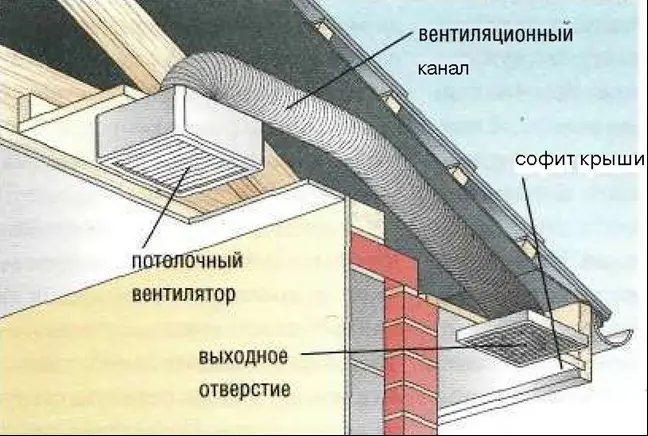
Figure 2 - Ceiling Mounting of Ventilation
IMPORTANT! Installation of an exhaust fan in a wooden house is regulated by special rules. For example, additional ventilation can be organized by making holes between the inner and outer layers of the house so that air between them can circulate normally.
In most cases, these measures are sufficient.
VIDEO. Installing an Exhaust Fan in the Bathroom
$ Installing an Exhaust Fan: Cost
The cost of installing an exhaust fan will depend largely on the price of the installed equipment: on average, it is 10% and in rare cases (e.g., installing chimney exhaust fans) about 30% of the device's cost.
Installing an exhaust fan on a kitchen by yourself will not guarantee the reliability of the system's operation or its safe use. Proper installation is installation done professionally by hired workers, confirmed with appropriate documentation.
Cost of Installing a Flat Suspended Exhaust Fan on the Kitchen (Standard)- Kiev - 99-120 UAH;
- Moscow - 350-500 rubles
- Kiev - from 350 UAH (with outlet hole organization);
- Moscow - from 1,650 rubles (with outlet hole organization).