Log cabin from timber beam — from material selection to installation
Structural strength and durability of a sauna absolutely depend on the quality of selected timber and correct assembly. However, the advantages of a wooden sauna built from a log wall are evident:
- simple wood laying (compared to logs);
- minimal shrinkage rate of about 6–10 cm;
- affordable cost.
If you examine a sauna log wall in photos, it's easy to see how appealing such structures are! However, there are nuances in proper timber selection that will determine the future durability and strength of the structure.
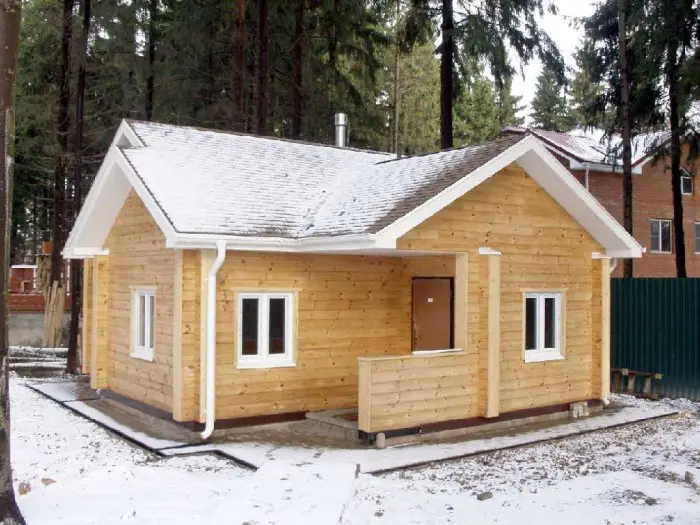
Photo 1 — Sauna log wall made from timber beam
Rules for selecting timberHere are the main guidelines to help you source high-quality timber and build a durable, exclusive log wall:
Unable to harvest timber yourself while planning to build a sauna from timber beam? Then carefully sort and select purchased beams.
Sorting timber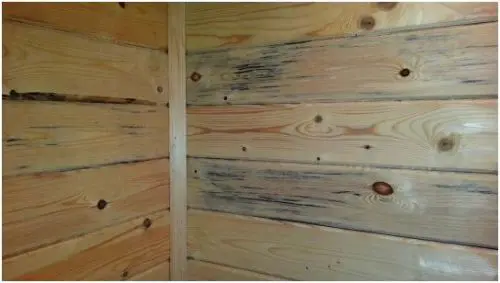
Photo 2 — Blue discoloration on timber
IMPORTANT! Each beam must have a dry structure, free from signs of mold or fungal damage.
Experts recommend using beams with a cross-section of 150×150 mm for standard sauna construction. This thickness is considered sufficient for year-round sauna types.
Finished saunas can be further decorated with various finishes and elements. Alternatively, you can leave the structure untreated on the exterior, simply applying a protective coating such as a lacquer-based paint.
Log cabin from profiled timber beam
Building a sauna using convenient profiled timber beam is the most popular method for constructing such structures.
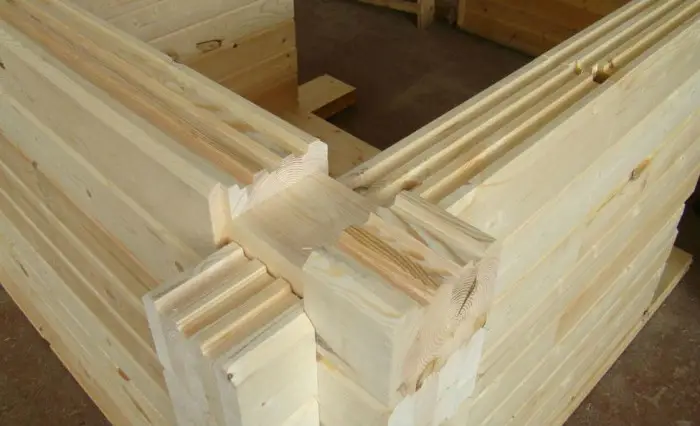
Photo 3 — Profiled timber beam
Profiled timber beam allows craftsmen to build saunas quickly, which are characterized by:
- attractive exterior;
- no need for subsequent interior or exterior finishing;
- precise geometric shape;
- high thermal and sound insulation performance;
- eco-friendliness.
Recommended profiled timber beams are a convenient building material, ensuring fast construction, long-term durability, and aesthetic appeal.
Presence of locking elementsThe manufacturing process of profiled timber beam ensures a smooth surface through careful edge sanding and shaping. Additionally, each beam has convenient joining elements such as tongue and groove.
Therefore, the entire structure can be assembled quickly without additional adhesives, saving labor and material costs.
ShrinkageThe shrinkage rate for saunas built from professionally prepared profiled timber beam is 3.2–4.5%, which is lower than that of traditional log construction.
Thermal performanceComparing profiled timber beam to standard logs, beams with a 15×16 cm cross-section have thermal conductivity comparable to logs with a diameter of up to 24 cm.
QualityFor producing profiled timber beams, well-dried wood from known coniferous species is used, due to its low susceptibility to resin-based decay.
Log saunas made from profiled timber beam are less prone to cracking if the original timber is high-quality or properly harvested.
Building a sauna from timber beam yourself
Planning to build a sauna from wooden timber beam yourself? Here are practical tips to help you!
First, note that building a sauna from beams is simpler and significantly faster than using logs.
Recommended reading: Build a sauna yourself
Another advantage — simplicity of assembly. For example, profiled beams are assembled like a construction kit due to pre-made grooves.
End joints (grooves)There are many types of joints.
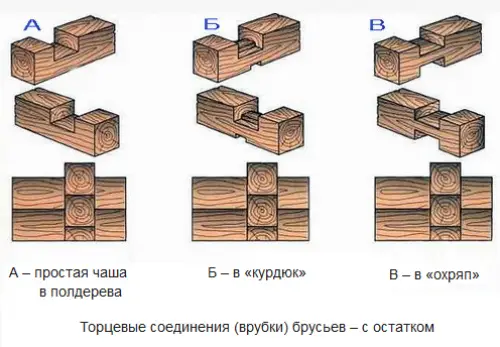
Photo 4 — Standard end joint types
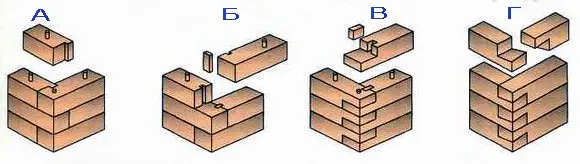
Photo 5 — Standard end joint types
The simplest is the L-shaped joint, known by experts as 'in the paw'. This joint can be easily made with a standard chainsaw.
First, create a template according to which the joints are later cut. Begin with cross-cutting, then make bevels. This method is more convenient.
IMPORTANT! Beams must be exactly the same length.
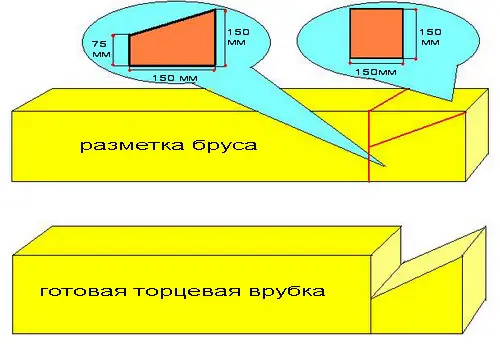
Photo 6 — Template for making an L-shaped joint
FoundationFirst advantage — the ability to assemble the structure directly on a professionally built foundation, which is not possible with log-based wood.
When laying the base beam, apply a moisture barrier. The layer is placed between the foundation and the prepared, sorted beams.
Moisture barrier layer
Photo 7 — Diagram of moisture barrier installation
On the photo — diagram of moisture barrier layer. It includes bitumen, roofing felt, and a wood preservative. The sequence is as follows:
Apply the second bitumen layer only after the first has fully hardened. The base beam must be pre-treated with a wood preservative on the side in contact with the roofing felt.
Base beamIMPORTANT! The first course beam should be 200×200 mm.
After foundation completion, the first course of beams must be laid manually.
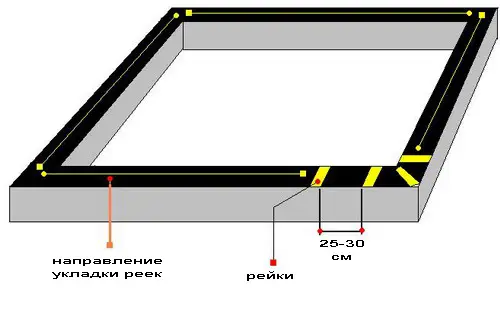
Photo 8 — Diagram of the first course
As shown, wooden strips previously laid on the moisture barrier serve as a base for the base beam. Use strips 15 mm thick and pre-treat with wood preservative.
These strips increase beam lifespan by lifting them above the foundation and preventing rot. The resulting space is filled with expansion foam, creating a ventilated cushion.
IMPORTANT! Do not secure the first course! During full structure assembly, it will be firmly pressed down by its own weight. If repair is needed later, it can be easily replaced.
Check horizontal alignment using a standard level.
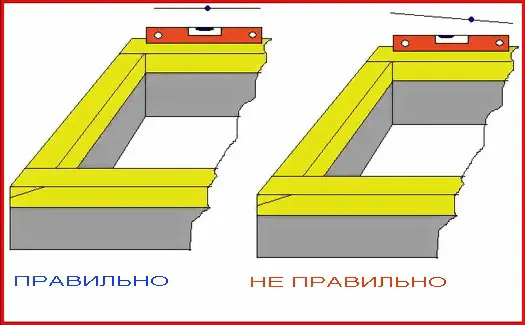
Photo 9 — Horizontal alignment of the first course
Subsequent coursesIMPORTANT! Beams for the second and all subsequent courses should be 150×150 mm.
First, lay a sealing material on the first course: natural moss, traditional hemp, or rolled jute. The sealant should be evenly distributed, with a 10 cm outward extension (exception: jute).
After placing the second course, secure it with dowels or pegs, inserting them into pre-drilled holes. Note: drilling after beam placement is not recommended — the sealant will wrap around the drill bit.
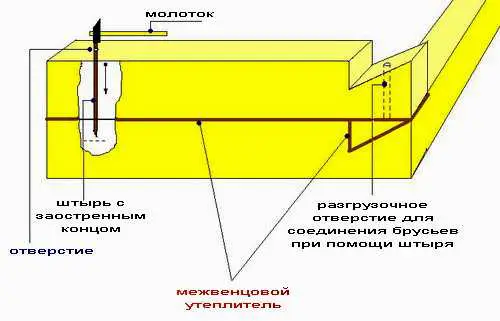
Photo 10 — Securing log courses
IMPORTANT! Do not secure the last two courses! After shrinkage, these courses must be removed when installing ceiling joists.
OpeningsWhen building a sauna log wall yourself, remember to plan for openings for windows and doors. These can be installed during construction or afterward.
Windows and doors installed after constructionInstalling window and door frames after the sauna is built is the most labor-intensive step. This requires special joint cutting, as shown in the diagram.
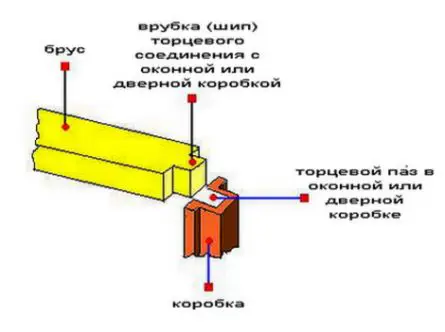
Photo 11 — Example of joint cutting for post-construction openings
Installing openingsIt’s much simpler to install window and door openings during construction. Leave gaps between beams, then later insert jambs. This method allows you to cut openings of any desired size.
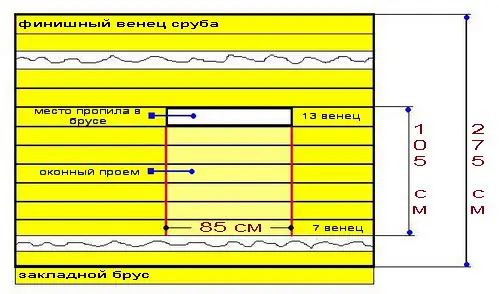
Photo 12 — Window opening installation during construction
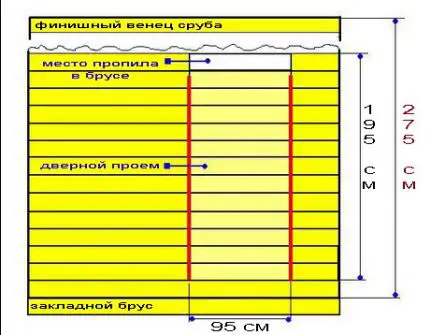
Photo 13 — Door opening installation during construction
IMPORTANT! Install windows and doors only after the sauna has settled — approximately six months. The joint sealant will compress, and the beams will shrink. The structure will settle by about 10 cm. Therefore, installed windows and doors will become misaligned.
‘Wintering’ the log wallAfter completing all courses, cover the finished log wall with 50 mm thick boards. Optionally, add roofing felt or corrugated metal and leave the structure to ‘winter’ for 6–7 months.
Sealing the log wallIf you used moss or hemp as a sealant, you will need to perform resealing after the wintering period.
The process is simple. Use a hammer and a special ‘sealer’ tool (see photo).
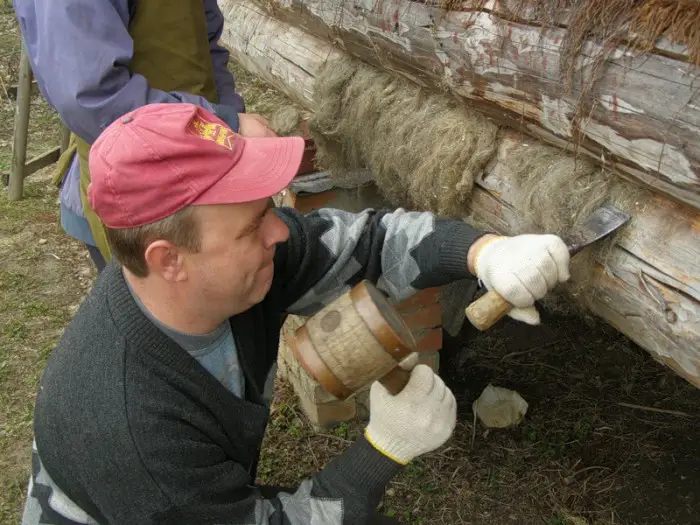
Photo 14 — Sealing the log wall
Roll moss or hemp into a rope and push it through the gap between beams using the sealer and hammer, ensuring a smooth, even joint.
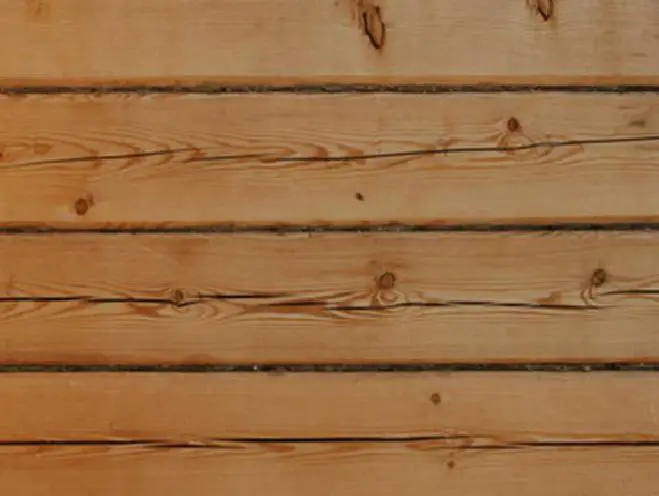
Photo 15 — Appearance after sealing
Did you use jute? Then sealing is not required!
Video: Building a sauna from timber beam yourself
Watch this video to visually assess the complexity of building saunas using timber beam.
$ Sauna from timber beam price
The cost of a sauna built from timber beam depends on several factors: required material size, structure scale, local climate conditions, etc.
Current standard pricing is as follows:
- Kyiv – from 1600 UAH per 1 m²;
- Moscow – from 3500 RUB per 1 m².