How to Replace Wiring in an Apartment
Share on Twitter
Post to Blog
Send by Email
In terms of how to lay wiring in a house or apartment, electrical installation devices play an important role. For example, when connecting wires, distribution boxes are always used which protect connection points and provide access to them.
When deciding how to replace wiring in an apartment or house, one not only chooses new wires but also new outlets and switches.
Regarding the cost of replacing wiring, the lion's share of some types of wiring costs comes from high-quality boxes, switches, and outlets.
For example, this is the case with retro wiring, where one meter of wire costs on average 80 rubles or 25 hryvnia, and one porcelain rotary switch can cost up to 2000 rubles or even more.
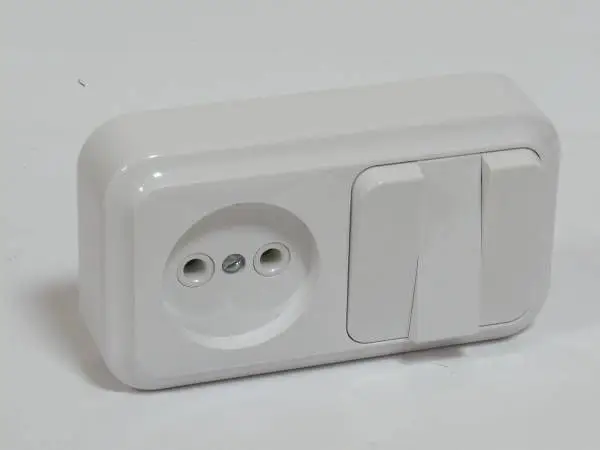
Photo 1 — Electrical Installation Box for Open Wiring
The cost of replacing wiring depends on the volume and complexity of work, required materials which make up about half the total sum, and the reasons for laying the wiring.
Wiring can be external (laid in air or underground) or internal – open or concealed.
In panel buildings with concrete walls and in houses with brick walls, concealed wiring is used, either in plaster or on gypsum board. Therefore, special electrical installation devices for concealed wiring are applied. They can also be mounted in wooden walls on a dacha, but flame-retardant outlets and switches are more commonly used for flammable substrates.
Fire-resistant electrical devices are made from porcelain, metal, and non-flammable plastic.
Special requirements for electrical installation devices are imposed in humid environments, such as bathrooms, saunas, and spas. Electrical installations should not be placed directly in rooms where washing or steaming occurs; only lighting is installed there, and the light fixture must have a high degree of protection. Outlets and switches are mounted in corridors or vestibules and must also be splash-proof.
Comparing the cost of materials for concealed versus open wiring, it can be said that neither option will be cheap. As mentioned earlier, external wiring may even cost more due to the use of electrical installation devices. However, when concealed wiring cannot be done, it's not profitable or causes additional difficulties, open wiring and appropriate devices are used instead.

Photo 2 — Switch for Open Wiring Makel
Switches for External Wiring
Installing switches for external wiring is not complicated. As with concealed wiring, the wiring diagram helps determine the required number of switches and their placement.
There are no strict rules about where to mount a switch, but it is usually installed at a distance from windows and doors so that the opening door does not cover it. The standard mounting height for a switch is 50-80 or 150 cm.
The switch is mounted directly to the wall using a flat mounting box made of metal, plastic, or wood. The size of the mounting box is usually slightly larger than the cover plate, and two screws or anchors are sufficient for securing it to the wall.
The switch mechanism is connected to the mounting box, and the ends of the wires are connected to the terminals. Then the frame is put on, in which a window has been cut out for the wires to pass through, and the switch buttons are inserted.
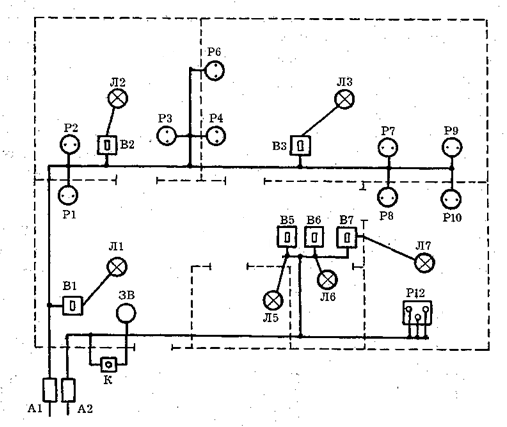
Diagram 1 — Wiring Scheme in a House, where V — Switches, R — Outlets
Outlets for External Wiring
Outlets for external wiring are installed in the same way as switches. They are mounted on a flat mounting box screwed to the wall.
Outlets for external wiring can have grounding or not, be designed for single-phase or three-phase networks, support different current ratings, and more.
The network in residential homes is usually single-phase. The current that a standard outlet can handle exceeds the possible load on the wires leading to it, and grounding is recommended for protection against electric shock when using household appliances but not mandatory. Outlets are typically mounted no less than 30 cm above the floor, and the number of outlets depends on how many electrical appliances will be connected.
As seen in the diagram, outlets are usually located at the end of branches from the main wire. However, sometimes one might wonder how to run wiring from an outlet to install another one nearby. For this purpose, a parallel connection is used: the ends of the installed wire are connected to the ends of the wire connected to the outlet, live to live, neutral to neutral. However, one must consider the load on the network.
If additional outlets are needed for powerful equipment, it is not advisable to run them from an outlet – they should be installed as a separate group from the distribution board. Additionally, for better connection, the conductors of the wires being joined must be made of the same metal.
If aluminum and copper wire are connected, special connectors with a special coating should be used.
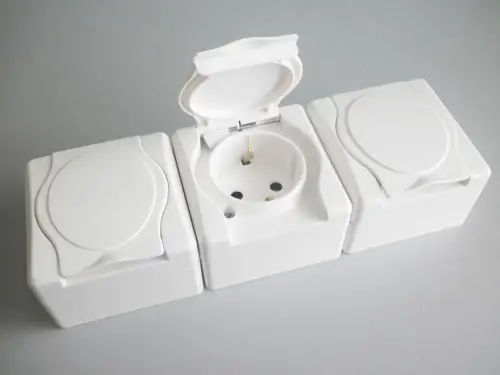
Photo 3 — Splash-Proof Outlets with Grounding for Open Wiring