Installing Socket Outlets Yourself
Modern appliances consume much more electricity than in Soviet times. Nobody even thought about such devices and their power consumption back then. According to all regulatory documents, when purchasing large household appliances, each device should have its own dedicated socket with independent connection to the electricity meter and installation of a residual current device (RCD), rather than just "plugging in" a new socket into an old, overloaded system.
New trends in socket outlet installation
Modern appliances consume much more electricity than in Soviet times. Nobody even thought about such devices and their power consumption back then. According to all regulatory documents, when purchasing large household appliances, each device should have its own dedicated socket with independent connection to the electricity meter and installation of a residual current device (RCD), rather than just "plugging in" a new socket into an old, overloaded system.
For example, electrical safety rules and use of electrical appliances require separate sockets for washing machines (with grounding required!), electric stoves, and even a dedicated socket for refrigerators!
With independent connection of each socket to household appliances with high electricity consumption, it will be easy to identify the cause of a breakdown or power failure, and protect equipment from damage due to a fault in a specific part of the network.
Moreover, appliances powered by their own socket will not overload the apartment's electrical wiring, allowing simultaneous use of several powerful devices (e.g., a washing machine and an electric stove). Otherwise, high network load may trip circuit breakers.
If you live in an old apartment, seriously consider not just installing a couple of new sockets but replacing the entire electrical wiring.
During a major renovation, replacing the electrical wiring is just as important as leveling the floor or replacing windows.
One cannot do it alone without professional help: knowledge of how to calculate wire capacity, how to properly connect wiring to the electricity meter, which sockets to choose for specific appliances, and how to design a socket installation plan in an apartment is essential.
Installing Socket Outlets: Regulatory Documents
For doing the work yourself, gather these documents:
- GOST 7397.0-89 (installation of switches);
- GOST 7396.1-89 (installation of socket outlets);
- GOST 8594-80 (boxes for installing switches and socket outlets);
- SNiP 3.05.06-85 (technical requirements).
Rules for Installing Socket Outlets
Installation rules for socket outlets vary not only based on the electrical points designed to power specific household appliances but also depend on the type of room and the material from which the walls were made.
Installing Socket Outlets in the Kitchen: General Requirements
IMPORTANT! The socket must not be blocked by the exhaust fan's ventilation duct.
IMPORTANT! It is forbidden to install socket outlets:
- above the stove;
- behind the casing of built-in appliances;
- behind sliding drawers;
- above the sink.
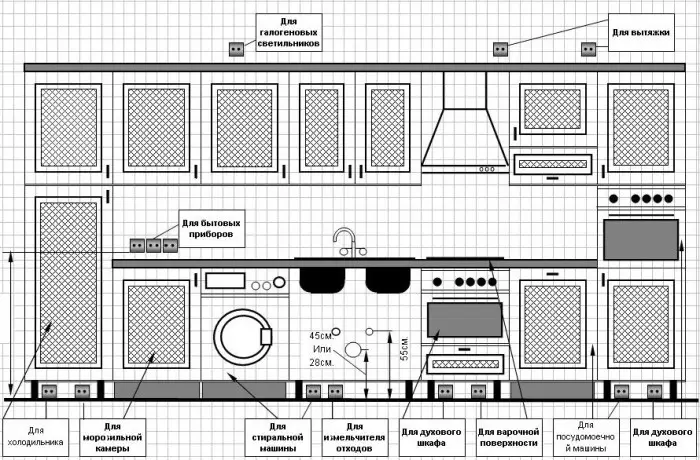
Scheme 1 — Kitchen Socket Outlet Installation Scheme
Installing a Socket for a Razor: Main Requirements
Manufacturers: For better reliability in operation, it's better to choose socket outlets from brands such as Kontakt, KORR, Gira, or ELSO.
Installing a Washing Machine and Other Powerful Household Appliances
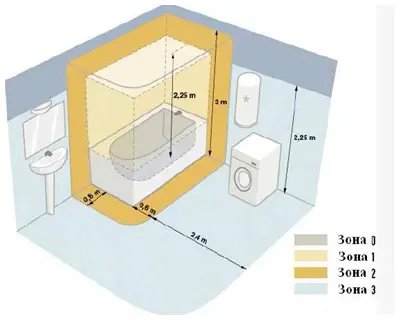
Scheme 2 — Bathroom Zoneing: 0 – No electrical appliances may be placed, except those that can be used in the bathroom (up to 12 W); 1 – Only water heaters may be placed; zones 0, 1 and 2 are not intended for socket placement; 3 – Sockets with power supply from an isolation transformer are allowed
Installing a surface-mounted socket is better in terms of heat dissipation than concealed installation.
Manufacturers: For reliable operation, it's better to choose products from brands ABB, Legrand, or Prodax.
Installing a TV Socket
The essence of installing a socket for a television is to hide the antenna cable in the wall and run it to the location of the TV.
TV socket installation should be done away from the signal source – an antenna or splitter. The cable for the socket is best laid in a baseboard in a special cable channel. TV socket installation in an installed box should be done with at least 10 cm of extra cable. Otherwise, the installation of an antenna socket is similar to that.
For the same reasons, it is also advisable to install an RJ-45 network socket. The process of installing a network socket is similar. When connecting the network socket, it's important to insert the wires into the slots of the socket according to their color coding and crimp them by snapping the tabs.
Installing a Telephone Socket
Instructions for installing a telephone socket:
IMPORTANT! All work should be performed wearing protective gloves!
Rules for Installing Socket Outlets Depending on Wall Material
For installing internal sockets, a hole of the appropriate diameter is first created for placing socket base plates or socket boxes. The socket is then mounted on spring clips.
In any case, it is forbidden to run electrical wiring openly in wooden houses, and when concealed, cables should preferably be placed in flexible conduits or metal sleeves.
IMPORTANT! Socket outlets in concrete, brick or GVL walls are secured with anchors or nails, while in wooden walls, they are installed with screws or nails.
Installing Socket Outlets and Switches
Installation standards for socket outlets and switches differ depending on the material of the walls.
The European standard specifies that socket outlets and switches should be installed no higher than half a meter above the finished floor level. However, placing elements at a height of 1.5 meters or more above the floor level, which is familiar to Soviet-era residents, is also not prohibited.
Socket outlets and switches can be installed by inserting the wire into a screw terminal and turning it inward (overzealousness may crimp the cable, spoiling the entire job), or by inserting the wire into corresponding slots on the switch housing (this type of fastening is characteristic of most modern European electrical goods).
IMPORTANT! The switch must be installed in the live wire circuit. Otherwise, fire safety rules will not be followed.
According to SNiP (Building Codes), the installation height of switches should be:
- in schools or preschool institutions, and any room where children spend time switches should be installed at a height of 1.8 meters from the floor level;
- in other rooms, installation at a height of 1.5 meters from the floor is allowed.
Switches should be installed on the side of the door handle.
Socket outlets should be installed according to these rules:
- in schools and any other children's institutions – at a height of at least 1.8 meters from the floor;
- in food service or retail establishments – no higher than 1.3 meters from the floor;
- in other public buildings and residential rooms, the socket outlet height is chosen solely based on residents' preferences to ensure convenient connection of electrical appliances.
External Socket Outlet
For outdoor installation, a socket outlet must meet the following criteria:
- The cable to the socket outlet must only be run concealed;
- The socket outlet must meet the water protection standard IP65 or higher (where 6 indicates complete dust protection and 5 indicates protection against water jets);
- It must be equipped with a special protective screen.
The installation height of an external socket outlet is highly individual.
Installing Double Socket Outlets
Installing double or even triple socket outlets is advisable based on the number of household appliances in use.
To install such a socket outlet, follow the detailed video instruction provided below.
VIDEO. Installing a Double Socket OutletVIDEO. Installing Socket Base BoxesPhoto Instructions on Installing a Socket Base Box for a Power Outlet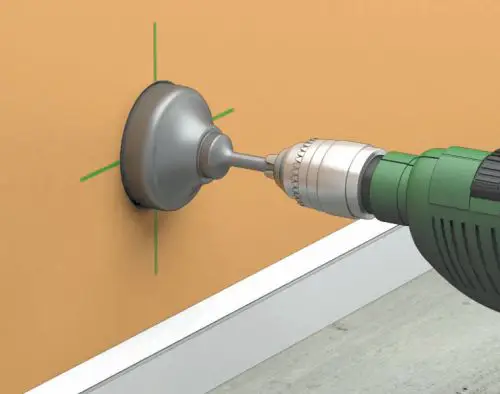
Photo 1 — Cut a hole in the wall with a coring tool for concrete
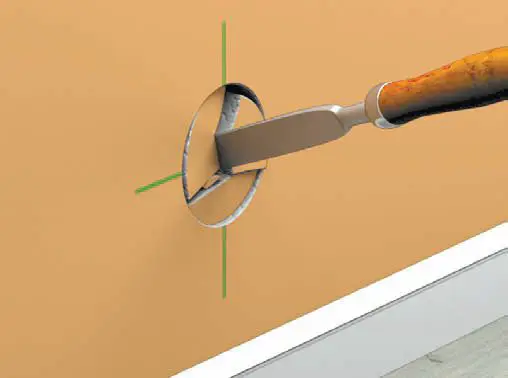
Photo 2 — Break off pieces of concrete
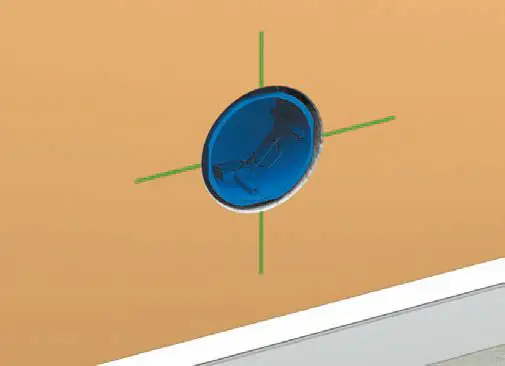
Photo 3 — Fit the mounting box to the hole
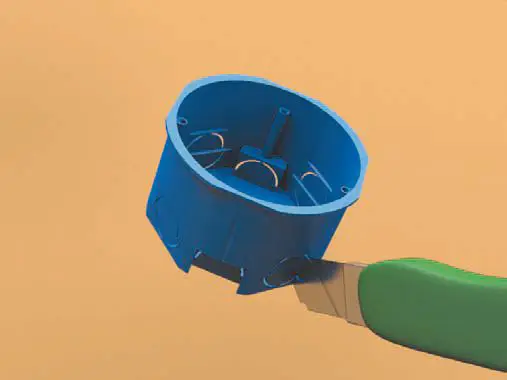
Photo 4 — Cut holes in the mounting box for wiring
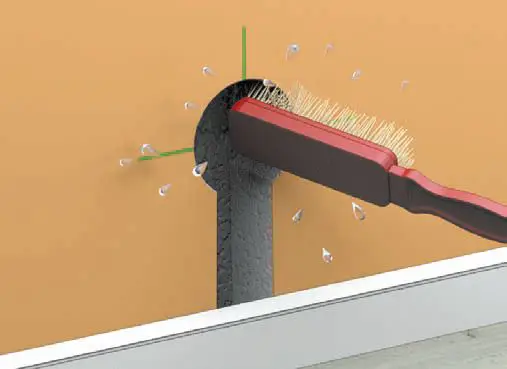
Photo 5 — Clean the hole of dust and apply primer
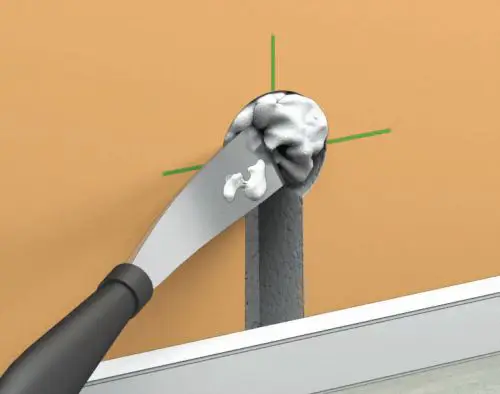
Photo 6 — Cover the inside of the hole with plaster
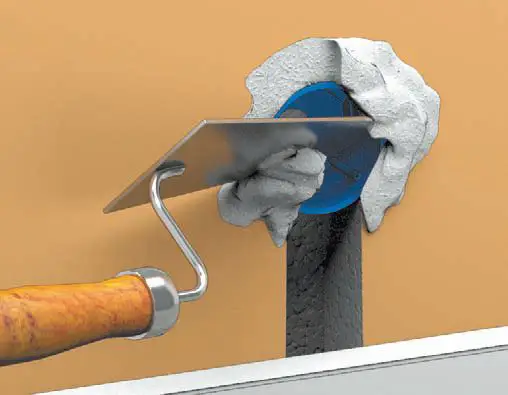
Photo 7 — Coat the box with plaster, remove excess with a trowel
$ Installing Socket Outlets: Cost of Work
If discussing apartment renovation and replacing socket outlets/switches, the comprehensive work for a one-bedroom apartment will cost approximately $450–$500, and for two- or three-bedroom apartments – from $750.
Single job variant:- installing an European socket for the stove – $10–$15;
- installing a computer network socket – $5–$10;
- installing an RCD – $10;
- installing a socket outlet – $12;
- installing a switch – $15–$20.
The cost of installing a socket outlet may vary depending on whether the box needs to be equipped, new cable run is required, wall material, and other factors.
The cost of installation when hiring workers should be agreed upon in advance, as well as the list of required works (including costs for grooving, electrical trunking installation, purchase of accessories, and cleaning of the premises).
Installing Electrical Socket Outlets:Kyiv:
- 30 UAH per unit (socket installation, price without replacing boxes)
- 70 UAH per unit (socket installation, price with replacing boxes and brick walls)
- 55 UAH per unit (socket installation, price with replacing boxes and gypsum board walls)
- 100 UAH per unit (socket installation, price with replacing boxes and concrete walls).
Moscow:
- 250 rubles per unit (socket installation, price without replacing boxes)
- 600 rubles per unit (socket installation, price with replacing boxes and brick walls)
- 500 rubles per unit (socket installation, price with replacing boxes and gypsum board walls)
- 800 rubles per unit (socket installation, price with replacing boxes and concrete walls).