Electrical Wiring in a House by Yourself
Connection Scheme
Home wiring starts with a detailed plan. The electrical wiring scheme is needed for several reasons: it allows calculating the amount of material:
Connection Scheme
Home wiring starts with a detailed plan. The electrical wiring scheme is needed for several reasons:
- it allows calculating the amount of material: how much and what cables are needed, with which cross-sections, how many sockets, switches, distribution boxes;
- determines the locations of power and electrical installation elements;
- necessary for future maintenance and repair of concealed wiring.
IMPORTANT! It is practically impossible to install wiring, especially concealed wiring, without a scheme!
A single-line schematic and a scale plan of an apartment or house, with distribution groups marked on it, are necessary for subsequent quality wiring installation.
Both in a house and an apartment, there is usually an incoming and internal electrical panel. From the latter, lines are drawn to rooms.
The main groups into which consumers can be divided:
- sockets;
- lighting;
- powerful appliances;
- sockets and bathroom lighting;
- sockets and kitchen lighting;
- household buildings.
It is not recommended to connect all wiring to one group of points as it creates too much load.
When preparing schemes, the planning includes protective devices such as Residual Current Devices (RCDs), which are installed on each distribution group.
The electrical wiring scheme depends on the planned location of household appliances and their power, which determines the number and placement of sockets and required cable cross-sections.
The electrical wiring scheme in a house and the electrical wiring scheme in an apartment differ only by the way electricity is introduced: in a house it comes via overhead lines, while in an apartment it comes via cable from the panel on the floor. The wiring scheme in a garage may involve electricity introduced from a centralized power transmission line or from the house via overhead or underground methods.
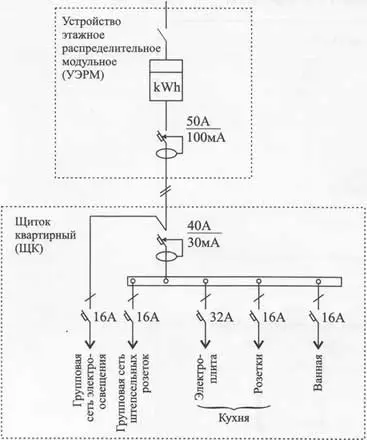
Scheme 1 — Schematic Diagram of Electrical Wiring in an Apartment
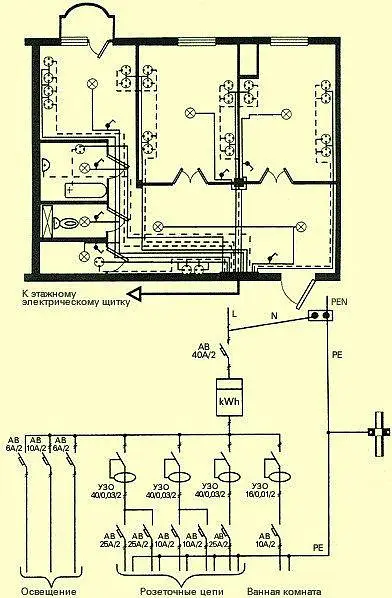
Scheme 2 — Plan and Schematic Diagram of Electrical Wiring in a House
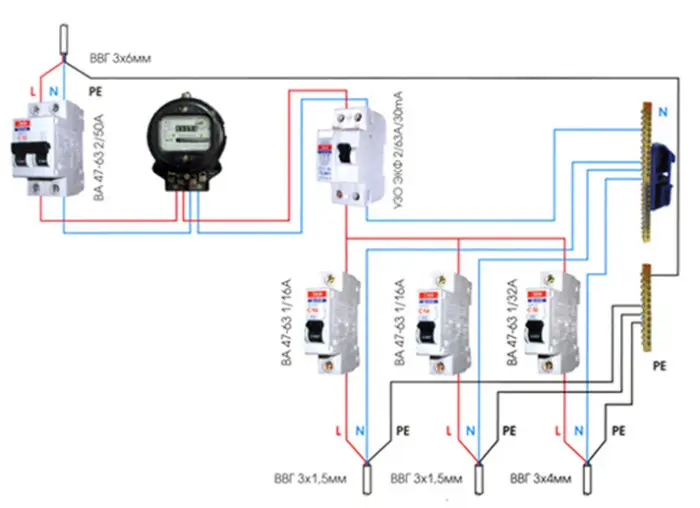
Scheme 3 — Electrical Wiring in a Garage
Electrical Wiring in an Apartment
An apartment is usually made of concrete or brick walls, covered with plaster or finished with gypsum board.
Electrical wiring in an apartment can be concealed or combined.
There are many options: wiring can be installed before plastering and then covered with plaster, electrical wiring in an apartment can be done by grooving the plaster, installed in cavities behind gypsum board and so on. For wiring installation, tubes, PVC corrugated pipes or flexible metal conduits are used, open wiring is usually installed in cable ducts and so forth.
There are specific rules and tips to help perform electrical wiring in an apartment properly.
To ensure safety, circuit breakers are installed in the distribution board to protect appliances from short-circuit currents and overloading, and Residual Current Devices (RCDs) that disconnect consumers during voltage surges. Separate RCDs are recommended for the bathroom due to increased humidity.
There are specific features in installing wiring in a bathroom: distribution boxes should not be located there, and it is undesirable to place switches inside. It is acceptable to install sockets. For wet rooms, waterproof electrical installation devices with grounding must be selected.
Wiring layout is marked according to strict horizontal and vertical lines. Power supply lines should not intersect each other. The route must always run parallel to a wall. If wiring is installed under the floor, the route should be at some distance from the wall.
Today in new apartments, copper wiring is mainly used – it is more durable than aluminum wiring remaining in most old apartments.
The cross-section of the cable should not be less than 2 mm² and is always chosen larger than the calculated one, which depends on the planned load on the network. The allowable current density for copper wire should not exceed 8A/mm². Different distribution groups require cables with different cross-sections.
Cables passing through cavities must be protected with tubes, conduits, or corrugated pipes.
Installing wiring using metal pipes and flexible conduits, PVC corrugated pipes ensures that the wiring can be replaced without damaging the finish.
All cable connections should only be located in distribution boxes, and there must be access to them so that any necessary adjustments can be made. Cable connections can be done by soldering or using terminal blocks.
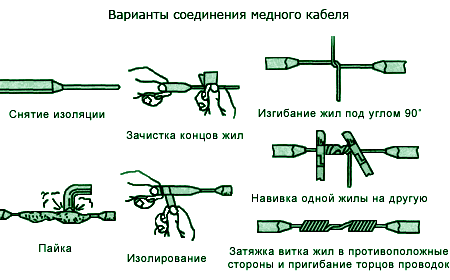
Scheme 4 — Copper Cable Connection Method
Cable fixing and mounting boxes for sockets and switches are installed using plaster or mortar.
There should be at least one socket per 6 sq. m throughout the apartment. In rarely used rooms such as corridors, 1-2 sockets are sufficient. On the kitchen, it is preferable to install several groups of 3-4 sockets (depending on the number and placement of appliances). Installing an extra socket can protect you from the inconvenience of using extension cords and associated dangers.
It is recommended to use sockets and switches with copper contacts and ceramic internals.
The placement of sockets and switches is not strictly regulated, but sockets should be placed at least 30 cm from the floor for safety reasons. Switches can be placed at any convenient height for arm reach.
If summarized, to carry out wiring installation in an apartment, one needs: knowledge, detailed electrical wiring schematics, RCDs, circuit breakers, cables and copper wires of various cross-sections, plastic or metal distribution and mounting boxes, corrugated pipes, conduits or metal conduits for cable installation, screws, anchors, nails, mounting elements, switches and sockets.
One of the well-known manufacturers of electrical installation equipment is French Legrand. For installation, gloves for protection, voltage indicators, angle grinder or hammer and chisel for grooving, a drill, screwdrivers, wire cutters are needed.
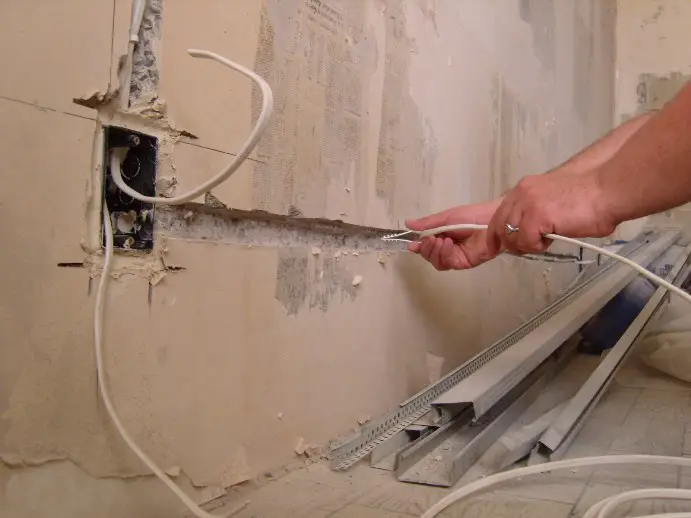
Photo 1 — Installing Electrical Wiring in an Apartment
Electrical Wiring in a Wooden House
Installing electrical wiring in a private house is done according to the same principles as in an apartment. However, electrical wiring in a wooden house has its own specificities. Due to the fact that the foundation of a log cabin is flammable, special safety measures are required for installing electrical wiring in a wooden house. Some use cables through PVC corrugated pipes, but this is not in compliance with PUE. Installing wiring by oneself in a country house should be done:
Naturally, the rules are quite strict, and installing such wiring, for example, on a dacha, seems unnecessarily labor-intensive and expensive. But safety comes first.
Another step in ensuring the safety of a wooden house is installing a differential relay or RCD.
Electrical network distribution can be done in the traditional way: open wiring is mounted on porcelain insulators, with a gap between the cable and wood – the wires do not touch the walls or ceilings. Probably, this is the only relatively safe and code-compliant method of installing open wiring on combustible structures. Given the openness of the wiring, one should carefully select the cable.
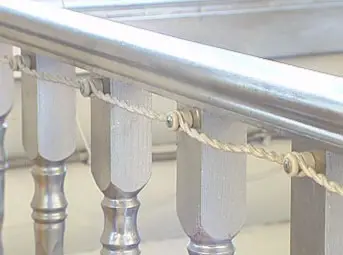
Photo 2 — Traditional Open Wiring in a Wooden House
Electrification work in the house should be carried out in full scope, not in parts, and must be completed before installing floors, ceilings, and doors.
It all starts with bringing the cable into the house from the centralized power transmission line or external distribution panel, according to the scheme, distributing wires through rooms, installing an internal distribution panel, preparing holes for switches and sockets. After completing the finishing works, all devices are installed.
Installing electrical wiring in a bathhouse or sauna has additional difficulties: apart from the flammable base, there is a humid environment and a stove.
- Cables with double insulation, moisture-resistant and heat-resistant are used, and connections are made only using terminal blocks.
- Wiring should not be installed above the hearth.
- Switches and sockets should not be placed in wet rooms. They can be in the vestibule and must have a protection level of at least IP-44. Requirements for light fixtures are even higher.
- Grounding, lightning protection, and installation of RCDs are mandatory.
When installing wiring in a garage, one should also remember about safety measures. Cables are run through grounded metal conduits and pipes, hermetic light fixtures and switches are installed, etc.
Wherever cables are installed, the color of electrical wiring matters. According to point 2.1.31 PUE, electrical wiring must ensure easy recognition of conductors along their entire length by color:
- blue color – for marking the neutral working or mean conductor of the electrical network;
- green-yellow color combination – for marking the protective or neutral protective conductor;
- green-yellow color combination along the entire length with blue markings at the ends of the line, applied during installation – for marking the combined neutral working and protective conductor;
- black, brown, red, violet, grey, pink, white, orange, turquoise color – for marking the phase conductor.

Photo 3 — Cable Color Coding
Repairing Electrical Wiring
Most often, the question is not about how to do it but how to replace the wiring. Repairing electrical wiring can be full or partial.
Since most of the wiring in apartments and houses is concealed, to replace all or part of the wiring, one must find the routes. To do this, one can use an electrical wire detector – such devices are produced by both domestic and foreign manufacturers. To find the places where wiring is installed under plaster, one should move such a scanner along the wall – with a strong sound or light signal, it will indicate the route.

Photo 4 — Universal BOSCH D-TECT 100 Scanner
When replacing old aluminum wiring, it is better to either not touch it at all or replace it completely throughout the living space. This is due to the fact that aged aluminum is unreliable and fragile, oxidizes quickly, its insulation deteriorates, and the reaction between new copper wires and old aluminum wires destroys the contact.
Repairing electrical wiring is often associated with connecting copper and aluminum wires. This includes partial replacement of old wiring with new, and connecting the incoming aluminum power cable to copper wires. Such connections cannot be made by twisting according to the above-mentioned reasons. For these purposes, terminal blocks and wire nuts are used.
Terminal blocks for wiring are one of the most effective methods for connecting copper and aluminum wires. The most popular terminal blocks for different types and cross-sections of wiring are produced by the company Wago. The material from which their contacts are made and special coating prevent oxidation of dissimilar wires.
Cables inserted into the terminal block are secured by spring clamps. Terminal blocks of another type – screw-type – are not suitable for aluminum wire connections as they damage such wires.
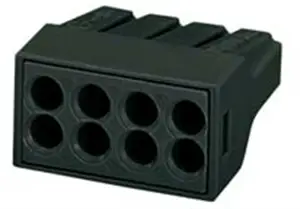
Photo 5 — WAGO Mounting Terminal 8x1.0-2.5 (Copper + Aluminum)
The type of connection to use in rooms with many electrical appliances, for example, on the kitchen, depends on the network load, cable cross-sections, and material of the cables, among other factors.
Video – Installing Electrical Wiring
$ Cost of Installing Electrical Wiring
As can be seen, installing wiring is not for unskilled individuals. Quality execution of electrical installation work is the guarantee of safety and peace of mind for homeowners. The cost of this type of work corresponds to its complexity. When planning a renovation, one should find out how much the material and installation cost of electrical wiring is.
Wiring in an apartment – the cost of replacing wiring in Moscow starts from 15,000 rubles. Wiring in an apartment – the cost of replacing wiring in Kiev starts from 3,000-4,000 hryvnia.
Each project is calculated depending on the room areas, required types of work, number of distribution boxes, sockets, light fixtures, etc. The material may be included in the cost or purchased separately.