Internal Walls from Gypsum Board — From Material Selection to Cladding
Gypsum board is one of the fastest ways to renovate a room. In addition, it's possible to level walls with gypsum board or clad walls for insulation, decorate walls with constructions of various forms and sizes, rebuild walls after demolition of old structures, provide additional sound or acoustic insulation.
Internal Walls from Gypsum Board or the Application Area of Gypsum Board Panels (GKЛ)
Gypsum board is one of the fastest ways to renovate a room. In addition, it's possible to level walls with gypsum board or clad walls for insulation, decorate walls with constructions of various forms and sizes, rebuild walls after demolition of old structures, provide additional sound or acoustic insulation.
The technology for cladding walls is diverse: gypsum boards can be attached to the wall using a standard method — securing with screws to a metal frame, or by gluing. In the end, gluing gypsum boards to walls is no less effective than the frame method.
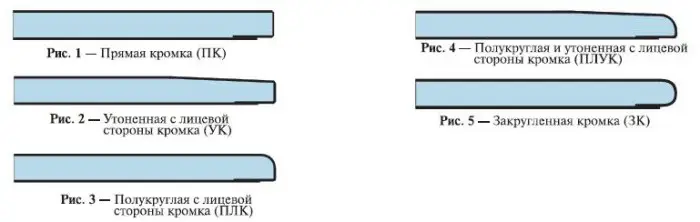
Photo 1. Gypsum board edge profiles (straight, narrow, semi-circular and rounded)
We'll consider making walls from gypsum board using materials from the German manufacturer Knauf, whose products are preferred by about 70% of our compatriots according to recent statistics.
How to Cover Walls with Gypsum Board: Instructions from the Manufacturer
This guide will help you properly level walls using Knauf panel and accessories from the manufacturer.
Which Gypsum Board Is Better for Walls
In work with walls, you can use:
- standard Knauf panels (GKL) — a material suitable for wall cladding in dry conditions;
- moisture-resistant Knauf panels (GKLV) — due to low moisture absorption, they can be used in rooms with both dry and humid conditions;
- Knauf panels with increased fire resistance (GKLO) — suitable for rooms with high fire hazard;
- moisture-resistant Knauf panels with increased fire resistance (GKLV) — combining features of the previous two types.
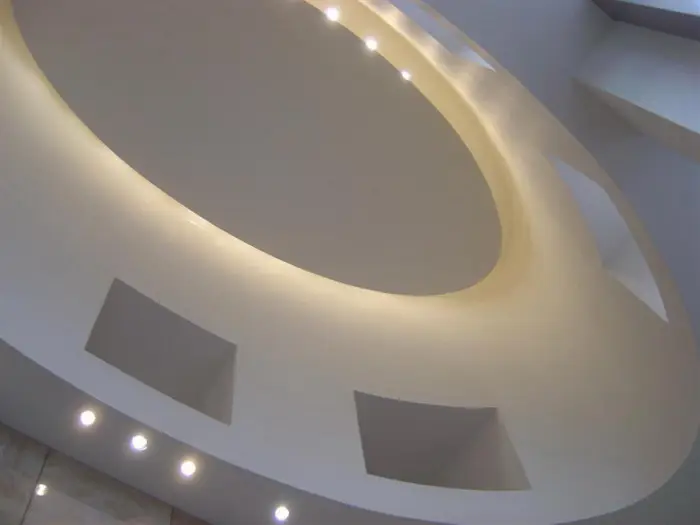
Photo 2. Wavy and round elements are often made from so-called arch-shaped gypsum board — its thickness does not exceed 6.5 mm, making it easy to bend without cracks.
Building Walls from Knauf Gypsum Board: Knauf Metal Profiles
Knauf profiles are galvanized, made from steel strip with a thickness of 0.55–0.8 mm (cold-rolled). These profiles are an essential part of forming cladding frames.
Frames serve as a rigid base for attaching gypsum boards.
The standard length of the profile is 2,750, 3,000, 4,000, 4,500 and 6,000 mm.
Knauf profiles can be cut with regular metal shears.
The table below lists the fasteners used in construction — screws and anchors.
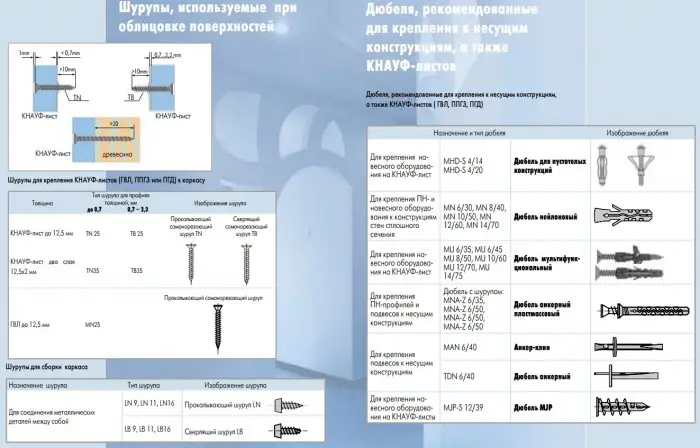
Photo 3. Fasteners used in construction
Cutting boards must be done on a flat surface: only the cardboard should be cut. After cutting, the board is placed at the edge of the work surface and broken along the cut line. Cardboard on the reverse side should only be cut after the gypsum is broken.
The edges are processed with a planing knife. Exposed edges should be covered or cut off with a sharp knife.
IMPORTANT! If the trimmed edges will form a joint, they must be prepped for skim coating: using a planing knife, remove a chamfer about 2/3 of the board thickness at a 22° angle.
We'll look at the frameless and framed methods of attaching gypsum board.
Frameless Cladding
The diagram below shows three main methods of frameless attachment of Knauf panels to walls.

Photo 4. Frameless wall construction from gypsum board
The methods listed above correspond to the initial surface unevenness:
- C611 A is used on surfaces with a tilt up to 4 mm;
- C611 B — up to 20 mm;
- C611 C — up to 40 mm.
The cross-sections of these methods are shown below (the example shows attachment to a brick wall), which will show the fastening system from inside.
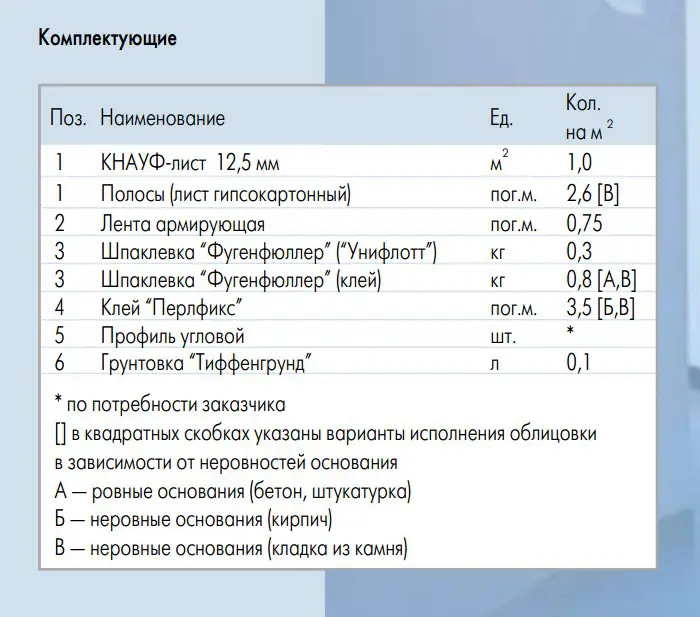
Table 1. Accessories for frameless attachment of panels
How to Build Walls Framelessly: Installation Sequence
It's possible to install gypsum board without a frame during finishing work, preferably in winter when heating is on and the temperature in the room remains constant.
IMPORTANT! Wall work should be done before floor finishing.
The length of the Knauf panel used should match the wall height.
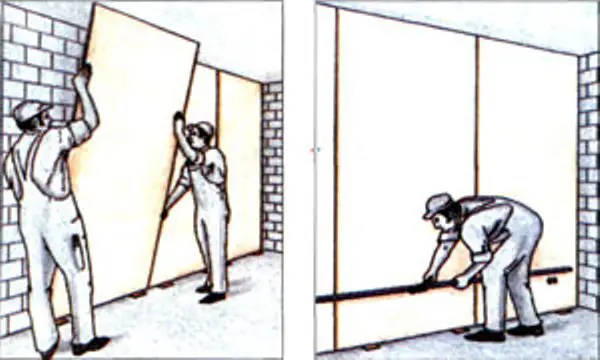
Photo 5. Attaching gypsum boards can be done in any room of an apartment — living room, children's room, hallway, etc., as the result is a strong and eco-friendly structure
General Wall and Material Preparation for Work
Determine the curvature of the walls and, based on the obtained data, choose one of three frameless methods for surface leveling.
Mark out the cladding on the floor (determine the position of panels relative to the walls of the room).
Using a plumb line, transfer the markings to the walls and ceiling.
Clean the wall to be clad of debris, greasy spots, and protruding irregularities (if it's a brick wall, remove and clean cement mortar from brick joints). After cleaning, dry the surface.
Wall priming should be done on a dry base with appropriate materials: only "Betonkontakt" primer is suitable for smooth and non-absorbent surfaces, while "Tiffengrun" and "Gundirmitte" primers are for hygroscopic surfaces.
Before assembling the structure, cut holes in the Knauf panels for outlets and switches.
IMPORTANT! If you plan to hang heavy items on the walls (e.g., a mounted cabinet or a heavy picture), the surface at the point of attachment should be additionally treated with adhesive.
Knauf panels should be kept 15 mm from the floor. The gap after installation should be sealed with Sanitarian-Silicon-type sealant.
At the junction of Knauf panels with side walls, a chamfer should be removed before installation for future skim coating.
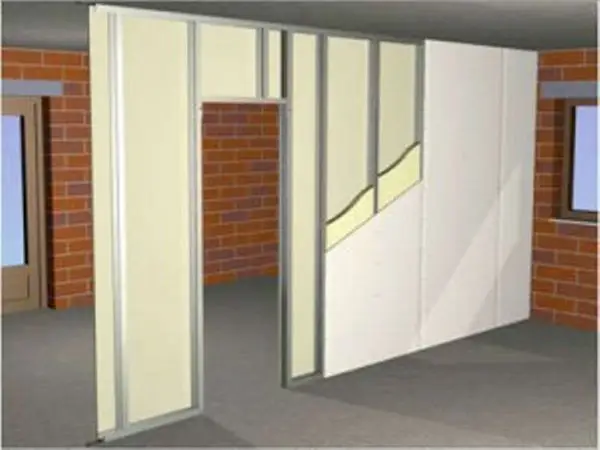
Photo 6. A false wall with a door (with metal frame)
Method C611 A
After wall preparation, mix the Fugenfugler plaster with water in the proportions specified on the label.
IMPORTANT! Plaster should be mixed by adding dry mixture to water, not the other way around!
After adding the dry mixture to water, wait about 2 minutes and then mix once. Do not use electric drills with special attachments; manual mixing is sufficient.
Plaster should be applied using a 12–14 cm wide notched trowel. Apply the plaster around the Knauf panel and along the centerline in one stripe (if desired, reinforce the panel with two central stripes).
After applying the plaster, lift the Knauf panel and place it on spacers, then press it against the wall. Check verticality with a level. Press the panel against the wall and smooth it with a straightedge.
If in places where one or more Knauf panels are attached to the wall, additional structures will later be mounted, then adhesive should be applied across the entire panel surface, not just point-by-point.
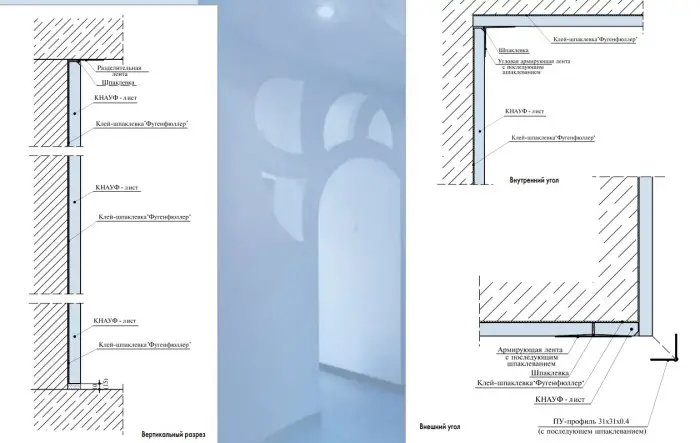
Diagram 1. Frameless attachment of gypsum boards — gluing on Fugenfugler plaster
Method C611 B
After wall preparation, mix the Perlfix adhesive with water in the proportions specified on the label.
IMPORTANT! The adhesive should be mixed with a drill equipped with a special attachment or a construction mixer.
Apply Perlfix adhesive to the Knauf panel in portions: all around the perimeter with minimal intervals, and also in the center of the gypsum board.
Attaching the panel to the wall is done in a similar way as described in paragraph 3 for C611 A.
If in places where one or more Knauf panels are attached to the wall, additional structures will later be mounted, then adhesive should be applied across the entire panel surface.
To make it easier to align the panel to the required level and even it out, install and align anchors with screws beforehand (on average, 4–6 wall "pickets" per Knauf panel).
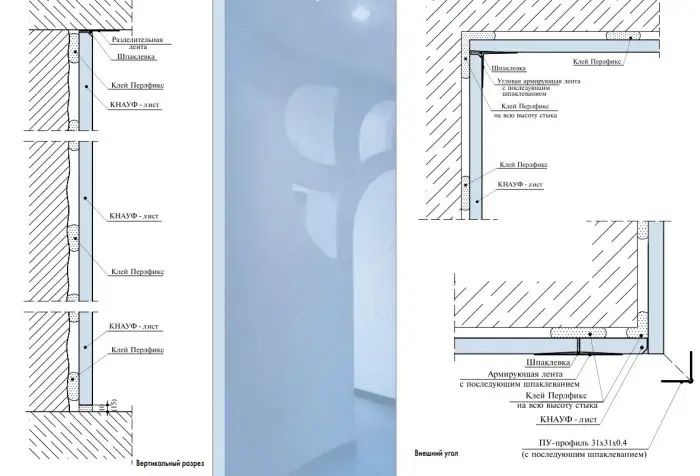
Diagram 2. Frameless attachment of gypsum boards — gluing on Perlfix adhesive
Method C611 C
This method can level very uneven inter-room walls and other surfaces. How to make a wall straight without using a metal frame?
After preparing the base surface in a way similar to that described for C611 B, attach strips cut from Knauf panels to the wall surface. Each strip should be 120 mm wide.
Attach the strips to the surface to be leveled so that the joints of the second row of panels fall in the center of the attached strips. Also, one strip should be positioned under the center of each Knauf panel in the second row.
After attaching the strips to the wall, level them to correct wall curvature.
After the Perlfix adhesive has fully hardened, apply Fugenfugler plaster to the Knauf panels in the second row using a method similar to that described for C611 A. Then attach the Knauf panel to the wall.
If in places where one or more Knauf panels are attached to the wall, additional structures will later be mounted, additional strips should be applied along the full height of the walls.
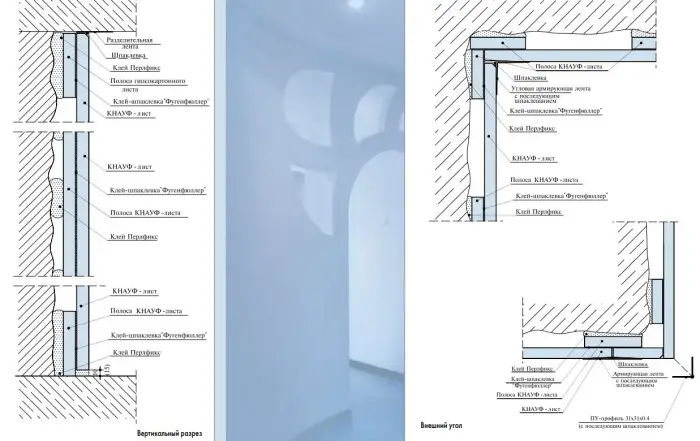
Diagram 3. Frameless attachment of gypsum boards — gluing Knauf panels on Fugenfugler plaster and strips
IMPORTANT! False walls from gypsum board, partitions, decorative walls with patterns, relief designs on walls, and any work involving door frames can only be done using a frame with metal profiles (as shown in the photo below). Walls can be leveled framelessly as well, and walls can also be extended if needed.
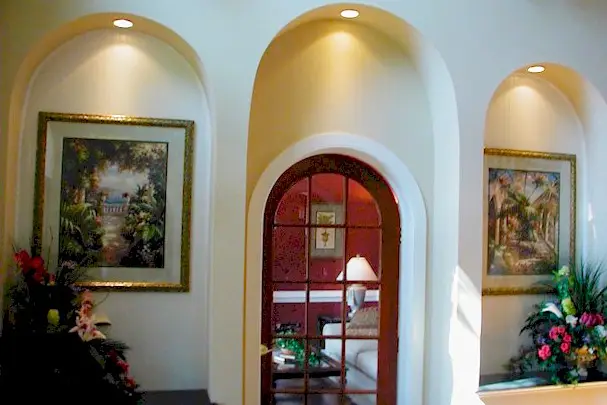
Photo 7. Organizing walls from gypsum board with backlighting can also only be done using a frame
Leveling Walls with Gypsum Board: VIDEO
Below are accessories for frame attachment of gypsum boards. In addition to the materials listed in the table, you will also need PP 60x27 profiles (profiles should be secured no more than 600 mm apart from each other).
IMPORTANT! It is not technically possible to build walls from gypsum board higher than 10 meters.
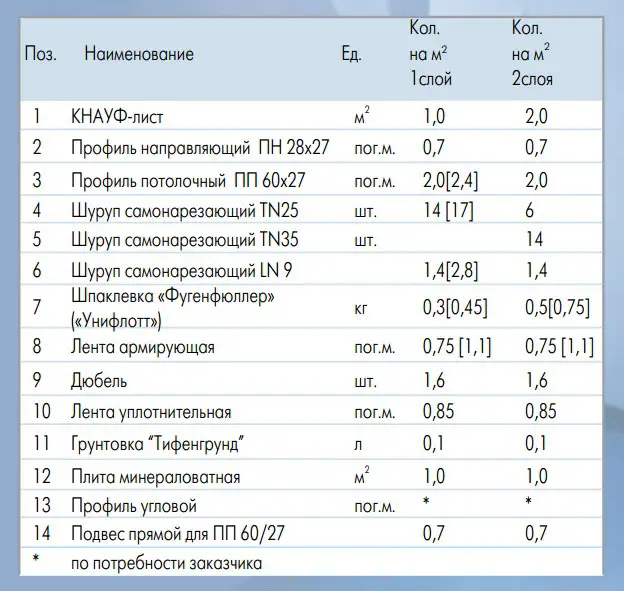
Table 2. Accessories for frame attachment of panels
Advantages and Disadvantages of Frameless Wall Leveling
This type of leveling can give you a completely flat surface in a short time. Cleaning after finishing work of this type is also quickly done (unlike standard plastering).
However, none of the three methods mentioned above provides wall insulation. To insulate walls, you need to build at least a frame for one-sided gypsum board cladding.
The frameless method is also disadvantageous in that channels for utilities cannot be hidden behind the gypsum board panel, but it saves space for leveling: if building a frame takes at least 7–10 cm, the frameless method will occupy no more than 3–5 cm.
IMPORTANT! Before finishing with a finish material (e.g., wallpapering, tiling, painting), GKL panels must be fully skimmed. It is a mistake to skim only the panel joints and screw holes.