Installation Guide for Toilet, Complete Step-by-Step Manual
Toilet Installation Guide
If you decide to install a toilet, you will need a manual, preferably visual. A detailed guide on how to install a toilet will help you complete this procedure.
Before starting the installation of a new toilet, you must remove the old one.
The rules for removing a toilet are simple:
- shut off the water supply (by yourself or with the help of plumbers);
- unscrew the cold water supply pipe;
- remove or break the toilet mounting bolts to the floor;
- tilt the toilet backward to drain remaining water;
- detach the toilet from the drainage outlet.
Selecting a new sanitary fixture is not a problem, given the wide variety of toilets available today. For example, in the mid-range price category, a good manufacturer is the Spanish company Roca, which produces sanitary fixtures under the brands jika and roca.
You can now proceed directly to installing the new toilet.
General Installation Diagram
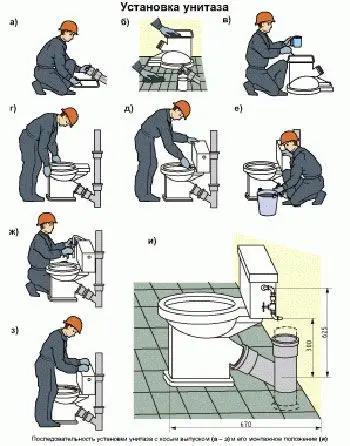
Photo 1 — General Installation and Mounting Diagram of a Toilet
IMPORTANT! According to standards set by GOST, the installation height of a toilet is 400 mm.
Installation Sequence of a Standard Set
Choosing the Location
You need to mark the exact coordinates for toilet installation. The easiest option is to install it in the same place as the old one. However, in new buildings or during apartment reconfiguration, it is necessary to choose the location carefully. This depends on how the drainage outlet is positioned, how far the water supply tap is from the toilet tank, and how comfortable it is for a person to sit on it.
IMPORTANT! After assessing the technical details, it is helpful to place the toilet in the intended spot and try sitting on it. This will help avoid future problems.
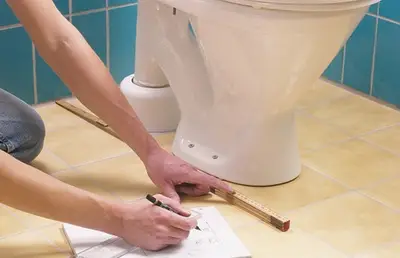
Photo 2 — Choosing the Location for Toilet Installation
Mounting the Toilet to the Floor
The installation on tiles is not complicated. There are two holes in the base of the toilet. After placing the toilet in its intended location, draw these holes with a pencil on the floor and leave the toilet in place. Then drill holes based on the markings, matching the size of the anchors included in the set. Insert the anchors into the holes in the floor, place the toilet in its designated position. Next, slide rubber washers over the screws included in the set, pass the screws through the toilet and carefully tighten them with the appropriate key into the anchors. To hide the heads of tightened screws, plastic caps are placed over them.
Another option is installation using silicone. The same process, but small wedges are placed under the base of the toilet and silicone is injected into the gap between the toilet and the floor. Then, fastening bolts are pulled through. This is the best option for installing a toilet on tiles or uneven floors (the tilt is corrected using silicone in the gap).
Another method of mounting is using adhesive. Epoxy adhesive is applied to the toilet base and installation area, then the toilet is aligned with the drainage pipe and pressed firmly against the floor. This method is suitable when it is not possible to drill holes, for example, when installing on a heated floor.
If the installation is done on a wooden floor, a wooden shim or rubber垫 is placed between the floor and the toilet.
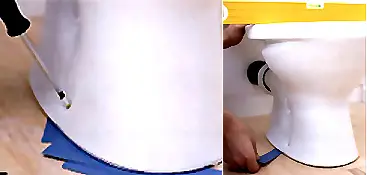
Photo 3 — Installing a Toilet on a Wooden Floor Using a Rubber Underlayment
Connecting to the Sewer System
To connect the toilet to the sewer system, various types of adapters are used. The most popular ones are flexible hoses (gofer). These are convenient due to their elasticity – stretching or compressing them allows achieving the necessary length for connection. One end is slipped over the toilet outlet, and the other is inserted into the stack fitting, with the joint optionally sealed with sealant. Other methods are also possible.
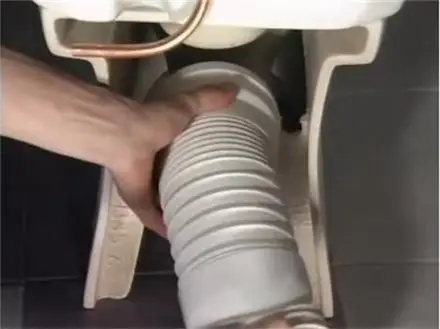
Photo 4 — Connecting a Toilet to the Sewer System Using a Flexible Hose
Installing the Tank on the Toilet
After choosing a location, prepare the toilet for installation – assemble it by connecting the toilet bowl and the flush tank. For this, a rubber gasket is placed around the drain hole on the toilet bowl, and the tank is placed on top of it. The holes in the bottom of the tank must align with those on the toilet bowl. Then, washers and conical rubber gaskets are placed over the bolts included in the set, and the bolts are threaded through the tank and toilet; nuts are tightened onto the bolts, placing washers underneath.
IMPORTANT! The nuts must be tightened carefully and slowly to avoid damage. After slightly tightening them, pour a small amount of water into the tank: if there is no leak anywhere, then no further tightening is necessary. The installation of the tank on the toilet is now complete.
At the same time or after connecting the water supply, proceed to install the toilet seat and lid, securing them with special bolts into designated holes in the toilet.
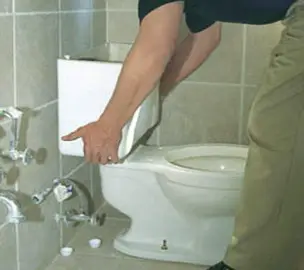
Photo 5 — Installing the Tank on the Toilet
Connecting Water to the Tank
Inside the tank, install the water supply system included in the set with a connector into the appropriate hole and secure it externally with a nut. Then, connect the connector to the water supply valve with a flexible hose.
IMPORTANT! When installing, remember:
- drain the water and check that all connections are tight and there is no leakage anywhere. If there is a leak, re-install the relevant parts or seal the joints with silicone;
- check with a level whether the installation is correct. If there is a tilt, adjust it by placing shims or filling the gap between the floor and toilet with tile adhesive, silicone, or similar materials.
Video: Installing a Toilet by Yourself
Installing a Toilet Installation Kit
There are various types of toilets, one of which is toilets with an installation kit. The main manufacturers of these fixtures are Grohe, Geberit, and Cersanit. However, installing such a kit will require a significant investment: for example, a Grohe frame costs about 2000 UAH in Kyiv or 8000 rubles in Moscow. Installation of the kit often costs as much as the toilet installation or even more. Therefore, installing the toilet installation kit by yourself, that is, an integrated system that holds the toilet and hides all the pipes, can be a way to save on the family budget.
Video: Installing a Toilet with an Installation Kit
Installing a Wall-Hung Toilet
Installing a wall-hung toilet differs from installing a regular one in that it requires the previously mentioned installation kit.
$ Cost of Installing a Wall-Hung Toilet
The total cost of such installation in Moscow is approximately 4150 rubles (2900 – console, 1250 – toilet), in Kyiv from 850 UAH (450 – console, 400 – toilet).
Installing the wall-hung toilet installation is an additional and somewhat laborious step, but it can also be done by yourself. There are various types of installations: wall-mounted, floor-standing, and corner (mounted in a corner or at an angle to the wall).
A typical installation guide for a wall-mounted toilet is as follows:
- marking and drilling holes for anchors, securing the module: align the module with the wall, adjust it to the toilet installation height (400-450 mm), mark the attachment points for brackets, drill and secure the module;
- connecting the built-in tank directly to the pipes or using a flexible hose to the water supply, setting up the sewer drain;
- screwing in the mounting studs for the wall-hung toilet;
- finishing: covering the frame with gypsum board, tiling it (leaving openings for access to the tank and flush button);
- hanging the new toilet: similar to mounting a freestanding toilet, connect the drainage outlet and water inlet with the corresponding outlets of the module. Then, tighten the nuts on the studs, and cover the mounting with special caps.
Video: Installing a Wall-Hung Toilet
The cost of toilet installation varies depending on the type of plumbing and the scope of work involved. It can be done independently (as discussed above), or it can be ordered from a professional.
$ Cost of Toilet Installation by Different Contractors
The price starts at approximately 150 UAH in Kyiv and 1850 rubles in Moscow.
Most pricing lists include a minimum price for the simplest installation. For example, on a website where toilet installation costs 1850 rubles, the assembly cost is listed separately and costs an additional 300 rubles. Therefore, it is better to inquire directly from the service providers about the actual cost in a specific case.
It is even more convenient to buy a toilet with installation included, so the delivery and installation of the toilet will be handled by the plumbing supplier – no need to find a plumber separately. If the sale and installation are handled as a single package, then the installation costs may be slightly lower than when ordered separately.