Installation Guide for Bathtubs: Hydro-Massage, Steel, and Plastic Bathtubs
Installing a bathtub yourself
Let's start with choosing a bathtub
- Casting bathtub. A bathtub made of cast iron has the best heat retention properties and the longest service life—guaranteed up to 25 years! Also, it is very stable due to its considerable weight. If you want to install such a bathtub yourself, you will definitely need help.
- Akryl bathtubs. The main advantage of an akryl bathtub is its weight (on average, it's about 20 kg). Additionally, these are 'quiet' bathtubs—when filling with water, compared to bathtubs made of other materials, akryl bathtubs are not as noisy. Plus, they're cheaper and come in various configurations.
- Steel bathtubs. These bathtubs are both lightweight and inexpensive. However, their list of advantages ends there, and the list of disadvantages begins: such bathtubs do not retain water temperature, and they don't last as long as akryl or cast iron bathtubs.
After measuring the room, decide on the shape, budget for the project, and go shopping!
Manufacturers: Leading manufacturers on the market offering quality products at reasonable prices are French brands JACOB DELAFON and PORCHER, and also the Spanish company RОСА can be considered based on price/quality ratio.
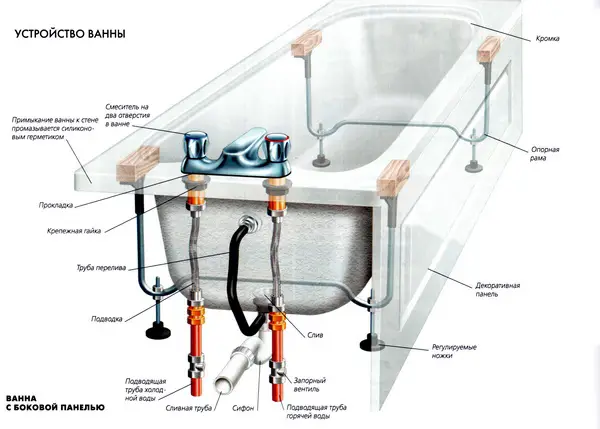
Photo 1 — Bathtub Design
You will need:
- hammer;
- angle grinder;
- screwdrivers;
- chisel;
- gas key #2;
- cement mortar;
- sealant;
- foam mounting tape;
- potential equalizer;
- oil paint;
- insulation tape.
Also:
- bathtub fitting;
- overflow pipe;
- drain pipe (d=40 mm);
- rubber gasket (40x50, in case of installing cast iron pipes) or drain pipe (d=50 mm for plastic pipes).
Removing the old bathtub
Cast iron. The most important thing in removing a bathtub is to remove the drain. A plastic drain can be broken or disassembled. If it's a cast iron drain, break the drain rim and the overflow nut from the front side of the bathtub with a chisel and hammer. Remove the tub feet from your side, asking a helper to hold the side of the bathtub. Then carefully place the tub on its side together: all done—time to remove it. There is also a more radical option: you can simply smash the tub. But this is a noisy and dusty job with a high risk of cuts from sharp shards.
Steel. You must not smash such a bathtub, and in other respects, the removal conditions are the same: the fittings on steel bathtubs are usually made of plastic, so you shouldn't have any problems with their removal.
Akryl. On such bathtubs, there is a new type of plastic fittings: they are easy to unscrew and remove.
Preparatory work
- If necessary, clean the drainage in the bathroom. If your home has steel or cast iron drainage, clean the drainage outlet to metal and cover it with a cloth.
IMPORTANT! Plan the bathtub installation system: you should easily be able to connect the waste pipe and cold/hot water taps to it.
- Connect the siphon, overflow pipe, waste pipes, and a tee to the appropriate communications.
- Assemble the fitting according to the instructions (included with each set). The most important part here is to correctly position the conical rubber gaskets at the fastening points. All connections should be treated with sealant. The drain pipe should not be connected yet.
If the bathroom drainage:
- plastic (standard d=50 mm), insert the drain pipe into the outlet;
- cast iron, first insert the gasket into the outlet, then the drain pipe;
- steel, wrap the drain pipe with tape on the side it should enter the outlet.
IMPORTANT! During bathtub installation, all connections must be treated with sealant. If the drainage is steel or plastic, the connection points between the outlet and the drain pipe should be covered with plastic tape. For insulating the bathtub, you will need one or two reels of tape.
Installing a steel bathtub
- Bring the bathtub to its installation location.
- Tilt the bathtub on its side and secure the rear legs.
- Lower the bathtub, lifting one side from the floor, and install the remaining two legs. The bathtub should not wobble after installation.
IMPORTANT! All modern bathtubs have adjustment mechanisms. These can be used to adjust the bathtub position. If your model doesn't have such adjustments, you can center the bathtub by driving a stopper nail into the mounting base of the feet.
Move the bathtub close to the wall and treat the remaining gap with foam mounting tape. After the foam dries and excess is trimmed, this area in most cases is simply covered with water-resistant paint, tiling, or decorative plastic edging.
You can install the bathtub on bricks (they can be laid from both sides of the room walls and along the perimeter of the bathtub). This is a reliable method that allows easy adjustment of the installation height. In any case, the bathtub must be installed strictly level.
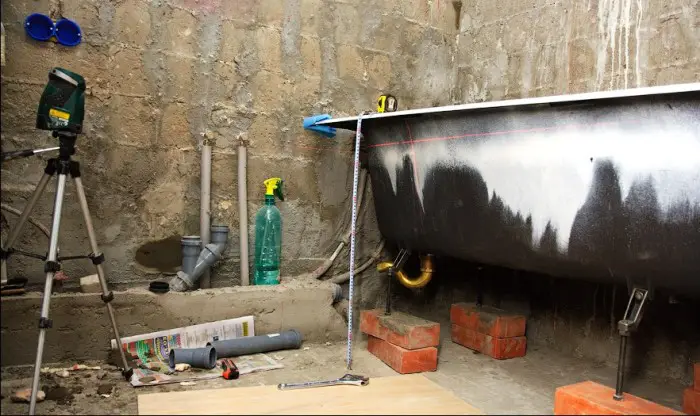
Photo 2 — Leveling the bathtub on bricks for higher installation
During installation, the bathtub must be grounded either by standard means—by running an isolation wire from the bathtub to metal communications in the room—or more safely by using industrial grounding designed specifically for bathtubs. The so-called potential equalizer is attached to a special mounting point on the bathtub on one side, and to the water pipes on the other. The purpose of the equalizer is to protect a person from static electricity that forms when water drops hit the bathtub surface.
IMPORTANT! Grounding of a steel bathtub must be done by an electrician. Doing it yourself can end badly.
- Wipe the drain/overflow holes dry.
- Attach the pre-assembled and sealed with sealant at joints fitting to the bottom of the bathtub. The fitting caps are secured from the front side of the bathtub. Tighten the mounting bolts fully.
- Connect the fitting and drain pipe through a conical gasket, with the cone point directed towards the fitting. Tighten the nut.
Installation is complete.
IMPORTANT! Cover the drain hole with a plug, fill it with some water and check for leaks under the bathtub. If the plug is closed but there's a leak, you incorrectly connected the drainage unit to the bathtub—i.e., the gasket is not installed correctly. If there's no leak, drain the water and tighten the fitting nut if necessary.
Under the fitting, after drying the floor under the bathtub and the fitting, place toilet paper in several layers. Fill the bathtub with water at least halfway and drain it. Is the paper still dry? Congratulations! You did everything correctly, and the installation is complete!
Installing a steel bathtub is similar to installing a cast iron one. The only difference is the higher effort required for installing the cast iron item due to its greater weight.
IMPORTANT! Due to relatively low weight, a steel bathtub can be mounted in an unconventional way—by fixing it in a suspended state on angle brackets. If you bought a bathtub without feet, this method not only frees up space under the bathtub but also adds an interesting look to the room. Mounting the bathtub on angle brackets is a truly robust solution. For medium-sized steel bathtubs, a 25 mm metal angle bracket secured to the wall with dowels and screws will suffice. On tile at the junction of the bathtub and the wall, a special plastic plug is then mounted, and the joint is treated with sealant.
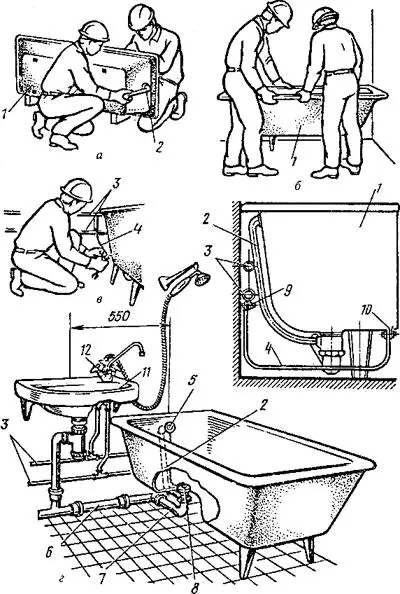
Photo 3 — Sequence of bathtub installation and its mounting position
Photo 3: 1 - bathtub; 2 - overflow pipe; 3 - water supply; 4 - potential equalizer (wire); 5 - overflow; 6 - drainage connection; 7 - water trap; 8 - discharge; 9 - clamp with bolt; 10 - grounding mount; 11 - washbasin; 12 - mixer.
Waterproofing
Thoroughly seal the joints between the bathtub and walls with silicone, or use a sealing tape, polyurethane mounting foam, diluted cement, tile adhesive, or for large gaps between the edge and wall, use a sealing material (tape) and cover it with sealant on top.
Installing a Hydro-Massage Tub
Installing a bathtub with hydro-massage is done following the same basic principles as standard bathtubs. The difference lies only in the need to mount hydro-massage elements and connect pipes to them.
Also, if the standard height is not enough, the installation height of a hydro-massage bathtub can be adjusted using a special platform—bricks won't do here.
When purchasing a hydro-massage bathtub, make sure the installation manual is included with the package, as each model requires its own system for connecting hydro-massage components.
Manufacturers: One of the most popular on the market is the product line from the Czech company RAVAK. The advantage of RAVAK bathtubs is that the warranty covers not just the bathtub but also its components. The manufacturer provides everything you need for installation when purchasing through a branded store or official website, from bathtub feet to mixers. Similar offers with a more limited selection are provided by companies CERSANIT, KALDEWEI, and KEROMAC.
Installing Plastic Bathtubs
There's nothing complicated about installing such bathtubs—installing one yourself will even be easier due to its low weight. However, when choosing a plastic bathtub, keep an eye out: taking advantage of the popularity of plastic, some manufacturers offer low-quality products. How to check if what you have is an original or a fake?
- A quality bathtub should not have any gaps. If the product has gaps, the manufacturer used a thin layer of plastic and such a construction won't last long.
- When gently pressing on the surface of the bathtub, there should be no play. A bend in the bathtub surface indicates one thing only—this is a fake, and it's better to avoid buying it.
- The product should be certified with a quality certificate, and the store should have documentation of partnership with the manufacturer.
IMPORTANT! Akryl bathtubs are mainly mounted on a special frame, and the mounting system is then hidden either behind tile cladding or special panels for bathrooms.
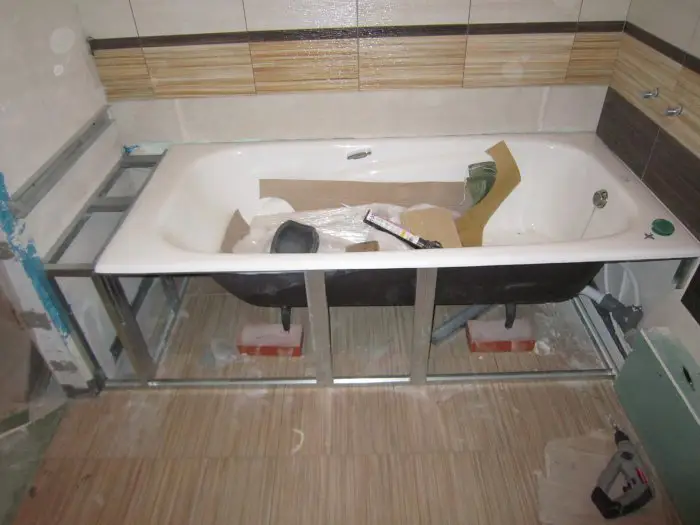
Photo 4 — Installing an Akryl Bathtub
Installing a Bathtub: VIDEO
$ Cost of Bathtub Installation
The cost of installing a new bathtub can depend on the prices of materials selected by you or the installer for installation (sealants, pipes), methods of bathtub installation (on feet or on brackets), the height of bathtub installation (whether a platform is needed or not), and the weight and type of bathtub.
Kiev — from 250 UAH for cast iron, from 150 UAH for steel and akryl bathtubs, from 450 UAH for hydro-massage ones;
Moscow — from 3,000 RUB for cast iron, from 2,000 RUB for steel and akryl bathtubs, from 4,500 RUB for hydro-massage ones.