Installing a Toilet Yourself. Complete Guide
Toilet installation guide
A toilet can be secured to the floor in three main ways:
- fixing the toilet to the floor with screws;
- attaching the toilet to a taft — a small wooden board slightly recessed into the floor;
- fixing the toilet with epoxy adhesive.
Ceramic toilets can be installed on tiles or concrete floors and secured using the methods described above. A sheet of rubber with a pre-drilled hole for the straight outlet pipe must be placed between the toilet and the floor. The method of attaching the toilet to a taft is only possible if it is embedded in concrete.
IMPORTANT! Shut off the water supply before starting the work! The removal of the old toilet must only be done after draining the water from the working area! The floor should be leveled if necessary before installation. Installing a toilet on an uneven floor is problematic and technically incorrect.
Toilet Installation Guide
A toilet can be secured to the floor in three main ways:
- fixing the toilet to the floor with screws;
- attaching the toilet to a taft — a small wooden board slightly recessed into the floor;
- fixing the toilet with epoxy adhesive.
Ceramic toilets can be installed on tiles or concrete floors and secured using the methods described above. A sheet of rubber with a pre-drilled hole for the straight outlet pipe must be placed between the toilet and the floor. The method of attaching the toilet to a taft is only possible if it is embedded in concrete.
IMPORTANT! Shut off the water supply before starting the work! The removal of the old toilet must only be done after draining the water from the working area! The floor should be leveled if necessary before installation. Installing a toilet on an uneven floor is problematic and technically incorrect.
You will need:
- impact drill (drill);
- concrete drills;
- adjustable wrench;
- bolts and anchors;
- Teflon tape;
- silicone caulk;
- flexible hose;
- flexible pipe;
- pencil.
Work procedure:
Mark the layout
Place the toilet in the intended installation area. Check the correct fit of the flexible pipe and the accuracy of toilet placement. Outline the toilet contour, as well as locations for drilling holes for mounting, should be marked with a pencil or marker.
IMPORTANT! The drilling marks must align with the ceramic holes for mounting on the toilet. It will be difficult to correct any curvature in the floor holes.
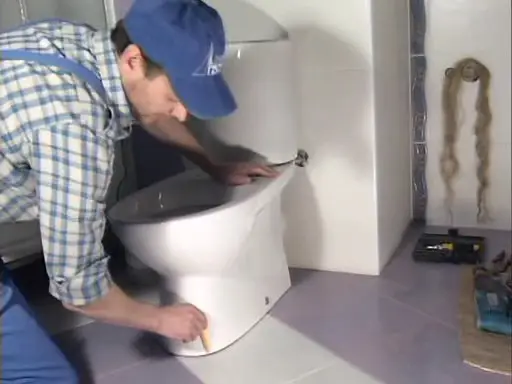
Photo 1 — Marking the floor
Drill holes in the floor
Move the toilet aside. Clear the holes of construction debris and insert plastic anchors into them.
IMPORTANT! If the toilet is installed on tiles, holes should be drilled in a non-impacting mode. The impact mode should only be used when the drill bit enters the tile surface. When mounting on a wooden floor, a rubber underlay of 5-15 mm thickness must be installed, and a mounting plate made from a solid board or thick plywood should also be installed. For warm floors with tile coating, toilets are installed using standard installation rules.
Install the toilet
Apply sealant to the floor surface where the toilet will be installed, applying silicone along the inner contour of the layout marking. Apply caulk to the floor in the same manner. Allow to cure. Apply sealant and caulk to the bottom of the toilet, then carefully position it in the installation spot, aligning strictly with the mounting points.
Connect the toilet to the sewage system
For this, align the gasket and the outlet hole of the toilet. The rubber gasket will ensure a tight connection between the drain and the sewage pipes. Connect the toilet to the sewage system using flexible pipe, securing the connection point with sealant.
IMPORTANT! To check the reliability and tightness of the system, you can pour a bucket of water into the installed toilet once the sealant has dried. If there are no leaks, it means everything was done correctly and the joints are properly sealed.
Secure the toilet with anchors
Insert bolts with small rubber washers. Tighten the bolts to pull the toilet towards the floor, calculating about two turns per bolt.
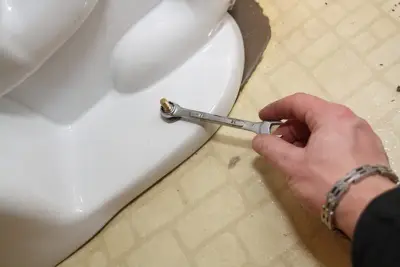
Photo 2 — Securing the toilet
Installing the Tank on a Toilet
Turn the tank upside down and place the gasket on the inlet hole. Install the tank, ensuring proper positioning of the outlet hole.
Place rubber washers on the mounting bolts, then insert each bolt into the corresponding holes in the toilet bowl and the siphon tank base. Secure the tank by tightening the nuts alternately. The tank should end up in a perfectly horizontal position.
IMPORTANT! The toilet installation process requires constant monitoring and checking the quality of each stage of the installation. Therefore, after installing the tank, fill it with water and check the drain seal. There should be no leaks!
Connecting the Toilet to the Water Supply System
It is better to choose reinforced hoses with threaded nuts for water supply.
- Connect the flexible hose to the pipe outlet, wrapping it with Teflon tape.
- Connect the other end of the hose to the tank, tightening the connection with an adjustable wrench.
- Check the tightness of the connections by running a little water through them.
IMPORTANT! The hose should be installed with some extra length. It must not be under tension during installation.
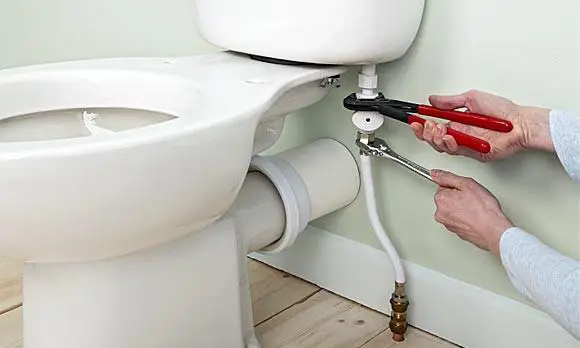
Photo 3 — Connecting the Toilet to the Water Supply System
Checking the Toilet Functionality
When filling the tank, there should not be any overflow. Fill the tank and check after some time if the connections are leaking. Drain the water and check the tightness of the sewage connections.
After this, you can proceed to install the toilet seat. The final step is mounting the toilet lid.
Proper toilet installation should not result in leaks, water stagnation, or other issues. Here are solutions to some common problems:
- If water is dripping from the siphon tank, you have incorrectly positioned the sealing gaskets. Shut off the water supply, remove the mounting bolts from the siphon tank to the toilet and adjust the sealing gasket.
- If the toilet wobbles, tighten the bolts. However, be careful — over-tightening the bolts can cause cracking of the toilet! If the problem is not with the bolts, remove them and add additional washers.
- If you cannot fix the anchors in the floor thickness, shut off the water supply, remove the toilet, strip away the old flooring and pour a new floor. You will have to reinstall the toilet.
- If water stays in the toilet, you have chosen an incorrect angle of the drain pipe. The height of the drain hole should exceed the level of the receiving pipe in the fan pipe. When a mismatch in the slope angles is found, remove and reinstall the toilet, following all necessary standards. You will need to raise the drain level.
- If the toilet leaks, check the tightness of the joints, sealed with silicone. Re-seal the flexible pipe.
Installing a Toilet Installation System
Lately, people who want to change the appearance of their bathroom have chosen non-standard toilets instead of conventional ones. This fixture differs from the familiar porcelain one only in that the mounting system is located not on the bottom of the toilet, but on the side. The price of a wall-hung toilet is not significantly higher than that of a standard one, but the labor costs and cost of accessories will greatly increase the required budget.
Installing a Wall-Hung Toilet
Installing the wall-hung toilet system is probably the most expensive part of all the work. Despite the price, you won't regret the result! It is not advisable to do these works yourself — the cost of labor will be much less than the cost of mistakes in case of incorrect installation.
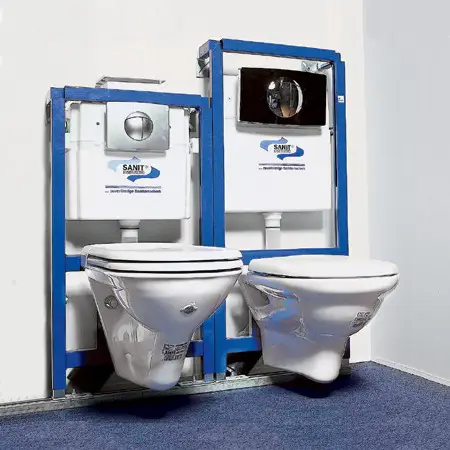
Photo 4 — Wall-Hung Toilet Installation System
If you still decide to do it yourself, here is the information for your attention.
Installation Instructions for Wall-Mounted Toilet
There are two options:
- In the first, you will need a ready-made installation system since it is practically impossible for a beginner to assemble such a system by themselves, but this is not the cheapest option;
- In the second case, you can install a wall-mounted toilet on a self-made base from concrete, which is both simpler and, believe me, much cheaper.
The expensive installation option involves installing an integrated water tank and placing the flush button in the wall base. In the economical version, you can do without installing a separate tank and use the standard method for mounting.
Let's look at the second option in more detail
You will need:
- threaded rods (20 mm in thickness and 500-800 mm in length) — 2 pcs;
- nuts — 4 pcs;
- spacers — 4 pcs;
- concrete M200 — about 40 liters;
- formwork materials;
- wood screws.
And accessories:
- drain fitting (at a 90-degree angle);
- a piece of plastic pipe with a diameter of 11 cm and a length of at least 8 cm;
- silicone sealant.
The following diagram shows the mounting of a wall-hung toilet.
Work procedure:
Secure the rods in the load-bearing wall. The toilet will later be hung on the wall projections (the total load capacity of these rods is approximately 500 kg!).
The bottom of the toilet will bear on a monolithic concrete base, which you will have to make. This base will contain the drain fitting.
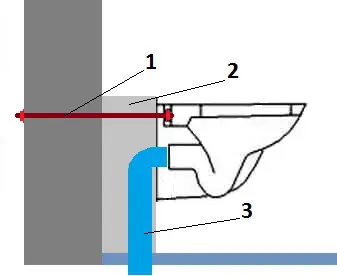
Photo 5 — Wall-Hung Toilet Mounting Diagram: 1 - rods; 2 - monolithic concrete base; 3 - sewage outlet
Install the drain fitting. The height of toilet installation can be adjusted by cutting the fitting if necessary.
The formwork should have a minimum 5 cm length reserve.
Measure the distance between mounting holes (rarely exceeds 20 cm). Mark the points for the holes on the installed formwork.
Measure the length of the threaded rods: add the depth of embedding (on average, 15 cm) to the distance from the wall to the toilet, accounting for the mounting thickness of the toilet and the length of free ends for securing nuts. The rods should be securely held in the wall with concrete adhesive — a chemical anchor (such as those in the Moment and Ceresit catalogs, model with index CF 850).
After installing the rods and formwork (see the image below), try fitting the toilet on the rods. The outlet hole of the toilet must align with the inlet hole of the previously installed drain fitting.
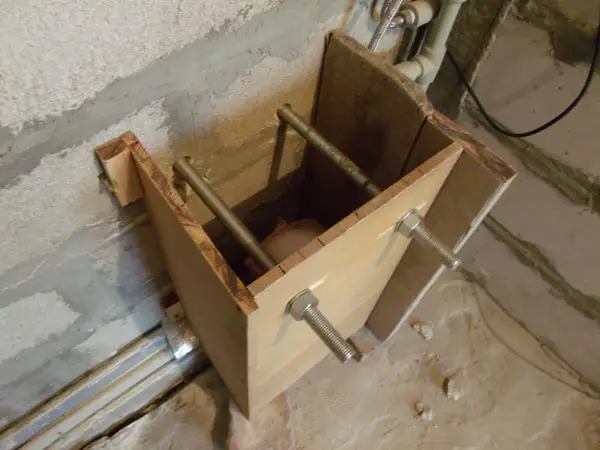
Photo 6 — Formwork for Installing a Wall-Hung Toilet
Attach polystyrene to the formwork for the sewage opening and start concreting.
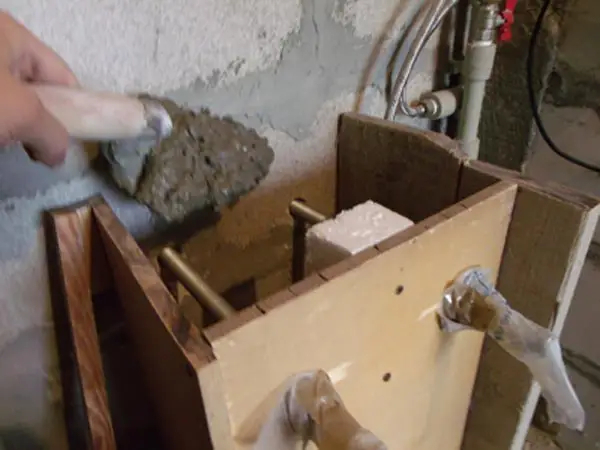
Photo 7 — Pouring the Formwork
As a result, after a week for the concrete to set, you should have a monolithic base with an open fitting and two protruding mounting rods (see the image below).
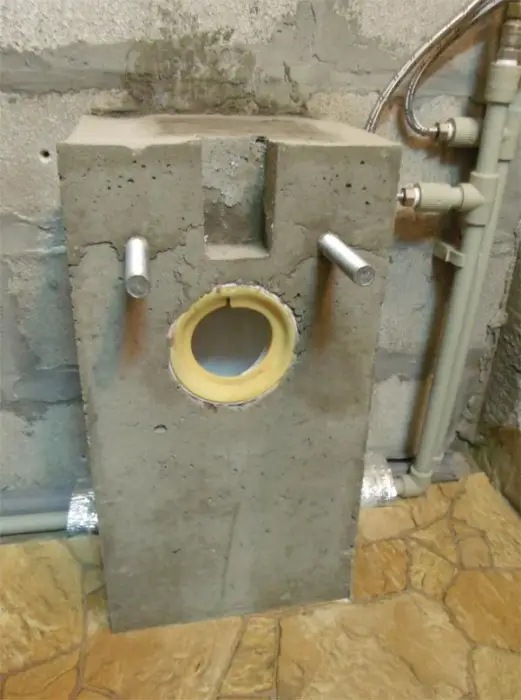
Photo 8 — Final View of the Monolithic Concrete Base for Installing a Wall-Hung Toilet
Otherwise, the process of installing a new wall-hung toilet is no different from the standard installation method: connecting the drain, sealing joints, tightening nuts on the rods, etc.
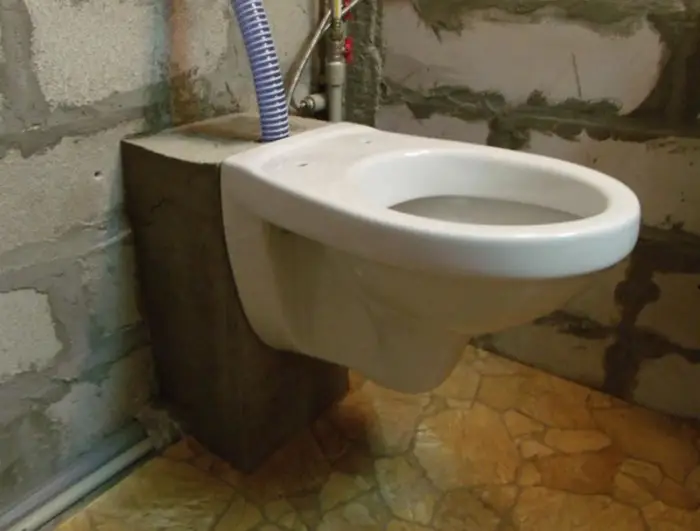
Photo 9 — Installation Result
It is better to understand the installation process by watching the following videos. It's not difficult to do plumbing work at home, and installing a toilet yourself is no exception.
Toilet Installation. VIDEO:
Toilet Installation with an Installation System. VIDEO:
Installation of the GROHE system:
Installing a Wall-Hung Toilet. VIDEO:
Installation of the Geberit system from the manufacturer:
$ Cost of Toilet Installation
- removal and disposal of the old toilet — $25-30;
- toilet installation — within $35-50;
- tank installation — within $20-35;
- pipe installation — up to $15-20.
$ Cost of Materials for Toilet Installation
- floor toilet (Cersanit) with a tank — from $100, without a tank — from $115;
- wall-hung toilet (Jika) — from $80;
- wall-hung toilet with installation (Grohe) — from $300;
- counter-mounted toilet (Roca) with a tank — from $160; without a tank — from $114;
- the total cost of construction materials and accessories will not exceed $50-70.
Where can you buy a toilet with installation?
Turned to dealers, whose range of services includes selling and installing toilets — you're making the right choice on 100%. Buying all services from one contractor will save you extra hassle and ensure quality. Delivery and installation of the toilet won't be a concern: all will be handled by professionals. This is a pleasant bonus, but unfortunately not every company offers it. By the way, when additional services are provided, ensure that the warranty you're promised covers not only the porcelain item but also the quality of its installation.
$ Cost of Replacing a Toilet
Prices in Kyiv:
- installation on a prepared base — from 200 UAH;
- removal, disposal and installation — from 320 UAH;
- installation of the system — from 300 UAH;
- installation of a wall-hung toilet — from 550 UAH;
- installation of the tank for a wall-hung toilet — from 150 UAH.
Prices in Moscow:
- installation on a prepared base — from 1,700 RUB;
- removal, disposal and installation — from 2,500 RUB;
- installation of the system — from 4,000 RUB;
- installation of a wall-hung toilet — from 2,000 RUB;
- installation of the tank for a wall-hung toilet — from 1,500 RUB.