Installing an Acrylic Bathtub: Selection and Instructions for Beginners
Installing an acrylic bathtub: instructions for beginners
Let's start with the advantages of acrylic bathtubs to convince you: acrylic is a high-quality alternative to cast iron material of the new generation!
Installing an Acrylic Bathtub: Instructions for Beginners
Let's start with the advantages of acrylic bathtubs to convince you: acrylic is a high-quality alternative to cast iron material of the new generation!
- External appeal of the product. Acrylic is a polymer that does not lose color or shape over time and can withstand considerable loads.
- Bathtubs made of acrylic have a smooth, perfectly white, durable surface that can easily be restored to its original appearance if damaged.
- Acrylic bathtubs retain heat excellently.
- The relatively light weight we mentioned earlier.
- Low cost.
- Simplicity of installation.
To avoid any dust on the product, let's also mention a couple of drawbacks:
- In terms of lifespan, acrylic cannot compare to cast iron.
- The bathtub surface does not tolerate mechanical damage.
- Such a bathtub must be installed on a frame (the installation scheme, as well as detailed instructions for installing an acrylic bathtub, should come with the product), in rare cases it is mounted on bricks (and even then — according to advice from resourceful craftsmen who urge us to save money). The frame assembly process is not complicated, especially since all components and a step-by-step description of the work procedure are available.
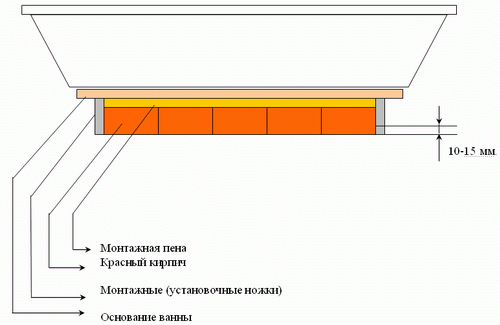
Photo 1 — Installation scheme of an acrylic bathtub on a brick podium
IMPORTANT! If you never received the paper version of the installation rules for the bathtub, you can find them on the manufacturer's website. Brands such as RAVAK or CERSANIT publish installation diagrams, drawings, and descriptions in relevant sections of their websites.
When choosing an acrylic bathtub, pay attention to the thickness of the polymer sheet. Acrylic bathtubs are made by joining several layers of polymer, so the final coating thickness should be no less than 6 mm. The material layers can be seen by examining the edge of the bathtub near the rim.
IMPORTANT! Determine whether it's a counterfeit or a quality product by three simple tests:
- Tap the edge of the bathtub. Is the sound dull? You have an original.
- The bathtub should not glow. If you shine a flashlight on the edge and see a glowing spot, the manufacturer cut costs on materials — it's better to avoid buying it.
- A quality bathtub should not emit a sharp chemical smell.
How to Choose a Quality Acrylic Bathtub: VIDEO
In standard configuration, only the instruction for the bathtub comes with it. In an extended package, in addition to the feet for the acrylic bathtub (mounted on a special enclosing support that preserves the shape of the product), and fittings for installing the mixer, drain/spillway, there may also be profiles for mounting a decorative screen and the screen itself.
Installing Acrylic Inserts in the Bathtub
Acrylic allows you to slightly cut corners during bathtub installation and instead of the dusty, labor-intensive removal of the old bathtub from its previous base, you can simply lay down a fresh acrylic coating. This way, you will not only significantly reduce the budget for bathroom renovation but also save time on it. Installing such an insert takes just a few hours and costs approximately $300 (manufacturing and installation of the insert in a 1.5m bathtub). When it comes to manufacturers, refer to the quality standards of SENOPLAST (Austria): more than 30 years of company experience and the scale of annual production allow speaking about it as a model manufacturer.
Installing Acrylic Inserts in the Bathtub: Detailed Master Class: VIDEO
Installing an Acrylic Bathtub: VIDEO
Cost of Installing an Acrylic Bathtub
The cost of installation work will largely depend on the type of installation, as well as the cost of fittings and materials used for that particular method.
An acrylic bathtub can be installed:
- on legs or a frame. Due to the quality of fittings and a well-thought-out installation system by the manufacturer, installing an acrylic bathtub in this way will not take much time and will be considered the most reliable method.
- on a wooden frame. This method is used if legs or a metal frame were not included in the bathtub set. A wooden frame for a bathtub is not the best solution, and no sensible craftsman can guarantee long-term integrity.
- on a brick frame. This method is also called combined: it involves using both factory legs for the bathtub and brick supports.
On average, such work will take about $55
Installing the Bathtub
Installing Legs on the Bathtub
Install the legs on the bathtub. Following the manufacturer's instructions, mark the locations for fixing.
IMPORTANT! Do not drill through the acrylic bathtub completely; holes should only be drilled a few millimeters deep, trying not to damage the inner layer. It is convenient to use a drill guide at this stage.
Connecting the Frame Guides and Bathtub Legs
The holes are ready, so now you can proceed to fasten the frame guides and then the legs.
Installing the Drain
The drain is installed in three stages: connect the top, then the lower drain connection, and finally assemble the drain.
Level Check and Marking the Joints
Place the bathtub on the legs and check the installation by level. Some frames come with a special height adjustment system for the bathtub, but if your set doesn't include these, you can use a backing made of solid materials (e.g., brick chips or a nail driven into the leg). After roughly aligning the bathtub by level, mark the joint points between the tub and the wall with a marker and temporarily set the bathtub aside. For greater convenience, a laser level can be used.
Installing Mounting Hooks
Check the marks on the walls with a level, and then install mounting hooks, leaving a width equal to the rim's edge. These will prevent deformation of the bathtub and secure it in your chosen position.
Installing and Fastening the Bathtub
You can now install the bathtub in place and securely fasten it.
Installing the Screen
The finishing touch is installing the screen that covers the bathtub mounting structures and plumbing pipes.
More — see the video above: Installing an Acrylic Bathtub.
Connecting an acrylic bathtub to utilities is done using the same principles as connecting a cast iron bathtub to the system.
Installing a Cast Iron Bathtub: Practical Tips for Connecting to the Water Supply
- Use rigid pipes, not corrugated ones. Due to the higher hydraulic resistance of corrugated pipes, they clog quickly and are difficult to clean, making their use impractical.
- When installing, plan for constant access to the drain: it sometimes needs cleaning rather than replacement. Also, during installation, do not use tools to tighten the drain — just using your hands should be sufficient.
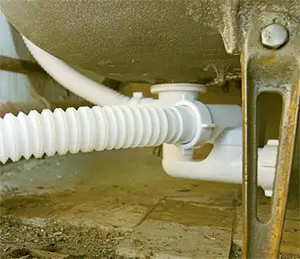
Photo 2 — Connecting the Bathtub to the Water Supply. Drain for the Bathtub. Corrugated Pipes
- All joints and connections should be treated with sealant after installation.
More Details on Connection
See the diagram below
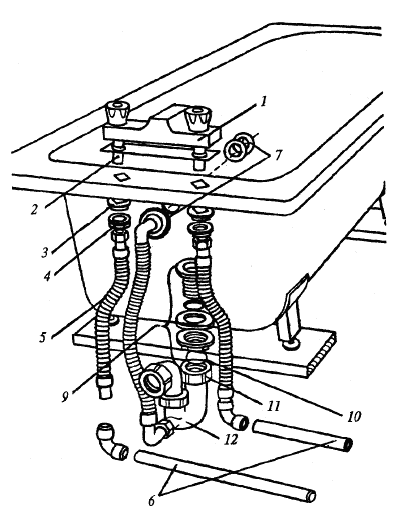
Photo 3 — Installation and Connection Diagram of the Bathtub to the Water Supply
In Photo 3:
- mixer;
- mixer fitting;
- gasket;
- fastening nut;
- flexible pipe;
- supply pipe;
- overflow unit;
- combined drain hose;
- drain device;
- compression ring;
- compression fitting;
- two-turn drain.
One of the most important stages in installation is connecting the bathtub to the water supply. The key here is to connect the drain using bends made of heat-resistant plastic, or flexible hoses can also be used by running them to the nearest drainage pipe. The minimum slope of the drain should be 2 cm.
When installing a cast iron bathtub by yourself, the vital stage is grounding. Without it, not only in a metal bathtub but also in an acrylic one, a person can suffer from static electricity shock caused by water hitting the bathtub surface.
The diagram below shows the connection, but it's better to leave this task to an electrician — the cost of these services won't be high.
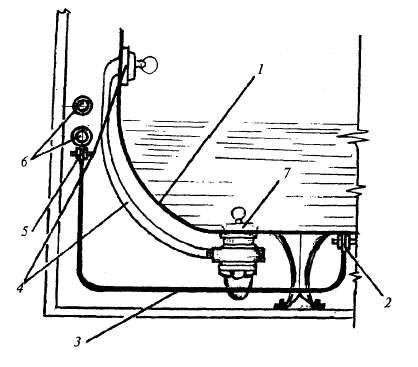
Photo 4 — Installing Grounding in the Bathroom
In Photo 4:
- bathtub;
- overflow;
- wire;
- spillway;
- clamp with bolt;
- water supply pipes;
- bathtub outlet.
Installing the Bathtub. Corner Version
Installing a corner bathtub is an ideal solution for small spaces. The video above shows the installation process, and each step is described in detail (video 'Installing an Acrylic Bathtub').
If you don't plan to remove the old wall coating in the bathroom, before purchasing a corner acrylic bathtub ensure that the installation area has a right angle. Otherwise, you'll have to spend money on additional plastering work to level the wall precisely at 90°.
IMPORTANT! Installation of an acrylic bathtub (corner) should be done after the final finishing of the bathroom walls and floor.
A corner bathtub can also be installed on a metal frame or bricks.
Want to know more about installing an acrylic bathtub? You can find videos on installation and tips for choosing bathtubs on most websites of acrylic bathtub manufacturers and accessories.
Cost of Work for Installing an Acrylic Bathtub
- Kiev — from 350 UAH;
- Moscow — from 1,700 RUB