Knauf Gypsum Board: Useful Tips for Installation and Cladding
Knauf Gypsum Board: Useful Tips for Installation from the Manufacturer
IMPORTANT!
Knauf Gypsum Board: Useful Tips for Installation from the Manufacturer
IMPORTANT! Often Knauf gypsum board and accessories are compared with similar products from WOLMA, referring to the lower price and quality of domestic gypsum board. If you have a choice between Knauf or WOLMA, the decision should be based on the expected budget and type of construction (not all structures can be built using WOLMA products, Knauf's material range is broader).
Knauf Gypsum Board: Sheet Processing and Required Tools
One of the key conditions for high-quality work with gypsum board is to choose materials and accessories from one manufacturer.

Photo 1 — Fixing Elements for Suspended Systems
Knauf Gypsum Board: Tools and Materials for Work
- For cutting gypsum board, use a universal knife, saw, or toothed saw, a drill or round bit, and a 12-inch ruler.
- For spackling joints of gypsum board sheets, use Knauf Fugenfüller spackle.
- For spackling gypsum board, it is recommended to use a universal spatula, screwdriver spatula, smoothing roller, wide spatula, and sanding machine.
- For spackling gypsum board — use a trowel, mixing container, mixing attachment, or mixer.
- Slots for installation can be marked and cut by hand. The second option is to make them with a drill or special round hole cutter.
- For proper layout of gypsum board, use a water level, marking string, and tape measure.
- For fixing gypsum board — use self-tapping screws and a drill driver.
How to Cut a Sheet
To cut a sheet of gypsum board, turn the sheet over so that the face side is towards you and make a cut along the markings using a universal knife and a guide or metal strip. Then break the sheet along its edge. You only need to cut the cardboard on the back side.
IMPORTANT! After making a cut in any sheet of gypsum board, if the cut edge is intended to be butted against another sheet, you must remove a 45° chamfer at an angle using a plane.
Proper Installation of Knauf Gypsum Board
Knauf Gypsum Board, depending on the type of structure and its purpose, can be mounted either on an existing monolithic wall using adhesive (ceiling gypsum board is only mounted on frames), or on a metal frame. If you need to divide a room, Knauf partitions with studs can be used: install the profile for Knauf gypsum board and then cover it on both sides with sheets of gypsum board.
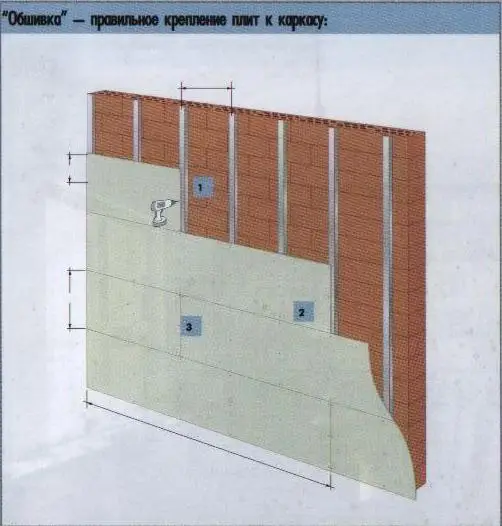
Photo 2 — Wall Cladding with Knauf Gypsum Boards on Metal Frame
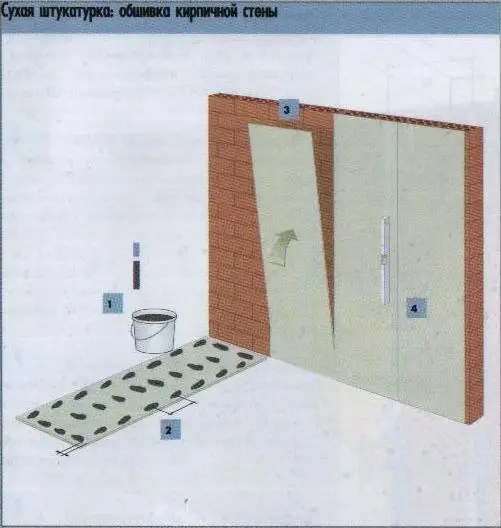
Photo 3 — So-called 'Dry Plastering' is primarily used on monolithic bases
The method involves fixing gypsum board sheets to walls using adhesive. This method can only be used when the wall curvature is small (up to 4 mm).
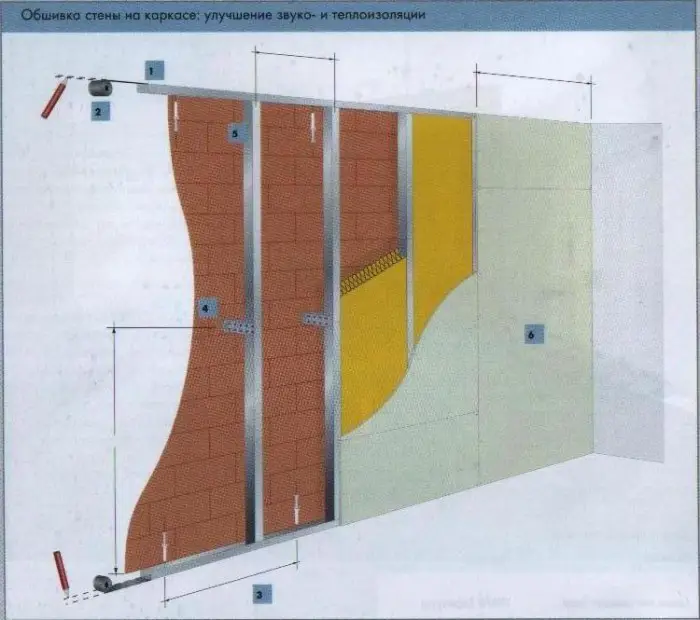
Photo 4 — Another Example of Frame Cladding with Gypsum Board
In this case, a material for additional sound or thermal insulation is placed between the wall and the gypsum board sheets on the frame.
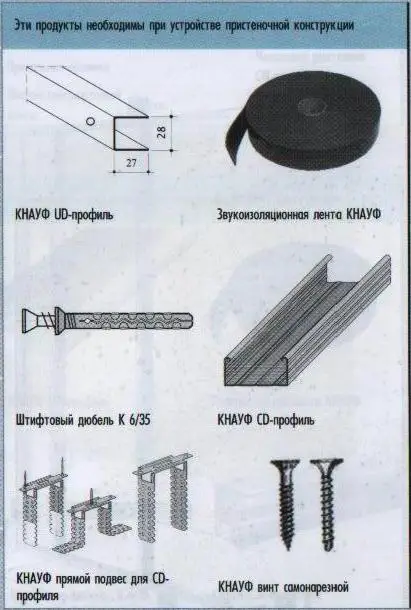
Photo 5 — Materials for Installing Standard Wall Structures
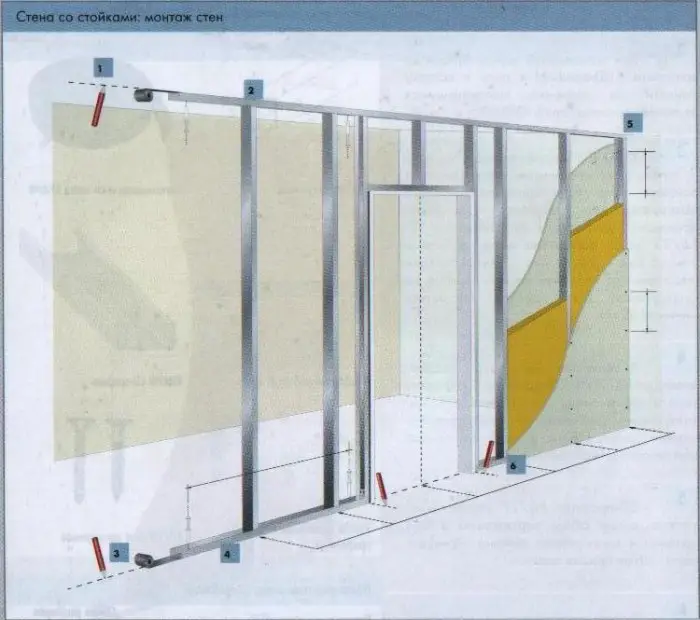
Photo 6 — Example of Double-Sided Cladding of Internal Partitions with Gypsum Board with Insulation or Sound-Absorbing Material
IMPORTANT! Gypsum board thinner than 12.5 mm is not used for wall cladding. If a wall clad with gypsum board is later planned to be tiled with ceramic tiles, the wall must be cladded with two sheets of gypsum board.
Proper Installation Technology
- Gypsum board sheets should be mounted on metal or wooden frames using Knauf self-tapping screws. Fixing sheets should begin from the center of the GKL or top corner to avoid sheet deformation. It is important that the screw driver bit NK 11 is used, which ensures proper insertion of the screw head into the gypsum board (required for finishing spackle).
- To achieve an optimal joint, Knauf gypsum board sheets should be installed edge-to-edge without gaps.
- During installation, cross-shaped joints should not occur. That is, the end edge of the gypsum board sheets must have a small offset—equal to the distance between the studs, known as the axial spacing.
Gypsum Board Cladding: Correct Fastening with Screws
- The distance between screws when cladding walls should be 25 cm, and for ceiling work with Knauf gypsum board — 17 cm.
- The screw length for cladding metal structures should be calculated based on: thickness of GKL sheet + 1 cm.
- The screw length for cladding wooden structures: thickness of GKL sheet + 2 cm.
Technical Characteristics of Knauf Sheets Example: Moisture-Resistant Gypsum Board
- Color of the board — green.
- Edge type — PLUK (semi-circular thin edge).
- Main dimensions, mm — 2500/1200/12.5 (standard sheet for floor and internal partitions).
- Weight of KNAUF GKLV (2500/1200/12.5 mm, 3 m²) — 29 kg.
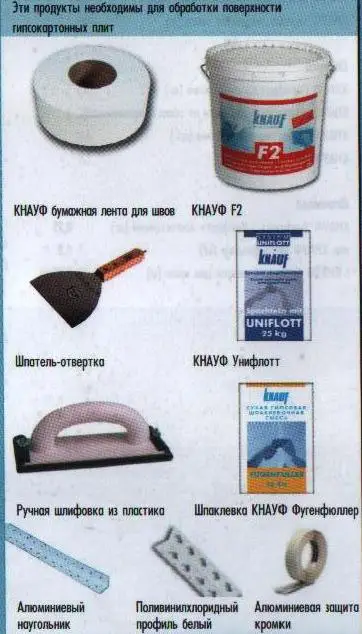
Photo 7 — Materials for Spackling Joints of Gypsum Board Sheets
Geometric Parameters of KNAUF GKLV
- Length — from 2000 to 4000 mm (with a step of 50);
- Width — from 600 to 1200 mm;
- Thickness (depending on the sheet length) — 6.5; 8; 9.5 mm (for sheets up to 2000 mm long), 12.5; 14; 16 mm (for sheets up to 4000 mm long), and custom-order sheets with thicknesses of 18; 20 and 24 mm.
Technology of Cladding Brick Walls with KNAUF Sheets
- For work in a medium-sized room, approximately 30 kg of KNAUF Perlfix should be prepared. The dry mixture is poured into a container with clean water (volume about 17 liters) and mixed until homogeneous.
- Gypsum board sheets are cut, then the KNAUF Perlfix solution is applied to the back side of the sheets at intervals of 35 cm using marking brushes. The distance to the edges must be at least 5 cm. Also, a row of lumps should be applied along the longitudinal axis of the sheet.
- The sheets are placed in a vertical position and pressed against the wall base, leveling them.
IMPORTANT! Perlfix sets in about 10 minutes. During this time, the sheets should be adjusted to level using a rubber mallet and a wooden stick.
Leveling Walls on a Frame Base for Improved Sound and Thermal Insulation
- KNAUF UD profiles are cut to size using metal cutters.
IMPORTANT! For better sound insulation, before mounting the UD profile to the floor and ceiling, special self-adhesive sound insulation tape from KNAUF should be applied to the profiles.
- KNAUF UD profiles are mounted to the floor and ceiling at the specified distance from the main wall using KNAUF K6/35 dowel anchors. The maximum spacing between anchors should not exceed 1 meter.
IMPORTANT! Sound insulation can be improved by leaving a gap of at least 50 mm between the front edge of the frame and the existing wall.
- To support the CD profile in the center of the wall height (considering that the maximum allowable spacing is 1.5 meters), straight hangers from KNAUF with pre-installed sound insulation tape are mounted to the wall using dowel anchors.
- CD profiles 60/27 must be installed vertically at intervals of 60 cm relative to the UD profiles, then the fasteners should be connected with screws. The straight hangers are also attached in the same way.
- Install the insulation layer of Knauf gypsum board. Now you can proceed to fix the sheets on the frame using screws (maximum spacing between screws is 25 cm).
The axial spacing between CD profiles during vertical cladding with gypsum board sheets is: if the width of the gypsum board sheet is 1200 mm, the axial spacing is 60 cm.
Knauf Gypsum Board can be purchased in almost all large construction superstores in the country. You can find standard GKL as well as moisture-resistant options, and specialty orders can also be delivered from the warehouse, including perforated acoustic gypsum board for improved sound insulation or fire-resistant gypsum board for passive fire protection in rooms with a high likelihood of open flames.
$ Cost of Knauf Gypsum Board
The price of a gypsum board sheet is influenced by: the type of gypsum board (GKL, GKLV, GKLO or GKLVO, arched, ceiling or wall), the dimensions of the sheet (width/length/thickness, mm), and whether it is purchased retail or wholesale.
arched;- KNAUF (1200/2500/6 mm) − $18.6 per sheet;
- KNAUF (1200/3000/6 mm) − $15 per sheet;
- KNAUF (1200/2000/9.5 mm) − $5.6 per sheet;
- KNAUF (1200/2500/9.5 mm) − $7 per sheet;
- KNAUF (1200/2000/12.5 mm) − $5.8 per sheet;
- KNAUF (1200/2500/12.5 mm) − $7.3 per sheet;
- KNAUF (1200/3000/12.5 mm) − $8.9 per sheet;
- KNAUF (1200/2000/12.5 mm) − $7.8 per sheet;
- KNAUF (1200/2500/12.5 mm) − $9.6 per sheet;
- KNAUF (1200/3000/12.5 mm) − $11.05 per sheet;
- KNAUF (1200/2500/12.5 mm) − $8.3 per sheet.
$ Cost of Knauf Gypsum Board Profiles
- KNAUF CD Profile (60/27/0.6 mm), length 3 m − $8.25;
- KNAUF UD Profile (28/27/0.6 mm), length 3 m − $6.
Knauf Gypsum Board: VIDEO
$ Cost of Work with Knauf Gypsum Board
In Moscow: ceiling work − from 280 rubles/m², wall work − from 190 rubles/m², partition installation − from 300 rubles/m².
In Kiev: ceiling work − from 65 UAH/m², wall work − from 45 UAH/m², partition installation − from 80 UAH/m².
Need a renovation specialist?
Find verified professionals for any repair or construction job. Post your request and get offers from local experts.