Installing Curtains Tracks Yourself
Instruction for Installing Curtains Tracks
To properly install a track, several rules must be followed. The length of the track should be greater than the width of the window opening by 30-50 cm. To ensure the track does not interfere with window opening, leave at least 5 cm between the track and the top part of the window opening, and the minimum distance between the curtain and the wall should be 10 cm.
The distance between the curtain and the radiator should be no less than 5-7 cm. It is not recommended to hang the track on walls covered with gypsum board. For proper installation of a ceiling or wall-mounted track by yourself, in general, the following steps should be performed:
Make a layout for mounting brackets. They must be placed symmetrically from the center of the window opening. However, it should be noted that if the track length exceeds 2.4 m, an additional bracket must be installed in the center.
When installing a ceiling track, ensure that the brackets are at equal distance from the wall. When mounting a wall track, make sure they are positioned strictly horizontally.
If your walls are made of brick, it is better to use wooden dowels from pitch pine with screws 4x50 mm instead of plastic anchors. However, all mounting holes in the dowels must be re-drilled; otherwise, they may crack during screw installation.
For other surfaces, standard anchors and screws included in the track set will suffice. After mounting the brackets, install the track and align it relative to the window opening plane. The closer the track is to the ceiling, the more it emphasizes the ceiling's curvature. Sometimes, to keep the track level, brackets must be mounted at different heights. If the track is adjacent to a heating pipe, it is advisable to install washers between the wall and brackets.
For light curtains made of sheer fabric, a string track is best. It consists of metal strings stretched between brackets mounted to the ceiling. Installing a string track is easy and quick. The only disadvantage of such tracks is that the strings tend to sag over time after installation, requiring periodic adjustment.
If you plan to hang curtains made of heavy fabric, it is better to choose ceiling plastic tracks. When selecting them, pay attention to the plastic used; it should not be too soft. Otherwise, for reliable mounting of such a track, steel plates of approximately 40x18 mm must be inserted into the slots on the back of the track for each mounting hole.
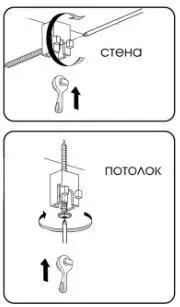
Flexible Track Installation Scheme
Mark the position for mounting the track – on the ceiling or wall, depending on your preference and desire. A flexible track can be used for any type of mounting.
Mark the positions for mounting fixtures. Note that the spacing between mounting points should be 40-50 cm, and the minimum allowable turning radius of the track is 20 cm.
Secure the supports. It is better to buy new ones with a maximum diameter of 11 mm, as the supports included in the set are often less reliable.
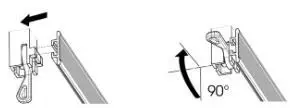
Scheme 1 – Installing a Flexible Track
Measure and cut the required length of the track. Use a fine-toothed saw (for metal).
Then install and secure the track profile on the supports, rotating the flag by 90 degrees.
Scheme 2 – Securing Track Profiles on Supports
Finally, install the end caps on the track and hang the curtains.
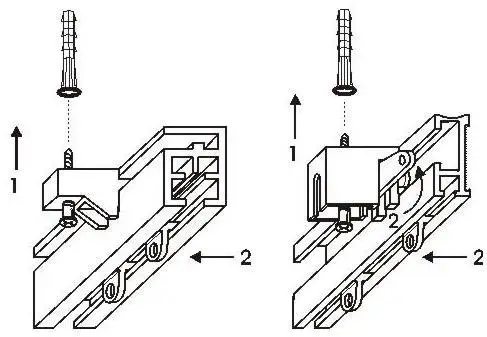
Wall Mounting Scheme of an Aluminum Profile Track
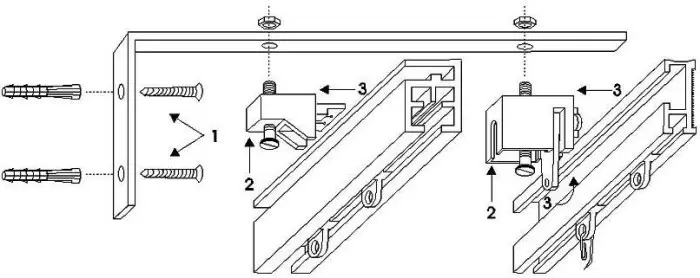
Scheme 3 – Wall Mounting of an Aluminum Profile Track
Secure wall brackets using anchors, marking their mounting points in advance. Check the layout using a level to ensure accuracy.
Connect wall and plastic brackets with screws.
Fix the track rails on plastic brackets.
Ceiling Mounting Scheme of an Aluminum Profile Track
Scheme 4 – Ceiling Mounting of an Aluminum Profile Track
Mark the mounting points for plastic brackets and secure them to the wall using anchors.
Fix the track rails on the brackets.
String Track Installation Scheme
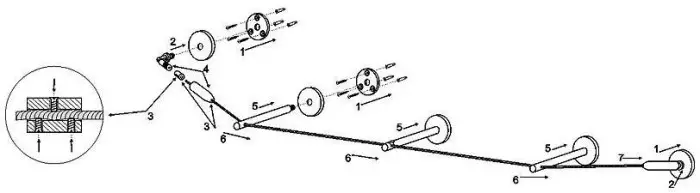
Scheme 5 – Installing a String Track
Mark the mounting points for support and intermediate brackets. The distance between brackets should be 30-50 cm. Secure the support brackets to the wall or ceiling using anchors.
Assemble the bracket bases.
Thread one end of the string through the end cap of the string bracket and secure it in the sleeve.
Slide the string bracket end cap onto the assembled base.
Mount the support and intermediate brackets on the wall or ceiling.
Thread the string through the slot of the support bracket and intermediate brackets.
Secure the free end of the string in the sleeve of the second support bracket. Then, using string brackets, tension the string.
Track Installation Scheme
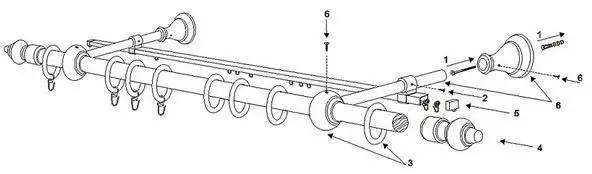
Scheme 6 – Installing a Track
Mark the mounting points for brackets on the wall. Ensure that the line passing through them is strictly horizontal. Drill holes for mounting and secure the bracket bases with anchors and screws.
Slide the clamps onto the sheer fabric rail and secure it to the brackets.
Slide rings onto the curtain rod and secure them to the brackets. Leave the outermost rings outside the brackets.
Slide end caps onto the curtain rod.
Insert hooks into the rollers of the sheer fabric rail and close it with caps.
Secure the assembled track to the wall in the bracket bases. Fix the track rod with screws.
Need a renovation specialist?
Find verified professionals for any repair or construction job. Post your request and get offers from local experts.