Installation of Wooden Windows — A Simple Process
Rule 1
Before taking measurements, familiarize yourself with the window structure. Personal experience in window installation is desirable.
Rule 2
Measurements of the window are taken from both sides of the window opening:
Main Rules for Installation
Rule 1
Before taking measurements, familiarize yourself with the window structure. Personal experience in window installation is desirable.
Rule 2
Measurements of the window are taken from both sides of the window opening: from inside and from outside.
These measurements will help calculate the depth of the window opening. The window can be larger but must not be smaller than the external dimensions of the opening — otherwise, the frame may fall out.
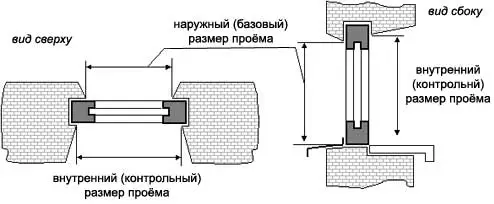
Figure 1 — Measuring the window from both sides of the opening: inside and outside
Rule 3
Installing wooden windows can significantly affect the existing dimensions of the opening. The opening may become skewed during installation or removal of the old window. To account for possible expansion of the window opening, the window size should exceed external measurements by 30–40 mm in width and 15–20 mm in height.
Rule 4
Decide clearly how the window should look from the street side: fully embed the window casing into the wall or leave the frame visible.
In the first case, precise calculations are required; otherwise, the edge of the glass unit may also end up in the wall along with the frame. In the second case, the risk of errors and inaccuracies is reduced, and corrections are much easier to make.
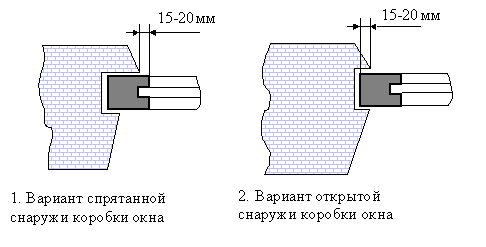
Figure 2 — Deciding how the window should look from the street side
Rule 5
For installing a sill from the outside, the bottom edge of the window casing should not be lower than the outer edge of the opening. The joint between the sill and the frame should be sealed with silicone. The sill, like the window sill, is installed under the window. The slope of the window sill installation should be 3 degrees (according to SNiP).
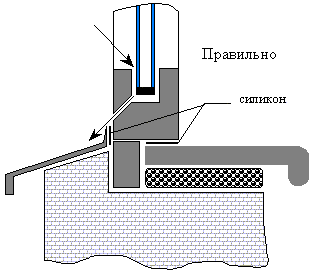
Figure 3.1 — Installing a Sill — INCORRECT METHOD
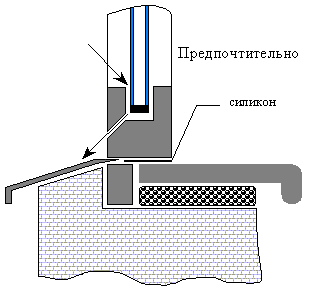
Figure 3.2 — Installing a Sill — CORRECT METHOD
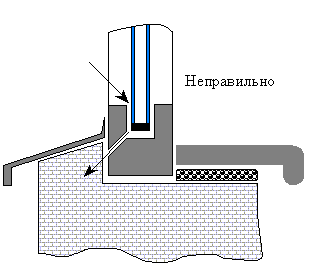
Figure 3.3 — Installing a Sill — PREFERRED METHOD
Rule 6
Compare the calculated window dimensions with the control (internal) dimensions of the window opening.
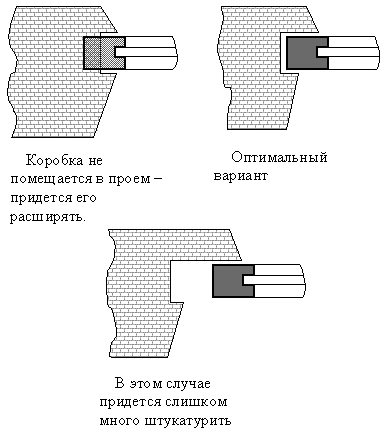
Figure 4 — Comparing calculated window dimensions with control (internal) window opening dimensions
Rule 7
In ideal conditions, the gap between the window frame and the wall should not exceed 3 cm. If needed, the width of the window casing can be increased by adding additional profiles.
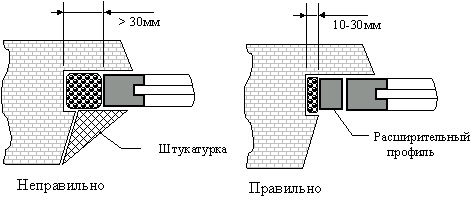
Figure 5 — Increasing the window casing width if needed
Rule 8
Installation of wooden window units is traditionally done using two methods:
The first method requires removing the window sashes and glass units for the entire installation period. This allows you to secure the window in any opening and guarantees that loads will be transferred to the internal metal reinforcement of the window.
The second method leaves no marks on the end surface of the wood.
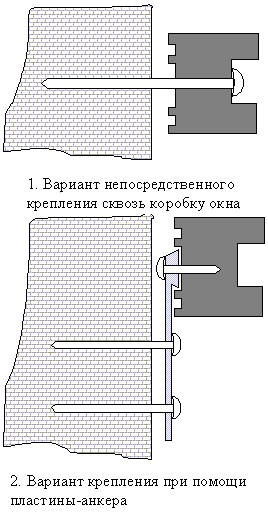
Figure 6 — Two Methods of Installing Wooden Window Units
Installing Wooden Window Units
Installation Process:
Remove the glass units and hanging sashes from the window.
Carefully align the empty frame using shims vertically and horizontally.
Drill holes in the frame and wall around the entire perimeter of the window.
Secure the frame with collet bolts.
Place the glass units and sashes back in position.
Seal the gap between the window and wall with polyurethane foam.
When performing installation work, follow these rules:
- All removed stops must be marked.
- The window must stand with support on the lower load-bearing shims, which are not removed after installation. The shims must be placed near vertical elements: under vertical partitions in the frame or at the corners of the frame.
- The window should not hang on dowels!
- When aligning the window vertically, use only a plumb line with a sharp tip and absolute axial symmetry.
- Do not over-tighten the fasteners. Over-tightening can cause profile deflection.
IMPORTANT! According to the GOST, the installation gap between the wall and frame should not exceed 15–20 mm depending on window size, and all installation work must be performed at a minimum temperature of 15 degrees Celsius.
Gaps should be filled with installation foam. Professional gun-type foam (e.g., GoldGun from the PENOSIL series or Soudal foam) is preferred. Working with regular foam (dispensed through a plastic tube) can be inconvenient (the best option in this category is Ceresit STD TS 61).
When installing, it is also recommended to use neutral pH mortars. Mortars based on unslaked lime are prohibited — due to the highly alkaline environment, the mortar can damage not only the paint or varnish layer on the window frame surface but also the wood itself.
Watch the installation video of wooden windows below.
Installing Wooden Window Sills
Installation of wooden window sills is performed according to these rules:
- The length of the sill should not exceed 3 meters (longer structures must be assembled from several panels).
- The length of the sill is calculated using the formula: installation opening dimensions minus 4 mm per gap. This measurement is calculated on both sides of the window for every meter of length.
- Heating appliances must be placed at least 8 cm away from the window sill.
Necessary materials:
Installation Process:
Clean the mounting base.
Try the panel and adjust it to calculated dimensions.
Place the panel on the cement slab without fixing it to adhesive.
Set shims level (remember about the required 3-degree slope!)
Install the sill panel on the shims.
During installation, a waterproof underlayment is used for the sill.
The sill board must be inserted under the window base, but the edges of the sill should not touch the window structure directly.
If installing a wooden sill yourself is more acceptable to you than hiring a professional, remember the golden rule: “Measure seven times, cut once.”
The window installation process concludes with the installation of the window reveals and hardware.
When purchasing or ordering wooden windows, ensure that their hardware has a quality certificate and that the hardware manufacturer guarantees at least 10 years of trouble-free operation (e.g., ROTO and MACO hardware offer this warranty). The cost of quality hardware is, of course, higher than typical Chinese hardware, but the key to reliable window system operation lies in quality hardware and proper installation. Therefore, the higher price of components is fully justified.
INSTALLATION VIDEO OF WOODEN WINDOWS
$ Installation Cost
Kyiv: from 125 UAH/m².
Moscow: from 1,260 RUB/m².