Ways to Install Plastic Windows
Installing plastic windows by yourself. VIDEO
Instruction for installing plastic windows: taking measurements
If you decided at this stage that you can do without professional help, know: a mistake during window measurement can cost you extra money, work, and time, so be extremely careful and follow the instructions provided below.
Measurements of a rectangular window:
IMPORTANT! Measurements are taken for the window opening, in rare cases new windows are installed on old window frames if they are in satisfactory condition.
1. Measure the opening width (Lpr. − opening width in mm).
2. Calculate the overall window width (L − window width in mm) using the formula L = Lpr. - 2q.
3. Measure the opening height (Hpr. − opening height in mm).
4. Calculate the overall window height (H − window height in mm) using the formula H = Hpr. - 2q.
In both cases q − size of the installation gap, according to GOST 30971-02 it should not exceed 20–30 mm.
IMPORTANT! Do not arbitrarily increase or decrease the installation gap size: in the first case, thick layers of installation foam in the gap may not support the window's weight, and in the second case, you will not be able to install the sill at best or even the window itself at worst.
Be careful: practically all modern plastic windows feature a so-called support profile that extends beyond the window frame level. It is designed for more reliable installation of the sill to the window. When calculating the overall window size, it is important to take into account its height.
In such a case, the formula for calculating window height should look like this: H = Hpr. - q.
Perfectly even window openings are extremely rare, so it is important to measure not only one length and one width of the window but also the entire perimeter of the opening, as well as its diagonals (from the lower left angle to the upper right angle and from the lower right angle to the upper left angle).
5. Measure the wall thickness (G − wall thickness in mm).
6. Installation guidelines require that the window be placed no closer than 2/3 G from the inner wall surface, i.e., not too shifted toward the street.
IMPORTANT! Shift towards the street can negatively affect room heat insulation but positively impact sound insulation.
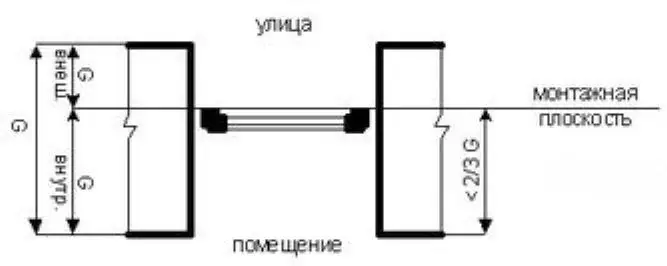
Figure 1 – Window placement measurements in the opening
7. Measure the overhang length (Lo − overhang length in mm). If you don't plan to install end caps, this value is calculated using the formula Lo = Lpr. + 50 mm, where 50 mm is the allowance for end joints of the overhang. If you do plan to install end caps, then Lo = Lpr. - 20 mm.
IMPORTANT! When measuring, be careful: the width of the window opening at extreme points may not match.
8. Calculate the overhang width (No − overhang width in mm) using the formula No = Gexternal + (30 mm or 40 mm), where Gexternal − the wall width from a certain point we determined earlier for mounting the window frame plane to the outer horizontal wall surface.
9. Measure the sill length (Lsub. − sill length in mm) using the formula Lsub. = Lpr. + 2x, where x − the depth of the sill extending into the wall.
IMPORTANT! The sill length should not equal the window width!
10. Measure the sill width (Hsub. − sill width in mm). Add Ginternal to the “overhang” size and subtract the thickness of the plastic window box (in standards, this is 60, 70 and 86 mm, but it's better to refer to the specific value rather than the standardized one).
IMPORTANT! A long “overhang” of the sill can hinder normal warm air circulation from the radiator. The sill should not cover more than 1/3 of the radiator.
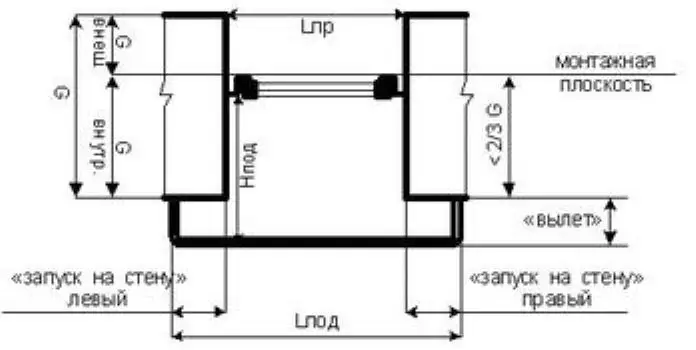
Figure 2 – Measurements of the sill parameters
11. Measure the jamb length using the formula Ljamb = Lpr.max + 30 mm, where 30 mm is the allowance for fitting, and Lpr.max is the maximum horizontal length of the window opening.
12. Measure the jamb width using the formula Hjamb = Ginternal + 30 mm or 40 mm, where 30 mm and 40 mm are installation allowances.
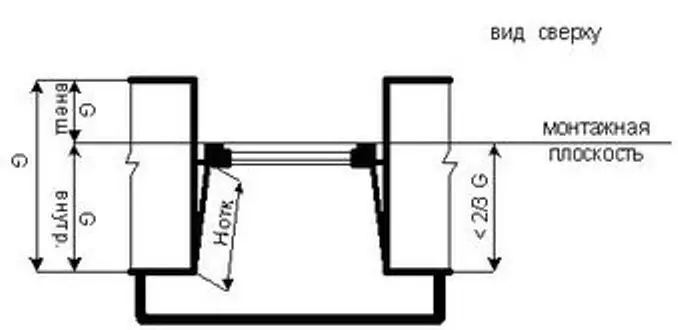
Figure 3 – Measurements of internal jambs
Congratulations! You've completed the window measurement. You should now have not just a list of window measurements written down, but also a final installation plan showing all parameters and mounting points for each element of the window system.
Don't be discouraged by so many calculations – in practice, everything will turn out to be much simpler. Proper installation of plastic windows is impossible without accurate measurements. So grab your tape measure, level, and off you go!
By the way, most euro-windows come with either a detailed installation manual for the specific manufacturer's plastic windows or at least general recommendations and a brief installation sequence. The advantage of such brochures is clear: you get reliable information and practical tips from the manufacturer about which materials to use for installing that particular window or how to properly handle the specific brand's products.
After the window has been ordered, manufactured, and delivered to your home, ensure its parameters match the measurements you've taken. If everything matches, you can begin installing plastic windows by yourself.
Methods of window installation
There are several methods for installing a window:
- with unpacking;
The window is completely disassembled before installation: the clips, glass units, and hinged windows are removed, and only the window frame is installed in the opening, secured with dowels and screws to wall anchor mounting plates. After the frame is installed, the window is assembled.
- without unpacking.
This method of installation assumes that the window frame will be secured in the opening using external fastening elements.
The last method is not suitable for high-rise floors – the installation of plastic windows above the 15th floor requires a more reliable method of frame securing after disassembling the window.
Installing windows in sandwich panels can significantly speed up any installation or finishing process.
Installing windows in a brick house and beyond
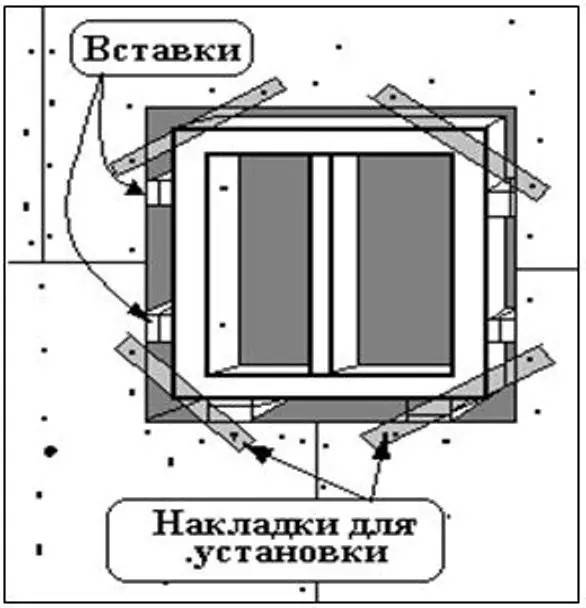
Figure 4 – Installing windows in a frame house using inserts and mounting brackets
You should also select windows based on the type of building. For example, brick houses differ in relatively wider walls and better heat and sound insulation properties, so windows for apartments in brick houses can be chosen from the “economy” range.
In frame houses, windows are installed using the standard method, paying a bit more attention to external waterproofing. When installing windows in such buildings, it's convenient to use mounting brackets.
However, the installation process of plastic windows in wooden buildings has many nuances, especially if it's about installing windows in a log house. Due to the high probability of settling in new wooden structures, windows in a log house must be secured in such a way that they do not interfere with the natural deformation of the walls.
Proper installation of windows in a wooden house implies relatively large installation gaps and static mounting of the verticals of the window frame, with horizontal elements mounted in a floating manner. This type of window installation in log and timber houses, as well as any other type of house, ensures the integrity of the window, as well as the reliability of mounting joints and element connections.
Installing plastic windows: professional tips
Let's return to window measurements. The installation plan you created yourself at the beginning of the work, which is more detailed and comprehensive, can also be provided by the manufacturer or the government. The so-called “technical specification” contains not only a detailed drawing with all components marked, but also a description of the use of various materials for installation. There are standard and working technical specifications.
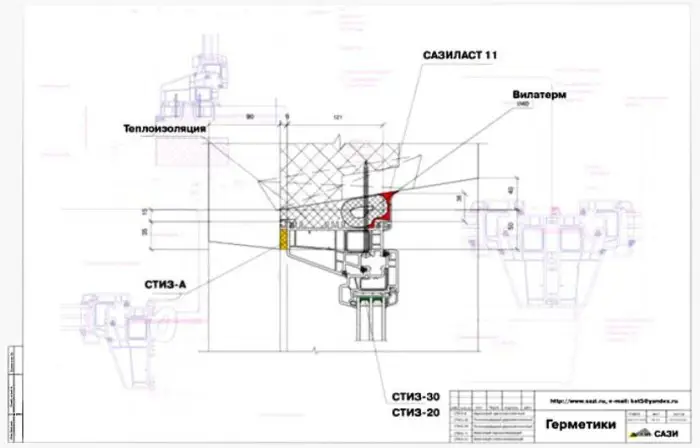
Figure 5 – Technical specification for window installation. Using sealants for window mounting
Installing windows according to GOST
Installation of plastic windows according to GOST requires the use of PSUL for waterproofing, as well as tape to protect installation foam from UV exposure and additional layers during installation to prevent the foam from leaking out of the joint onto the outer wall side.
Work sequence:
The window opening, cleaned of debris and dust, is treated with primer.
Vapor barrier tape is applied to the window frame along half its perimeter (the tape edge, which was exposed to setting installation foam, is folded over to close the joint).
External waterproofing – PSUL – is applied to the frame without gaps in the tape.
The frame is installed into the opening at the location you determined during window measurements (G), aligned with a level in both horizontal and vertical positions using wedges.
The frame is secured to anchor plates or through the wall with a step no more than 70 cm, starting with upper fasteners. The outermost fasteners should not be placed more than 15 cm from the frame corners.
To create an overhang on the outer side of the frame, diffusion tape and PSUL are installed.
Installation gaps are filled with foam and closed after 15 minutes with the previously applied film on the frame.
The overhang, cut according to the measurements taken, is attached to the frame with a hook under it. The sill is also installed (aligned horizontally using wooden wedges for leveling).
This is a brief installation of plastic windows according to GOST. More information can be found in the video.
Installing windows according to GOST. VIDEO
Proper window installation: tips on materials used
- Installation foam. When purchasing installation foam, consider the approximate air temperature. For work at temperatures below +5°C, you should buy special winter foam. Otherwise, due to temperature mismatch, summer foam may not come out of the can. Also note that this installation material expands after application by at least 2.5 times. Therefore, do not apply more foam than necessary. It's better to buy a little extra: 3 cans are enough for one standard-sized window of medium size.
IMPORTANT! The surface of the window opening must be moistened with a sprayer before foaming!
Reliable manufacturers: Moment, Ceresit, SomaFix.
- Dowels and screws. It's better to choose special screws – for metal. Only these have a sharp tip that allows the screw to securely enter the reinforced PVC profile.
- Sealants. For sealing joints between window elements (window-jamb, window-sill), it is better to choose a sealant in the same color as the window profile or a clear sealant.
Reliable manufacturers: Ceresit, Geosel, Soudal.
- Windows. If you can take window measurements by yourself, it's better to consult with a professional regarding window selection. Otherwise, you risk buying a counterfeit that does not possess the properties claimed in the marketing brochure or overpaying for heat insulation of the window – that’s just a waste of money.
Reliable manufacturers: REHAU, Veka, KBE, Brugmann or Trocal.
- Window hardware. Hardware is usually not ordered separately from the window, but in that case, pay attention to the brand of the product you're buying. The quality of hardware is just as important as the quality of installation.
Reliable manufacturers: Siegenia, G-U, Winkhaus, Schuko, Maco.
$ Installing PVC windows. Price:
Kiev – from 130 UAH per m²;
Moscow – from 1,200 RUB per m².