Calculation and Schemes of Two-Level Suspended Ceilings
Two-level ceilings from gypsum board (PHOTOS)

Photo 1 — Two-level ceiling in a small kitchen
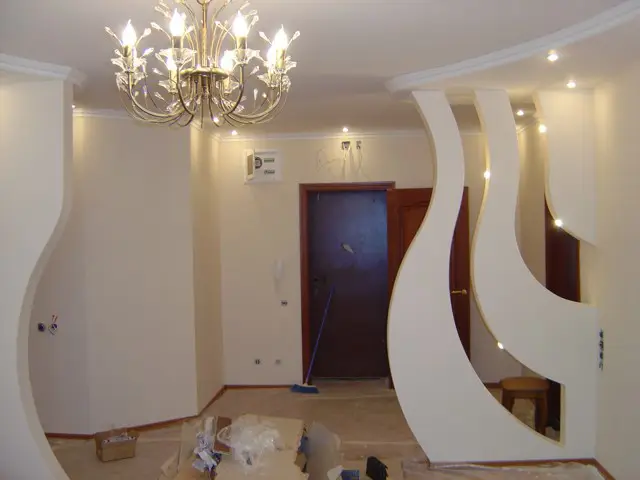
Photo 2 — Two-level ceiling in the hallway
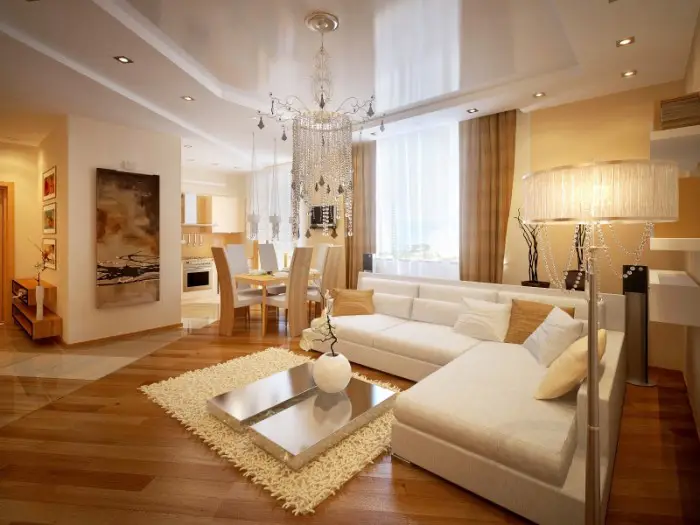
Photo 3 — In this interior, a two-level ceiling complements the room's decor, making the studio's open space more noticeable and lighting up the room with its white color.
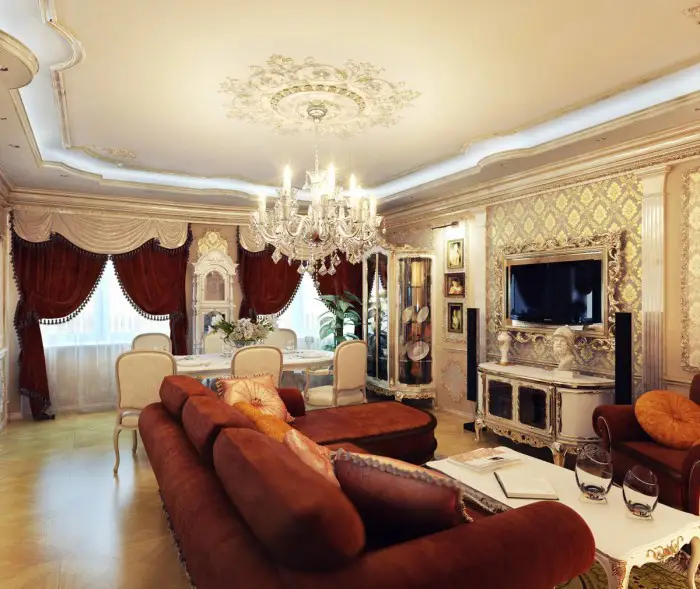
Photo 4 — Two-level ceiling in classical style
Ceiling from gypsum board by yourself (two-level): brief instructions
Preparation work before installing a gypsum board ceiling includes:
- You need to clear the renovation area and ensure free access to the ceiling throughout its surface;
- Remove the old finish (wallpaper, plastic tiles, etc.);
- Calculate the required amount of materials for ceiling work according to the project (sketches);
- Before mounting gypsum board structures, carry out electrical wiring for lighting.
Now let's go through everything in order.
Preparing the ceiling surface involves removing the layer of old finishing and, if necessary, covering ceiling cracks with filler.
Calculating the materials needed for the job can be done automatically. Today, there are many programs available online that allow you to get a list of all materials and their quantities in just a few minutes. You only need to decide on the mounting scheme and final look of the ceiling (if you don't have experience in drawing such schemes, you can use one of the most common options for organizing two-level ceilings listed below).
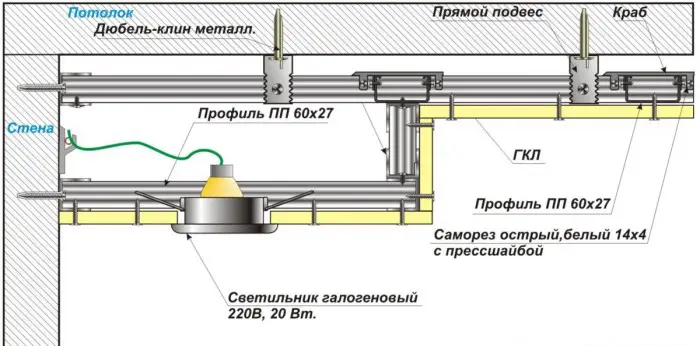
Scheme 1 — Two-level ceiling with recessed lights installed around the perimeter of the ceiling. Only the hanging cornice part is made from gypsum board
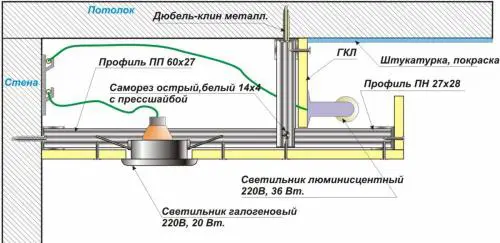
Scheme 2 — Two-level ceiling with recessed lights around the perimeter and hidden halogen lighting along the cornice edge. As in the previous example, only the hanging cornice part is made from gypsum board

Scheme 3 — Two-level ceiling with recessed lights around the perimeter and hidden halogen lighting along the cornice edge. Both the hanging cornice part and the core of the ceiling are made from gypsum board
Scheme 4 — Two-level ceiling with recessed lights installed around the perimeter of the ceiling. Both the hanging cornice part and the core of the ceiling are made from gypsum board
This is not all the schemes for two-level ceilings, but constructing such frames is one of the most common cases in renovation practice.
The following are visual examples of how the above design schemes for two-level ceilings can be implemented in an interior.
Two-level gypsum board ceilings with backlighting by yourself (PHOTOS)
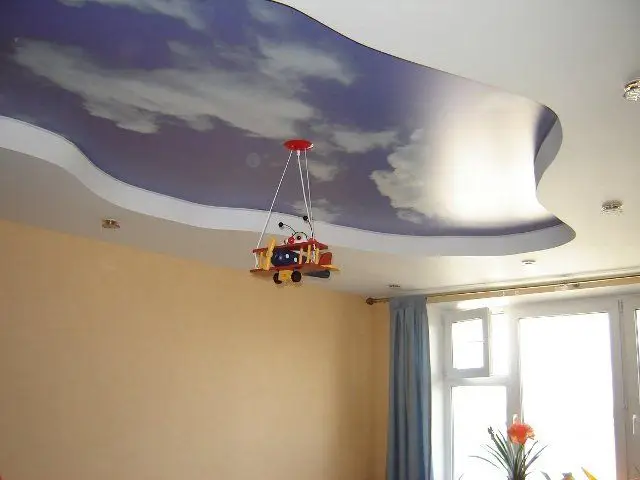
Photo 5 — Two-level ceiling of the first type (when the core is made as a suspended ceiling or paint) — an ideal option for low ceilings
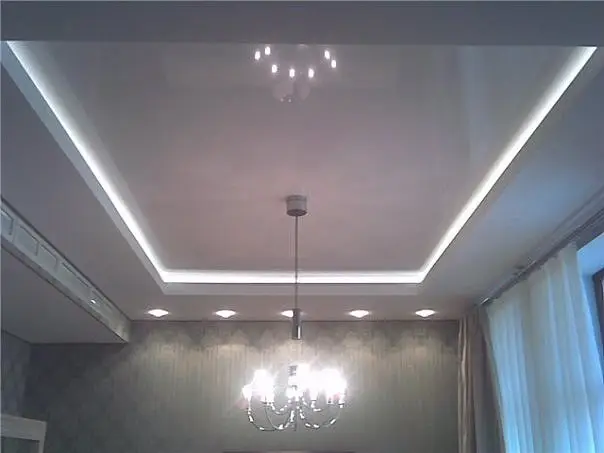
Photo 6 — Two-level ceiling of the second type for a bedroom
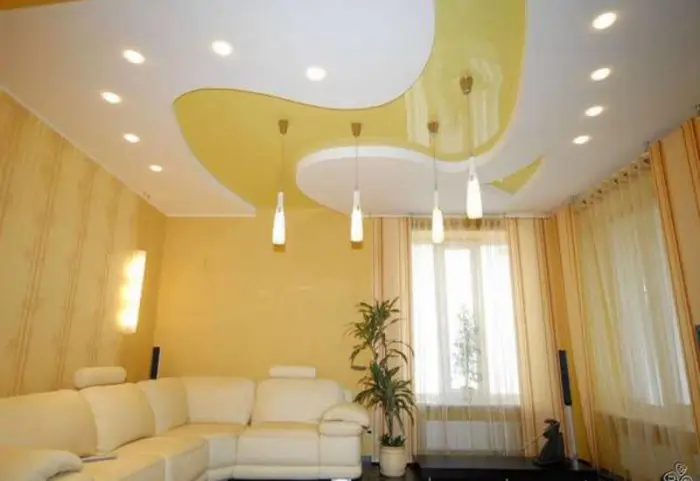
Photo 7 — Ornate two-level ceiling of the first type in a living room
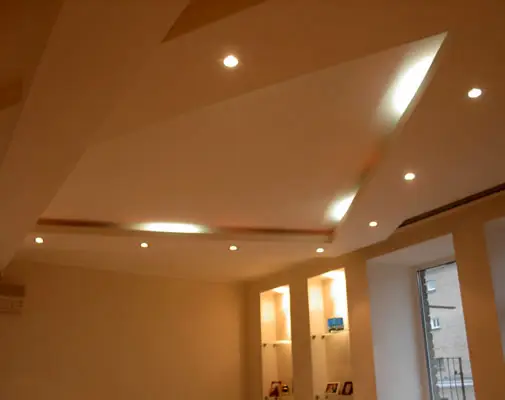
Photo 8 — Two-level ceiling of the third type for an office
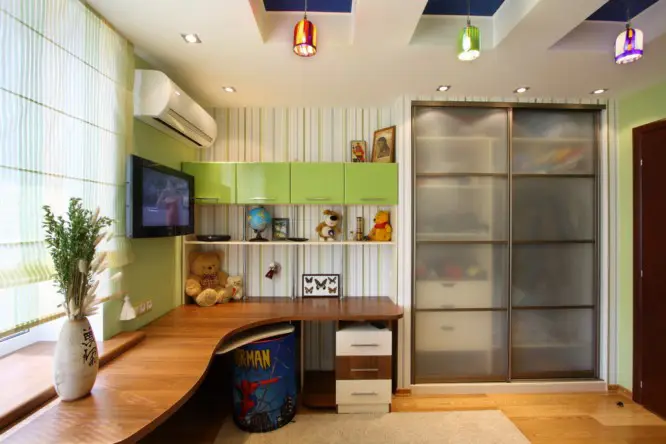
Photo 9 — Two-level ceiling of the fourth type for a child's room
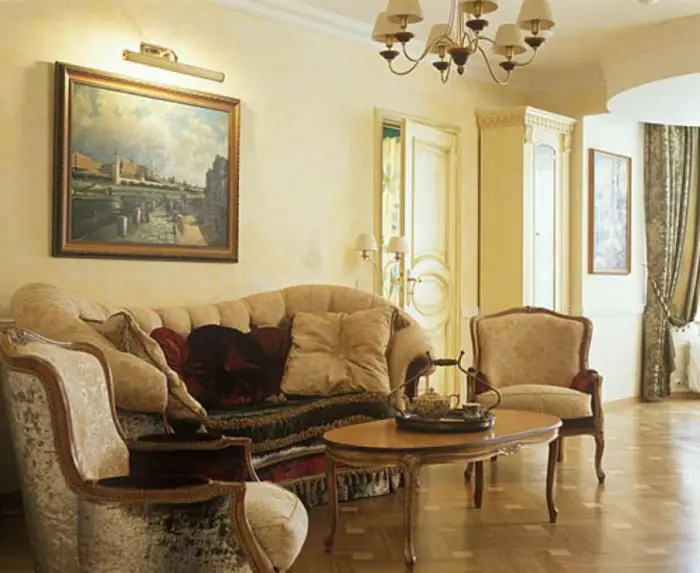
Photo 10 — The types of ceilings shown can be presented in several variants. For example, use a hanging system for room zoning without backlighting
IMPORTANT! You can measure the ceiling manually to calculate material quantities.
Gypsum Board Ceiling Frame: How to Calculate Components
We need the perimeter of the ceiling. For a ceiling measuring 5 by 3 meters, the perimeter is 16 meters. This value equals the length of the guide profile UD. When organizing two-level ceilings, the perimeter is doubled because two guide contours must be mounted, not just one.
IMPORTANT! Not every room has walls of equal length. It's common for parallel walls in rectangular rooms to have different lengths. When calculating gypsum board structures, use the larger value for length.
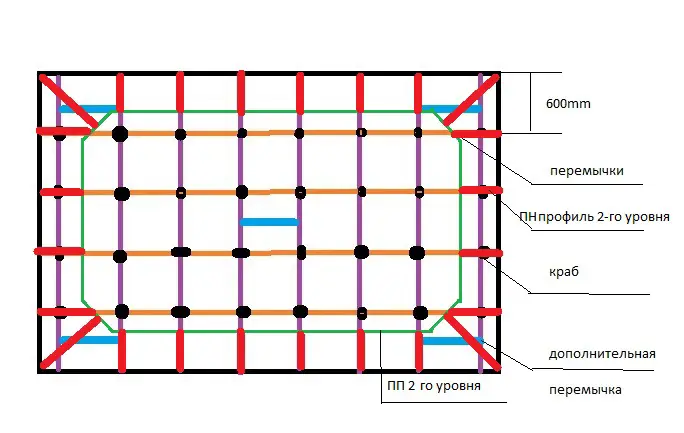
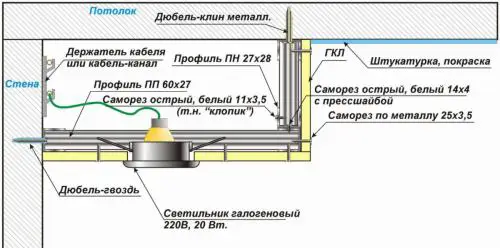
Scheme 5 — Installing fasteners
In addition to the guide profile, the CD structural profile is also involved in setting up the base for mounting GKL. Experts recommend fixing it at intervals no greater than 600 mm. The length of the strips can be calculated knowing the width of the room. In our example, that's 5000/600=8.3. Therefore, we need approximately 8.5 strips of CD profile, each 3 meters long.
The spacing for mounting the structural profile should match the dimensions of the gypsum board sheets. GKL is produced in widths from 600 to 1200 mm. When mounting, ensure that the edges of the gypsum board lie precisely on the profile.
After calculating the number of structural profile strips, we move on to calculating the straight hangers of the ceiling system. Hangers are mounted on these strips. Note that the spacing for mounting hangers should also not exceed 600 mm, with hangers at walls along the guide installed no more than 300 mm from the wall. Calculate the number of hangers: (3000/600)*8=40 (pieces).
IMPORTANT! Since a two-level ceiling is quite heavy, to reinforce the frame, it's necessary to install beams across the main structural profiles and special connectors — crabs.
The number of crabs can be calculated based on the spacing for mounting connectors (600–650 mm). Calculation: (3000/600)*8=40 (crabs).
Thus, we have 5 rows of beams, each 5000 mm long.
IMPORTANT! When installing the first beams and crabs, the offset from the walls should be based on the dimensions of the second level. For example, if the width of the second level of the gypsum board ceiling is 500 mm and you plan to install hidden backlighting, the first and last beams should be placed 400 mm from the walls.
That completes the calculation for the first ceiling level.
The second level is calculated more simply. For mounting beams, you will need 18 pieces of CD profile, each 400 mm long, and 4 profiles, each 1000 mm long for corner connections. For mounting the second-level beams, you will need 22 hangers.
This structure will only be strong if you install CD profile uprights (on which vertical gypsum board sheets will be mounted to hide the island of the structure). You need as many uprights as you have beams. In our case, that's 22 pieces.
The number of gypsum board sheets is calculated last. For calculations, you need the area of both ceiling levels including the area of the second level's rise. Knowing standard sheet sizes (e.g., a 2500x1200x9.5 mm sheet), you can calculate the area of one sheet and, accordingly, the number of GKL sheets.
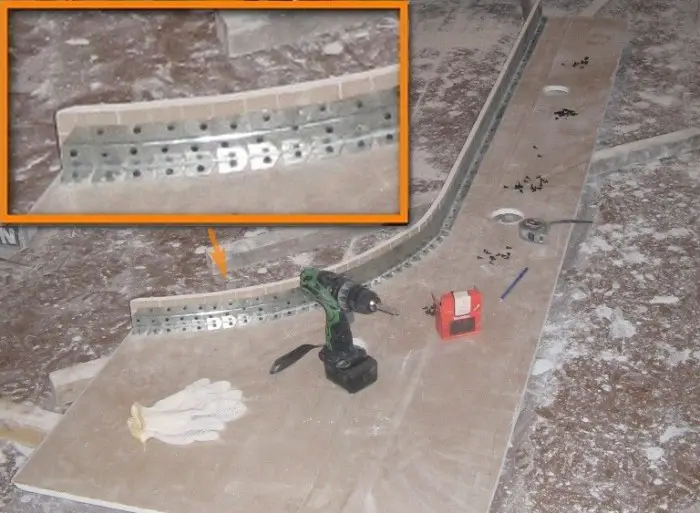
Photo 11 — Preparing gypsum board sheets for recessed lighting
Electrical Wiring Installation
First, draw a ceiling layout and determine the placement of ceiling lights. After that, calculate the power consumption of all lighting fixtures and the length of cables for connecting them to the power supply.
Based on these data, you will need to purchase cables of appropriate cross-section, flexible conduit, and mounting box/cable channel. The advantage of the conduit in this case is that it can easily be routed through the entire ceiling structure directly, while cable channels and boxes must be mounted to the walls around the perimeter of the ceiling.
For this work, you may need:
- plugs and screws for mounting the structure to the walls and ceiling (6x40 mm, 6x60 mm, with mounting intervals up to 300 mm);
- self-tapping screws of type LN 9, LN 11/LB 9, LB 11 for connecting hangers and profiles, crabs and profiles;
- self-drilling screws MN 25 and MN 30 for mounting gypsum board sheets (mounting interval up to 250 mm).
IMPORTANT! When mounting crabs, use 4 screws, and for connecting hangers and profiles — 2 screws per mounting point.
This stage is preparatory but has equal importance to the actual installation process. Proper installation is impossible without correct calculations.
We will tell you how to make a two-level ceiling from gypsum board by yourself in one of our upcoming articles.
Two-level gypsum board ceiling by yourself: VIDEO
$ Two-level gypsum board ceiling: price
If, after reading this article, you decide that such work is too difficult for you right now, consult professionals. The price of a qualified master’s work is cheaper than the cost of fixing a wrongly installed ceiling.
- in Moscow — from 380–450 rubles/m² (depending on the type of construction);
- in Kyiv — from 65 UAH/m² (depending on the type of construction).
Need a renovation specialist?
Find verified professionals for any repair or construction job. Post your request and get offers from local experts.