How to Paste Felt Wallpapers - Part 2
Applying felt wallpapers
IMPORTANT! Before starting the work, turn off the sockets and switches in the room being renovated, and close the windows and doors - there should be no drafts in the room until the wallpapers are completely dry!
You will need:
- plumb line (or laser level);
- measuring tape (at least 3 m long);
- bristle roller;
- brush for smoothing wallpapers;
- soft edge spatula (preferably plastic);
- sharp knife;
- 2 buckets (or any other container for mixing adhesive with clean water);
- mesh;
- narrow metal spatula;
- sponge;
- pencil.
Work procedure
The entire wallpaper hanging technology can be conditionally divided into three stages:
- preparation and marking of walls;
- cutting wallpapers;
- applying.
According to popular knowledge that has been passed down since ancient times, wallpaper application should be done exclusively on the wall perpendicular to the window, i.e. start from the window and move into the room. This approach is correct only if you intend to paste wallpapers 'grandfather's way' - overlapping. In this case, the light entering the room through the window will even out unattractive seams.
How to do it correctly in this case?
To properly paste any type of wallpaper on a felt base, you must paste the strips edge to edge!
In some cases, the quality of the edges of the sheets allows you to paste the walls without joints (visually they will be almost invisible). For success, start wallpapering from the corner of the room.
So, step one.
Room Marking
Choose the starting corner. Measure 1 meter from it along adjacent walls. The width of felt wallpapers is usually 0.53 m or 1.06 m. In our example, meter-long wallpapers were used. The difference of 0.06 m can be used as a small overlap at the corner.
QUESTION: How to paste wide wallpapers?
ANSWER: The same way as standard-sized wallpapers. The only difference is that the room walls must be perfectly straight.
After measuring 1 meter from each corner, use a plumb line or laser level to draw a vertical line at the 1-meter mark. It is not necessary to draw the line along the entire wall height. You can limit yourself to intermittent marks every 40 cm.
Step two.
Cutting wallpapers
Prepare the sheets for hanging in advance. Consider the need to match the pattern. Wallpapers without a pattern are easier to cut, and less material will go to waste in case of defects. The size of pattern matching can be found on the packaging of the rolls.
For example, in a case where the pattern repeat (i.e., matching) is 64 cm, it means that in these wallpapers the pattern repeats every 64 cm.
In most cases, room height does not exceed 2 m 85 cm.
Your task is to cut the wallpaper strips so that when aligning individual sheets, you do not have to glue additional pieces at the top or bottom of the strips.
In our case, you cannot use only the standard recommendation for adding length to the strips (5-10 cm for allowances). The length of wallpapers with a pattern must be a multiple of 64 cm, as specified by the manufacturer on the roll, i.e. not less than 3 m 20 cm.
If you don't have a special cutting table, spread polyethylene film on the floor and roll out the wallpaper roll face down. The first strip of wallpaper can be cut to the standard wall length, adding 10 cm for allowances. However, to avoid confusion, measure 3 m 20 cm on the first strip and make a mark with a knife.
Based on this mark, fold the wallpaper as follows: the edge of the folded strip should align with the edge of the main wallpaper sheet rolled out on the floor. In this way, you should form a 90° angle and cut the sheets along the fold line. There is no special care required when cutting.
The next sheet should be rolled out in the same way, starting from the same point. If the direction of wallpaper cutting was not followed, you risk ruining the entire roll.
All sheets must be checked for pattern compatibility before cutting.
IMPORTANT! Mark the wallpaper strips in order of application, and also mark the top of each strip.
These references will definitely be useful during work.
After cutting all the strips, roll them into rolls with the face side inward.
IMPORTANT! All rolls must be rolled in the same direction: from bottom to top.
Step three.
Wallpapering
QUESTION: Can felt wallpapers be glued with vinyl adhesive?
ANSWER: Yes, but it is better to choose adhesive appropriate for the type of wallpaper used: for felt wallpapers - felt adhesive. All necessary data on mixing proportions in water is indicated on the packaging. The only thing to add: it is better to mix adhesive only in cold or cool water, as warm or hot adhesive will form lumps.
Applying felt wallpapers does not require smearing the sheets with adhesive: adhesive is applied only to the wall using a roller.
First, cover the previously marked corner of the room with adhesive, slightly extending beyond the vertical line.
Adhesive should be applied in sufficient quantity, but without creating streaks.
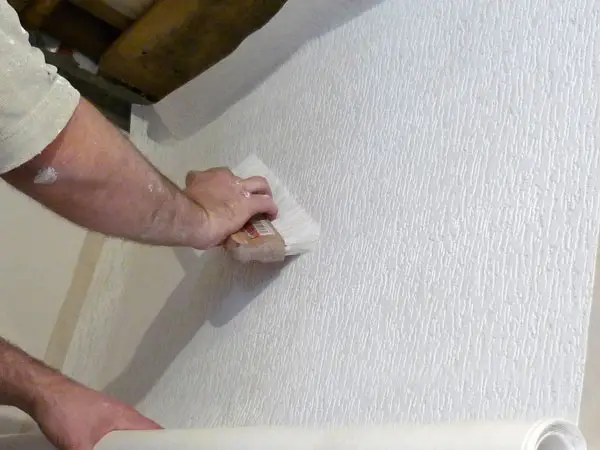
Photo 1 - Smoothing the sheet on the wall
IMPORTANT! In areas with streaks, if excess adhesive was not removed, wrinkles will form over time.
When doing the work yourself, pay special attention to applying adhesive to the corner: there should be enough of it so that the adhesive does not dry before the second corner strip is applied.
The first strip is applied to the wall, aligning the edge with the marked vertical on the wall. Leave approximately 5 cm allowance for the ceiling.
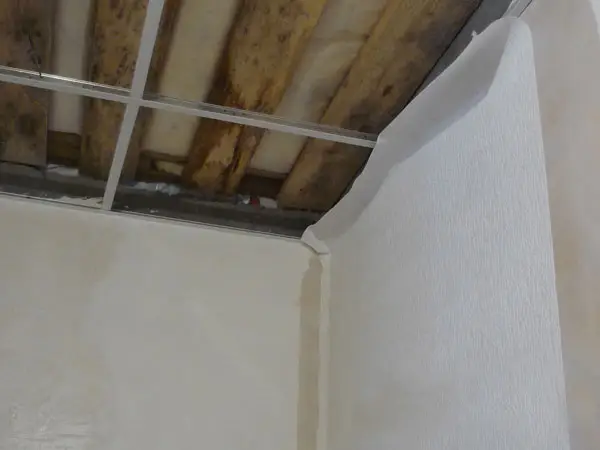
Photo 2 - Ceiling allowances
When securing the sheet to the wall, first roll it in the center area without detaching from the wall, then from the center to the sides, pushing out air but not stretching the sheet width (excessive pressure can cause significant differences in strip dimensions after shrinkage).
IMPORTANT! Roll the roller (or smooth the wallpapers with a brush) without detaching, as otherwise wrinkles will appear on the wallpaper. If wrinkles or so-called 'wrinkles' do occur, they can be removed using a special brush or soft plastic spatula.
Since the length allowance of one sheet is 64 cm, after rolling out the first strip, cut off excess material at the bottom even with the floor.
Take a plastic spatula and gently squeeze adhesive from under the angled edge of the wallpaper - you can now start joining the sheets.
Trim the folded edge of the wallpaper at the ceiling. By touch, find the top corner where the walls and ceiling meet. At this point, make a cut at an angle: fold the already secured strip and cut it. The knife should be moved towards you.
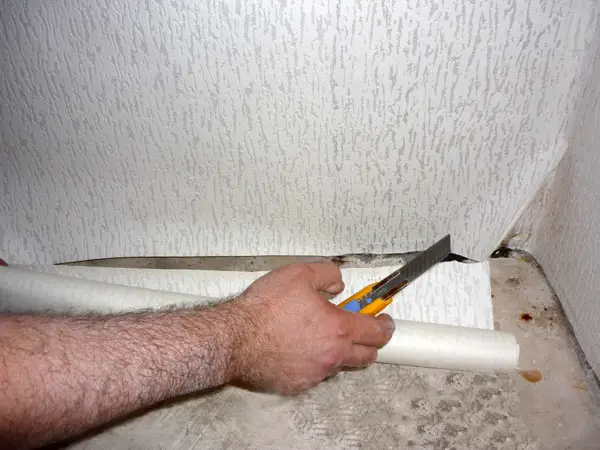
Photo 3 - Trimming the edge of the sheet
With a spatula, pressing down, go along the wallpapers at the wall-ceiling joint. Fold the strip away from the wall and cut along the formed fold line. You can also cut directly on the wall, moving the knife along the spatula (it is better to use a narrow spatula).
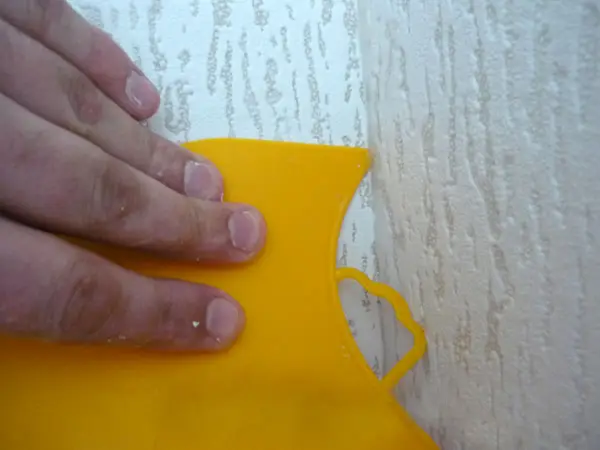
Photo 4 - Smoothing wallpapers with a soft spatula in corners
IMPORTANT! If the walls in the corners are uneven, the method of cutting with a spatula may damage the sheet.
Stains of adhesive on the ceiling can be removed by wiping them with a damp sponge.
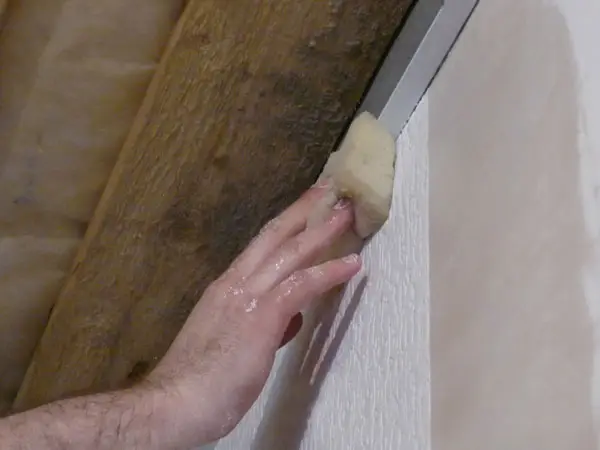
Photo 5 - Removing adhesive from the ceiling
Place subsequent sheets on the wall by joining the pattern. Do not try to roll out the sheet immediately edge to edge with the already applied strip: leave a 0.5-1 mm gap. Stretch the sheet over the seam using a plastic spatula.
IMPORTANT! The smoother the walls of the room, the smaller the gap should be left.
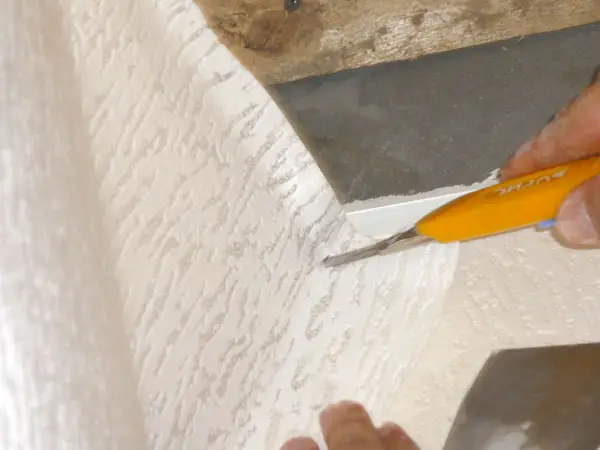
Photo 6 - Trimming wallpapers at the wall-ceiling joint
Second and all subsequent sheets are smoothed in the same way as the first one.
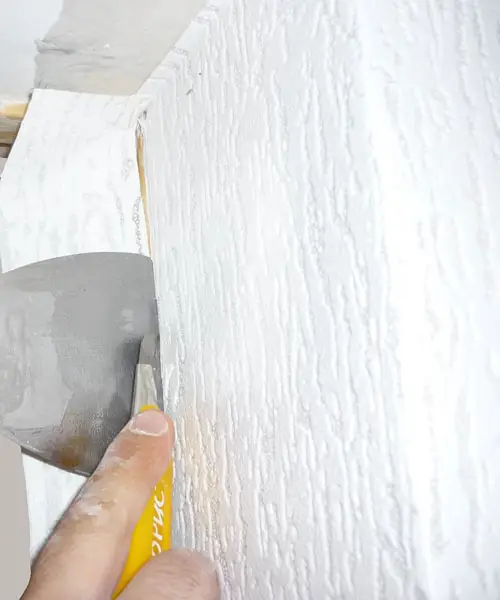
Photo 7 - Post-cutting edge. Removing sheet allowances
How to Paste Felt Wallpapers in Corners: VIDEO
How to paste wall corners is shown visually in the following video.
Applying Felt Wallpapers on the Ceiling
The rules for applying felt wallpapers to the ceiling, as well as other surfaces, are similar.
In any case, you need to consider the material of the wall surface on which you plan to apply new wallpapers:
Before applying wallpapers on water-emulsion paint, check the quality of adhesion between the paint layer and the wall: in several places, scratch the wall, apply tape to the paint. If paint remains on the tape when removing it, the wall (or ceiling) needs to be cleaned beforehand - it is no longer safe to apply wallpapers on this coating.
IMPORTANT! Some types of felt wallpapers are translucent, and therefore the surface on which they will be applied should be light in color, ideally white.
On concrete, if the house is new, wallpapers can only be applied after the surface has been spackled and double coated with deep-penetrating acrylic primer.
Before applying new wallpapers on gypsum board, surface priming and spackling are mandatory.
New wallpapers can be applied over old paper wallpapers if the previous coating does not peel off from the wall, there are no cracks or wrinkles on the old wallpapers, and they were applied edge to edge. The old wallpapers must be cleaned of dust and primed. This method is effective if you plan to apply them on paper, but it is not advisable to apply new sheets over old vinyl-coated wallpapers.
What Adhesive to Use for Felt Wallpapers
The best adhesive is one designed specifically for felt wallpapers.
Among the most popular manufacturers:
- Pufas adhesive (Germany) - 200 g (one packet) of this adhesive is enough for hanging an area of 25-30 m², the adhesive has a neutral smell, it dries for 24-48 hours, you can prepare such adhesive in 5 minutes, it is used for any type of wallpapers;
- Metylan Premium adhesive (Germany) - 250 g (one packet) of adhesive is enough for hanging an area of 25-32 m², the adhesive has a faint smell, it dries for 24 hours, you can prepare the adhesive in 7 minutes, it is used for hanging ceiling wallpapers for painting, structural wallpapers on felt nonwoven base, as well as painted felt;
- Quelyd Special Felt Adhesive (Ukraine) - 300 g (one packet) of adhesive covers 35 m², the adhesive has no smell, it dries for 24-48 hours, the mixing time is 10 minutes, it is suitable for hanging heavy vinyl wallpapers on felt, as well as felt wallpapers for painting, the main advantage of this adhesive is its ability to remove old wallpapers completely;
- Kleo EXTRA adhesive (France) - 250 g (one packet) is enough for hanging 30 m², the adhesive has a neutral smell, it dries for 24 hours, you can prepare the mixture in 5 minutes, and store it for up to 10 days, it is designed for wallpapers on felt, textile and vinyl wallpapers.
QUESTION: How long do wallpapers dry?
ANSWER: The time needed for the adhesive to fully dry is determined by the manufacturer. On average, it takes 24 hours.
IMPORTANT! The density of wallpapers plays an important role in choosing adhesive and applying a specific amount of adhesive to the wallpaper strip. The denser the wallpapers, the stronger the adhesive composition should be.
IMPORTANT! It is not recommended to add PVA or mix PVA into other adhesives. Modern adhesives are self-sufficient and do not require any strengthening additives.
QUESTION: Can felt wallpapers be glued with vinyl adhesive?
ANSWER: Yes, but in this case, the adhesive mixture should be thicker than recommended. Otherwise, to ensure good adhesion between the sheets and the surface, you will need to spread adhesive not only on the wall surfaces but also on the wallpaper strips.
Adhesive for Felt Wallpapers: Price
Let's go through the manufacturers mentioned above:
- Pufas adhesive (200 g) - $3.5;
- Metylan adhesive (250 g) - $4;
- Quelyd adhesive (300 g) - $4.2;
- Kleo adhesive (250 g) - $3.8.
Felt Wallpapers: How to Paste? VIDEO
How to Remove Felt Wallpapers
If the old wallpapers peeled off, it is not difficult to remove one strip or even clean the entire room by yourself.
As we wrote earlier, there are adhesives that allow removing wallpapers from walls without residue. This is, undoubtedly, a great advantage, as removing wallpapers glued another way can sometimes be quite difficult: the sheets are scratched, torn off in pieces or scraped with a spatula. These methods can cause considerable damage to the wall surface.
IMPORTANT! When removing old wallpapers, a label with the marking of this type of wallpaper (contained in each roll) may help you to some extent. Having such a label at hand, you can determine whether old wallpapers can be removed dry or more labor-intensive methods should be applied.
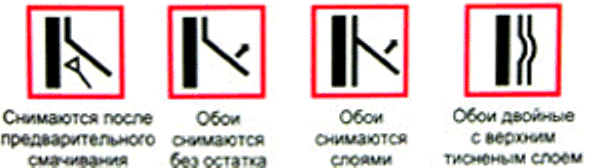
Figure 1 - Icons on the wallpapers
They are removed after preliminary soaking. These wallpapers should be thoroughly soaked with a spray bottle, wait 10-15 minutes and gradually remove them from the bottom corner to the top.
Wallpapers are removed without residue. These wallpapers often come off completely, leaving no torn spots on the walls. They can be removed from the wall without soaking (dry).
Wallpapers are removed in layers. In this case, it is most likely about vinyl wallpapers on felt. The top vinyl layer easily separates at the corner of the sheet and can be peeled off from the wall. Then the choice is yours: to scrape the felt or leave it on the wall as a backing for new wallpapers.
Cost of Felt Wallpapers:
- Kiev - from 61 UAH;
- Moscow - from 1,300 rubles.
Cost of Wallpapering:
- Kiev - from 25 UAH/m²;
- Moscow - from 140 rubles/m².