Cement screed: FAQ (frequently asked questions)
What tools might be needed for floor screed installation?
- The main tool to pay attention to is the construction level. If you set the level, that's how the floor will end up;
Therefore, when purchasing this tool, don't economize on funds: the saving is not justified.
IMPORTANT! It is possible to use a level with a bubble ("bubble" construction level) when organizing floor screed. The accuracy of such a level (if the quality of the tool is not Chinese) is only 0.5 mm per meter, i.e. when working in a room with a width of over 5 m, the error will be only 2.5 mm. In the scale of the room, this is a negligible deviation.
We recommend using a regular construction level "Brigadier" (note the wide aluminum profile of the level). The cost of such a tool rarely exceeds $12-13, but it fully justifies itself in work.
As for the laser level, don't rush to conclusions: yes, this technology is indeed more advanced and significantly eases the work. But a laser level is also adjusted "by the bubble"! So the degree of error in the laser is initially the same as in a regular construction level.
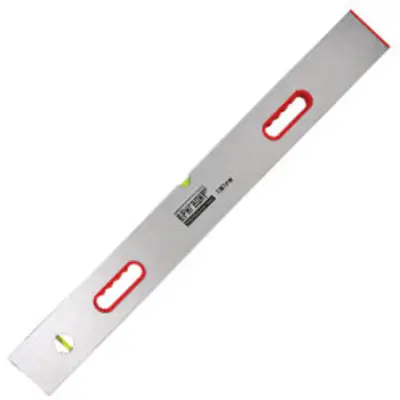
Photo 1 — Construction level
- The evenness of the screed, in addition to the level, will also depend on the correct installation of the leveling profiles - galvanized profiles;
This is a reasonable alternative to wooden guides.
A variant of installing leveling profiles from cement-sand mixture is also possible, but it significantly slows down the work: you at least double the floor screed process by two days.
- Another important tool is the plastering trowel;
The trowel is used for sanding defects on the floor after the work is completed. If such a tool is not at hand, you can use a master trowel, but for beginners in renovation work, it is more convenient to work with the trowel.
- A rule is used for laying cement-sand mixture between the leveling profiles.
We recommend an aluminum rule: it is a lightweight material that is not afraid of moisture. In the market, you can find such types of aluminum rules: rectangular profile, I-beam and complex profile. You can choose the best one only by hand, the main thing is that it is a flat and strong tool.
You also need to additionally acquire:
- buckets for mixing the mixture;
- nylon thread for marking;
- a pencil;
- 1 kg of plaster for securing the leveling profiles.
Cement floor screed. Where to start?
We have more or less clarified the choice of tools. Let's move on to work. And we will start with marking the floor.
How to make a floor level marking?
Work on the floor screed usually begins with removing the old flooring - linoleum, floor tiles, or even wooden base. After cleaning the floor of construction waste, you can start working on leveling.
Determine the locations of the leveling profiles and their required quantity. We recommend setting the distance between the leveling profiles from 1 m to 1.5 m at most. For a beginner who is setting up the screed by himself, such intermediate spacing will make the work easier.
IMPORTANT! The greater the distance between the leveling profiles you set, the less time and effort will be spent on the preparation stage. However, the chance of making an error increases significantly with a spacing of 2 m or more. Correction of the mistake in the end will take more time than installing one more intermediate leveling profile.
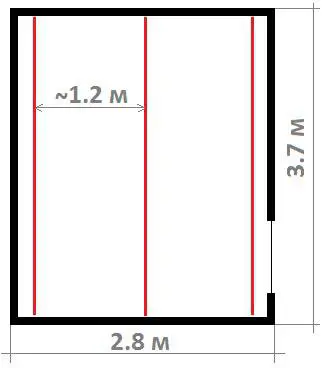
Figure 1 — Example of leveling profile placement in a room of 2.8 by 3.7 m. Three profiles are installed at a distance of 1.2 m to use for floor installation. It is important that the profiles are at least 30 cm away from the walls
Level marking means applying marks on the walls of the room, based on these marks, we will install the leveling profiles. It is important to make the reference marking not based on the floor level, but orienting on the horizontal (the floor may be uneven).
Arbitrarily choosing a corner of the room, draw lines on the walls at the assumed level of the floor screed.
And here you should have another question:
What is the maximum thickness of a cement screed?
The cement screed should not exceed 5 cm in thickness, the minimum layer thickness is 3 cm: with such parameters, the screed dries evenly, forming a strong coating. If you exceed the allowable norms, the mixture may dry unevenly, if you reduce the thickness, the cement layer will crack and become useless.
Let's return to marking the floor screed level on the wall. When choosing the thickness of the screed, also consider the height of the finishing floor:
- ceramic tiles will need at least 15 mm of floor height;
- laminate - about 10 mm;
- linoleum - around 5 mm.
To create a screed layer of 7 cm or more, reinforcement for the mixture is used - special reinforcing mesh (a fibrous cement screed can also be organized as a strengthening screed). In residential buildings, the height of the screed rarely exceeds the mentioned 5 cm.
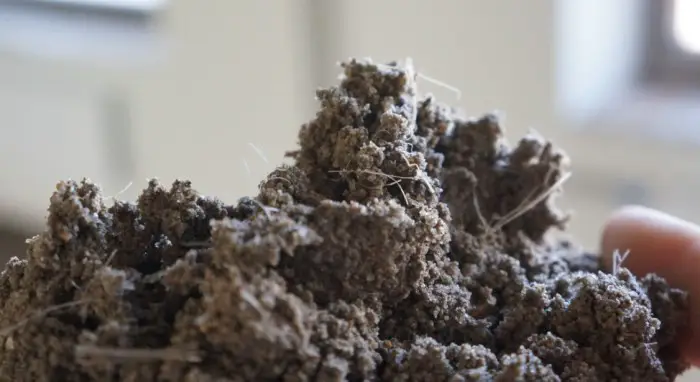
Photo 2 — Cement screed with fiber
Using a construction level, mark the height of the rough floor on the walls around the perimeter at the locations of the leveling profiles.
What is better to use for securing the leveling profiles?
It is convenient to use plaster mixture to secure the leveling profiles. The cement-sand mixture, as we said above, hardens for about 2 days, while plaster sets in 15 minutes.
IMPORTANT! The setting time of the plaster may not be enough for a beginner to properly set the leveling profile, so it is better to mix plaster in portions and not rush. One portion of 200 g will be enough for one time.
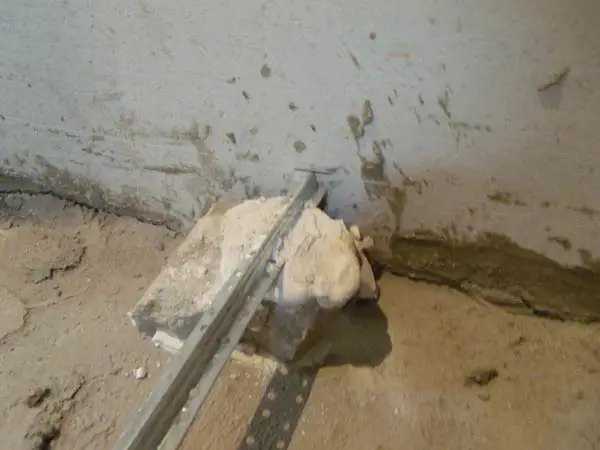
Photo 3 — Setting leveling profiles according to wall markings (secured with plaster)
Clear and wet the area where the leveling profiles will be attached to the floor.
The leveling profiles are secured on plaster, one portion of plaster is applied for each leveling profile, the distance between them. More frequent attachment is not required - it is strong enough. However, you can place a stone or brick under the profiles in areas where deflection is expected.
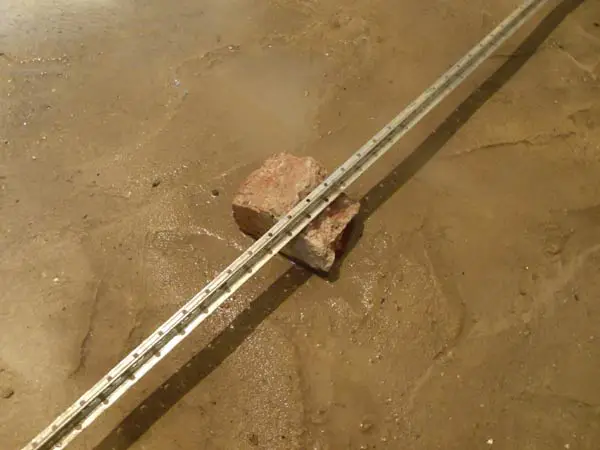
Photo 4 — Padding under leveling profiles (used to prevent deflection)
How to prepare the base for pouring cement-sand mixture?
Base preparation will depend on its type. For example, for laying screed on floor slabs or any other concrete base, sweep off dust and dirt carefully. It is important to remove waste to reduce the likelihood of cracking of the screed.
Wooden structures must be protected from moisture of the cement-sand mixture: waterproofing should be laid on wooden floors (installing screed on such floors is a separate topic; old flooring must be removed!) and on wooden door frames.
IMPORTANT! If you plan to hide some utilities under the screed, consult with a specialist about the correctness of performing repair work. Because hot water pipes often undergo thermal expansion: in such cases, a height reserve is needed for the proper functioning of the system.
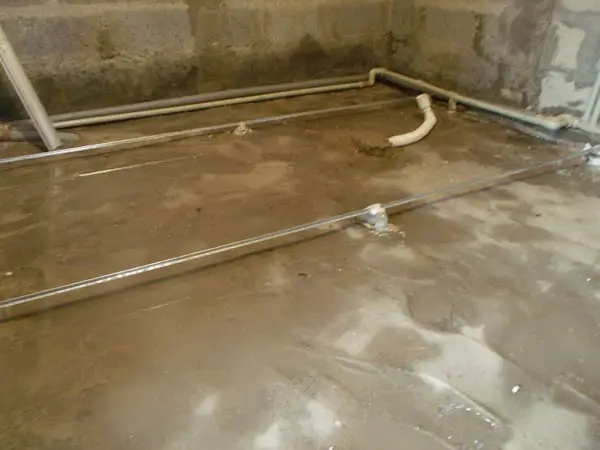
Photo 5 — Leveling profiles installed - you can start pouring the cement-sand mixture
Cement mixture for screed: how to prepare?
The mixture composition should be selected based on the characteristics of the floor finishing:
- composition for floors under laminate, ceramic tiles, parquet and other hard coverings: 1 part of cement M400 is mixed with 5 parts of sand and 0.7 part of water;
- composition for floors under soft floor coverings (linoleum, carpet): mix 1 part of cement with 4 parts of sand and 0.7 part of water.
IMPORTANT! The screed has set and cracks have appeared? The most common cause of cracking of the screed is excess water. Do not increase the water consumption unnecessarily.
TIP: To make the mixture more workable, i.e. easier to use, use plasticizers - for example, S-3. Do not try to mix the entire floor mixture at once: you simply won't have time to apply it before it sets. Just as with plaster, it is better to mix cement-sand mixture in portions.
What cement to use for screed? What cement is better for screed in an apartment?
Cement M-200 is most often used for leveling floors in residential buildings (you can use the "UNIS Horizont" screed of this cement grade: the screed is easily applied, it does not cause shrinkage and cracking or take the "MAGMA" screed).
Cement M-300 is intended for creating floor screed in public places: educational institutions, shops, libraries, etc.
Cement M-400 is the basis for floor concreting in public places with high mechanical impact on the floor surface. Unlike the two upper grades of cement, to prepare a mixture from M-400 you need sieved sand and mountain dust.
The technical characteristics of each grade should be indicated by the manufacturer on the packaging - this includes the fineness modulus, bulk density of cement, and filtration coefficient.
How long does cement screed take to dry?
This is a common question, but initially incorrect: the screed should not dry, it should set. The setting process lasts longer than surface drying and depends on it for the long-term service life of the floor.
Thus, screed made from M-200 will dry in 2-3 days, screed made from M-300 and M-400 in 3-4 days, and concrete setting should be allowed for at least 28 days! That's why many choose dry screed with expanded clay, because cement or concrete screed, according to standards, requires a considerable delay before starting finishing works in the room.
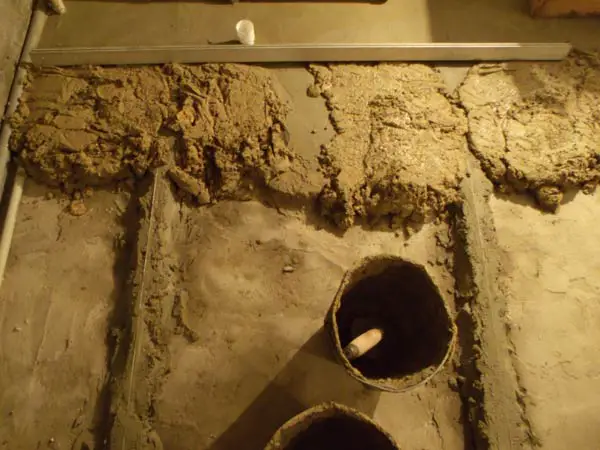
Photo 6 — In this example, a rule was used across the width of the room
How much cement is needed for screed?
When performing calculations, it is important to know how much cement is needed for the screed.
The calculation is simple:
Write down the required thickness of the screed (for example, 5 cm).
Write down the area of the floor in the room (for example, 12 m²).
Calculate the volume of the floor screed by multiplying the indicators from point 1 and 2 (remember to convert the numbers to the same unit of measurement!):
12 x 0.05 = 0.6 (m³)
Based on the above-described ratio of mixture ingredients, we calculate the screed: in 0.6 m³ of screed, there will be 1 part cement and 4 parts sand, i.e. 0.15 m³ of cement and 0.45 m³ of sand. The weight of each element can be calculated, knowing the constant value: the specific density of construction sand and cement is listed in reference books and available for free on the Internet.
What is the consumption of cement screed?
To not confuse you with arithmetic: the approximate material consumption for floor screed - for the indicated 12 m² at a screed thickness of 5 cm, we will need about 7 bags of cement (25 kg each) and about 17 bags of river sand (50 kg each).
What is the weight of cement screed?
When installing a cement screed, it is important to know how much you will load the building's supporting structures: the screed is a far from light object. In some cases, the load is incomparable with the capabilities of the slabs, which can lead to collapse.
Keep in mind that the total weight of screed ingredients cannot be considered as the weight of the screed after it is poured, because part of the mass loses volume, compacts and gains weight due to air bubbles. For example, from 1 m³ of dry mixture, we get only 0.7 m³. Therefore, different types of material density and specific weight are distinguished, i.e., weight before and after mixing.
These indicators can be found in the relevant SNiP and GOST standards. For example, according to GOST 8736-77 (Sand for Construction Works), the sand should initially weigh 1,600 kg/m³, but its weight can vary between 1,550 - 1,700 kg/m³.
A screed that is 5 mm thick, depending on the cement grade and sand size used, will weigh about 90 kg/m² (compare: dry screed with expanded clay, i.e. filling rather than pouring the floor, weighs only 39 kg/m²!).
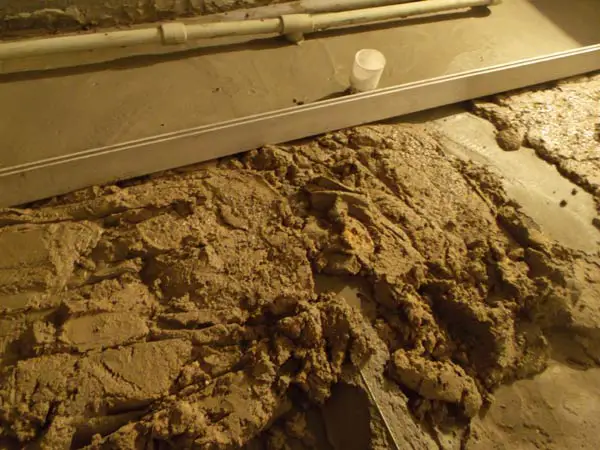
Photo 7 — Leveling the screed
How to pour the screed?
Using a trowel, fill the spaces under the leveling profiles with cement-sand mixture.
Apply the mixture to the floor, moving from the far corner of the room to the entrance door.
Gradually fill the space between the leveling profiles with the mixture, leveling the surface with a trowel as needed. After laying several square meters, level the surface with a rule using smooth, confident movements from left to right.
You will not achieve a perfect surface on the first pass with the rule, so uneven areas and other minor irregularities are removed after the screed sets using a plastering trowel or the same trowel.
IMPORTANT! When performing work, carefully monitor the level and horizontality of the screed.
This is all the technology. Installing cement floor screeds for beginners, who are doing such work for the first time on their own, should take a little more time: prepare the mixture in portions, apply not more than 1.2-1.5 m² of mixture on the floor in one go.
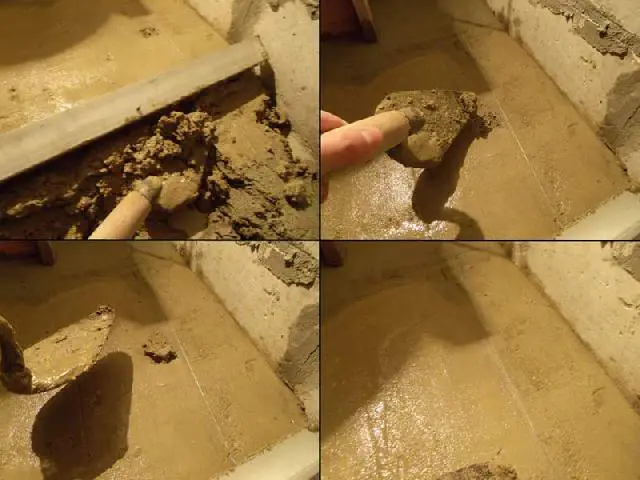
Photo 8 — Smoothing irregularities
How to care for a fresh screed?
The screed should set in a room without drafts and direct sunlight (uneven lighting in the room can cause uneven setting of the screed, which leads to uneven shrinkage of the floor). After one day of hardening, it is advisable to cover the screed with polyethylene film.
Tiles should be laid on the screed no earlier than two weeks after the setting. The screed should fully set after 28 days.
Laminate should be laid on the screed after one month of setting under film and another 2-3 weeks of drying in open air.
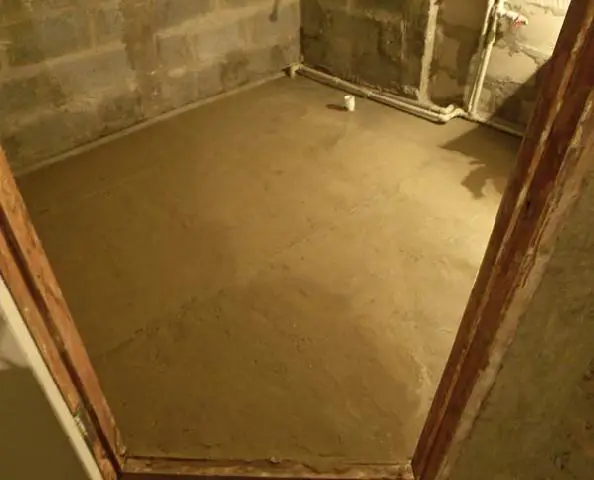
Photo 9 — Final result
What is a finishing screed of the floor?
Finishing the floor with only one screed, of course, does not end the work. The finishing screed of the floor is the measures taken to achieve a perfectly flat surface of the floor. It is performed after finishing works in the room:
- remove the remaining mortar mixture with a spatula from the floor;
- the floor is primed;
- the floor is sanded to achieve a perfectly flat surface.
You can walk on such a floor after one day, and lay floor coverings after 3-4 days.
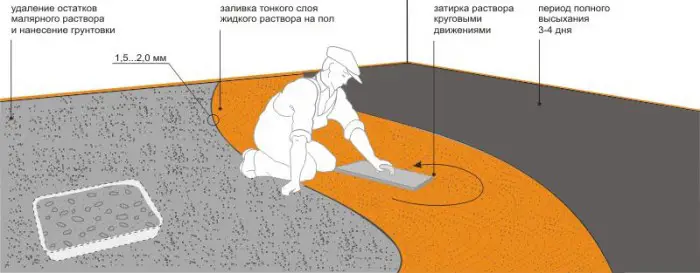
Figure 2 — Organizing the finishing screed of the floor
Cement screed: alternative options
As we said, instead of cement screed, you can make a dry one - from expanded clay filling and super sheets of GVL. From "wet" screeds: there is also a fast and reliable polymer-cement screed, or as it is also called, "pourable floor". Large thermal insulation will provide perlite screed. It is also used for organizing a "warm floor" system.
$ Cement screed of the floor: the cost of the question
The cost of installing a floor screed will depend on whether you decided to buy all the necessary materials yourself and carry out the floor repair, or the final figure will include the cost of the master's work.
$ Average cost of materials
- floor primer Ceresit CT 17 (10 l) - from $10.1/unit;
- profile (3 m) - from $0.7/unit;
- plaster for securing leveling profiles (20 kg) - from $5.2/bag;
- construction sand (50 kg) - from $8.2/bag;
- cement M 400 (25 kg) - from $3/bag.
$ Average cost of hiring masters
When organizing a screed up to 40 mm thick:
- in Moscow - 180 rub./m²
- in Kiev - 45 UAH/m².